Introduction
This manual provides detailed instructions for the setup, operation, and maintenance of your WEELIAO Fingerprint Time Clock, Model I60. This device is designed to efficiently manage employee time attendance using fingerprint, password, or RFID card verification, and to generate automatic reports for streamlined record-keeping.
Package Contents
Please verify that all items are present in the package:
- WEELIAO Fingerprint Time Clock (Model I60)
- Power Adapter
- USB Flash Drive
- 5 x RFID Key Fobs
- Mounting Screws and Rubber Stoppers
- Nano Paste (Adhesive)
- User Manual (this document)
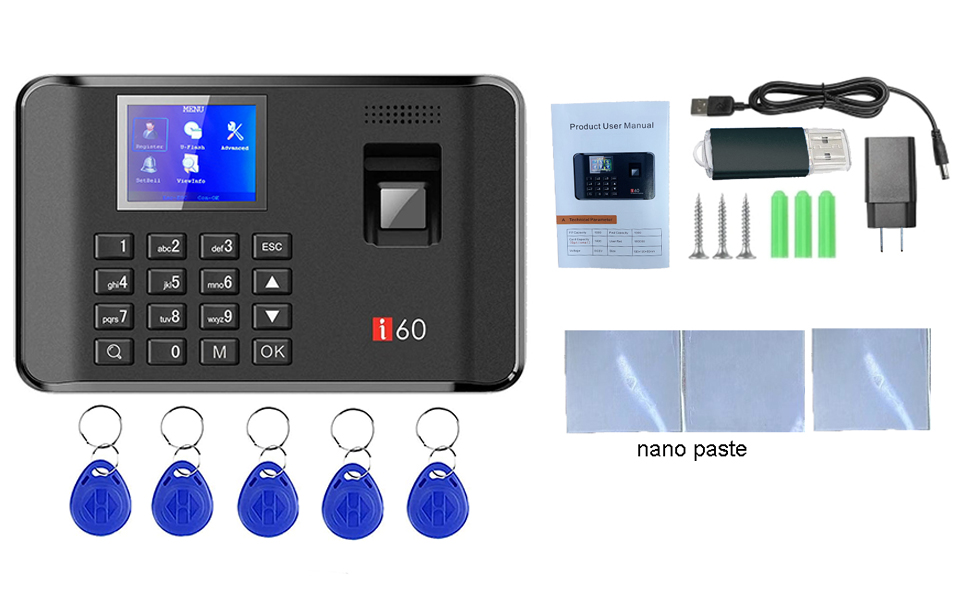
Image: WEELIAO Fingerprint Time Clock and its included accessories.
Product Overview
The WEELIAO I60 features a compact design with a 2.4-inch HD color screen for clear display and easy operation. It includes a responsive fingerprint sensor and a numeric keypad for various authentication methods.

Image: Front view of the time clock, emphasizing the screen and keypad.
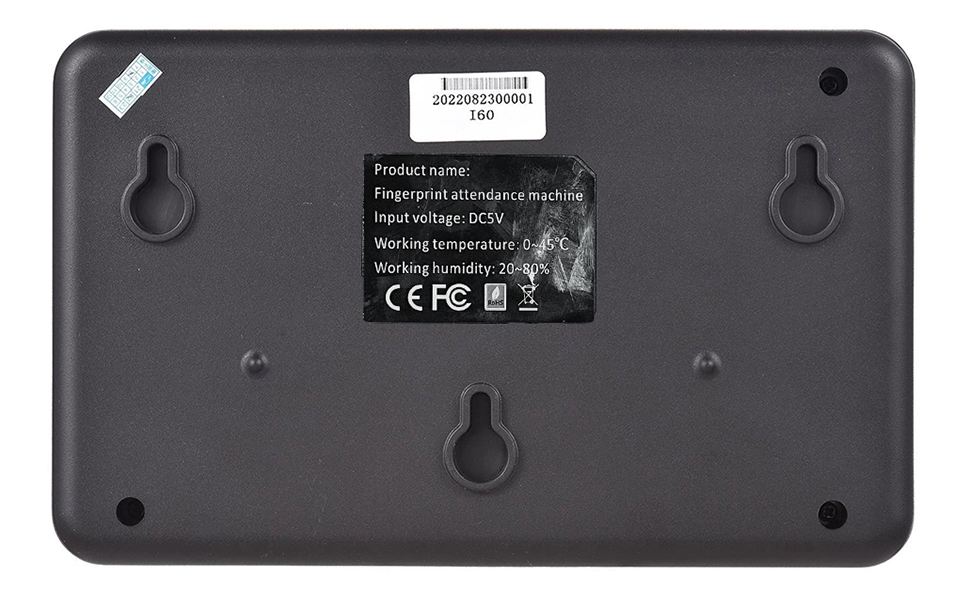
Image: Back view of the time clock with mounting points.
Setup
1. Installation
The device can be wall-mounted using the provided screws and rubber stoppers, or adhesive nano paste. Ensure the installation height is convenient for all users.
- Identify the three mounting holes on the back of the device.
- Mark the corresponding positions on the wall.
- Drill holes, insert rubber stoppers, and drive in the screws, leaving them slightly protruding.
- Align the device's hanging holes with the screws and secure it to the wall. Alternatively, use the nano paste for adhesive mounting.

Image: Installation diagram for wall mounting.
2. Initial Power-On and Basic Settings
Connect the power adapter to the device and a power outlet. The device will power on automatically. Set the correct time and date through the device's menu. The device retains time settings even when unplugged due to non-volatile memory.
3. Registering Users (Fingerprint, Password, RFID Card)
To register new users, navigate to the 'Register' menu. You can register employees using their fingerprint, a numerical password, or an RFID key fob.
- Fingerprint Registration: Select a user ID, then choose the fingerprint option. Follow the on-screen prompts to press the finger onto the sensor three times for successful registration.
- Password Registration: Select a user ID and the password option. Enter a numerical password twice for confirmation.
- RFID Card Registration: Select a user ID and the card option. Briefly tap the RFID key fob against the sensor to register it.

Image: Employee using the fingerprint scanner.
4. Setting Shift Schedules
Shift schedules are managed by exporting a template to a USB drive, editing it on a computer, and then importing it back to the device.
- Insert the USB disk into the time clock.
- Access the 'U-Flash' menu and select 'Download Overtime' to export the shift schedule template (INFO.xls) to the USB disk.
- Insert the USB disk into a computer and open the INFO.xls file.
- Edit the 'Times table' sheet to define shift times (e.g., AM In/Out, PM In/Out, Overtime).
- Edit the 'Shifts Table' sheet to assign employees to specific shifts, including their name, department, and shift number.
- Save the edited file to the USB disk.
- Re-insert the USB disk into the time clock.
- Access the 'U-Flash' menu and select 'Upload Overtime' to import the updated shift schedules to the device.
Note: This machine can only set one work time per department. Different departments can have different work times, but a single department cannot have multiple shifts (e.g., 2 or 3 shifts).

Image: Example of shift and time table configuration.
Operating Instructions
1. Clocking In/Out
Employees can clock in or out using their registered fingerprint, RFID card, or password. The device provides clear voice prompts for successful clocking events.
- Fingerprint: Place a registered finger firmly on the fingerprint sensor.
- RFID Card: Tap a registered RFID key fob against the card reader area.
- Password: Enter the registered password using the keypad and press 'OK'.

Image: Time clock showing voice prompts for successful clocking.
2. Attendance Query
Employees can query their own punching records directly on the device. After a successful punch, press the 'Search' key (Q) to view recent records.
Data Management
The WEELIAO I60 uses a USB disk for data transfer, eliminating the need for Wi-Fi or network connectivity and avoiding monthly software fees.
1. Downloading Reports
To download attendance reports:
- Insert the USB disk into the device.
- Press the 'M' key to enter the menu.
- Navigate to 'U-Flash' and select 'Download Report'.
- Wait approximately 20 seconds for the data to download successfully to the USB disk.
- Remove the USB disk and insert it into a computer to access the attendance reports.
2. Uploading Shift Schedules
To upload edited shift schedules:
- Insert the USB disk containing the edited INFO.xls file into the device.
- Press the 'M' key to enter the menu.
- Navigate to 'U-Flash' and select 'Upload Overtime'.
- Wait approximately 15 seconds for the data to upload successfully.

Image: USB disk transmission for report downloading and schedule uploading.
3. Setting Ring Time
The device supports setting specific ring times for breaks or shift changes.
- Press the 'M' key to enter the menu.
- Select 'Set Bell'.
- Set the number of ring times and the specific time for the bell to sound.
Video: This video demonstrates the process of downloading attendance data, setting up shift schedules via USB, registering fingerprints and RFID cards, and configuring bell ring times on the WEELIAO Fingerprint Time Clock.
Maintenance
- Keep the fingerprint sensor clean and free from dust or debris to ensure accurate readings. Use a soft, dry cloth for cleaning.
- Avoid exposing the device to extreme temperatures, direct sunlight, or high humidity.
- Do not use abrasive cleaners or solvents on the device.
- Regularly back up attendance data to the USB disk to prevent data loss.
Troubleshooting
- Fingerprint Not Recognized: Ensure your finger is clean and dry. Try pressing your finger firmly and covering the entire sensor area. Re-registering the fingerprint might be necessary.
- RFID Card Not Working: Ensure the card is properly registered. Try tapping it directly over the sensor area.
- Data Transfer Issues (USB): Verify the USB disk is properly inserted and formatted correctly (FAT32 is usually recommended). Ensure the file name for shift schedules is 'INFO.xls'.
- Device Not Powering On: Check the power adapter connection and ensure the power outlet is functional.
- Incorrect Time/Date: Access the device menu to manually adjust the time and date settings.
Specifications
| Feature | Detail |
|---|---|
| Brand | WEELIAO |
| Model Number | I60 |
| Display Type | Digital |
| Power Source | Corded Electric |
| Room Type | Office |
| Shape | Rectangular |
| Frame Material | Acrylonitrile Butadiene Styrene |
| Batteries Included | No |
| Mounting Type | Wall Mount |
| Item Weight | 0.011 ounces (approx. 0.31 grams) |
| Alarm Clock | Yes |
| Operation Mode | Electrical |
| Dial Color | Black |
| Clock Form | Multi Display |
| Connectivity Technology | USB |
| Product Dimensions | 7.48 x 1.5 x 4.72 inches |

Image: Product dimensions and included accessories.
Warranty and Support
For warranty information and technical support, please refer to the contact details provided with your purchase or visit the official WEELIAO website. Keep your purchase receipt as proof of purchase.