Product Overview
The Thermalright Aqua Elite 240 V3 is an all-in-one liquid CPU cooler designed for efficient heat dissipation. It features a fourth-generation pump head, a 240mm aluminum fin radiator, protective mesh water pipes, and two 120mm ARGB PWM fans. This cooler is engineered to provide low vibration, high heat dissipation, low evaporation, and a long lifespan for your CPU cooling needs.
The fans and water-cooling header support ARGB synchronization with a 5V 3-pin motherboard header, offering 16 million color soft light effects. The dual TL-C12B-S V2 fans operate at 1500 RPM ±10% with a noise level of ≤23dBA and an airflow of 66.17 CFM (MAX). They feature PWM functionality for automatic speed adjustment based on CPU temperature. The unique octagonal pump head design includes an ARGB halo and a rotation speed of up to 3,300 RPM ±10%, ensuring consistent cooling performance.
What's in the Box
The Thermalright Aqua Elite 240 V3 Liquid CPU Cooler package includes the following components:
- AIO Water Cooler (Radiator, Pump, Tubing, and Pre-installed Fans)
- Mounting hardware for Intel LGA1150/1151/1155/1156/1200/2011/2066/1700/1851 sockets
- Mounting hardware for AMD AM4/AM5 sockets
- Thermal compound
- Fan PWM splitter cable
- ARGB lighting sync cable
- User Manual (this document)

Image: All components included with the Thermalright Aqua Elite 240 V3 Liquid CPU Cooler.
Setup and Installation
Follow these steps for proper installation of your Thermalright Aqua Elite 240 V3 Liquid CPU Cooler. Ensure your system is powered off and disconnected from the power source before beginning installation.
Video Installation Guide
Video: Official installation guide for the Thermalright Aqua Elite series CPU water cooler. This video demonstrates the step-by-step process for mounting the cooler on both Intel and AMD platforms, applying thermal paste, and connecting the necessary cables.
Step-by-Step Installation (Intel LGA1700 Example)
- Prepare the Backplate: Adjust the backplate for your specific Intel socket. For LGA115X/1200, use the inner holes. For LGA1700, use the outer holes.

Image: Demonstrates adjusting the backplate for LGA1700 by sliding the posts to the outer holes.
- Install Backplate: Install the Intel backplate from the backside of the motherboard, ensuring the screws protrude through the front.

Image: Shows the Intel backplate being installed from the rear of the motherboard.
- Add Standoffs: Install the blue standoffs onto the screws from the front side of the motherboard.

Image: Blue standoffs being screwed onto the backplate posts on the motherboard's front side.
- Prepare Water Block: Remove the protective sticker from the water block's copper base. Align the arrow on the Intel bracket to the water block and rotate to lock it in place.
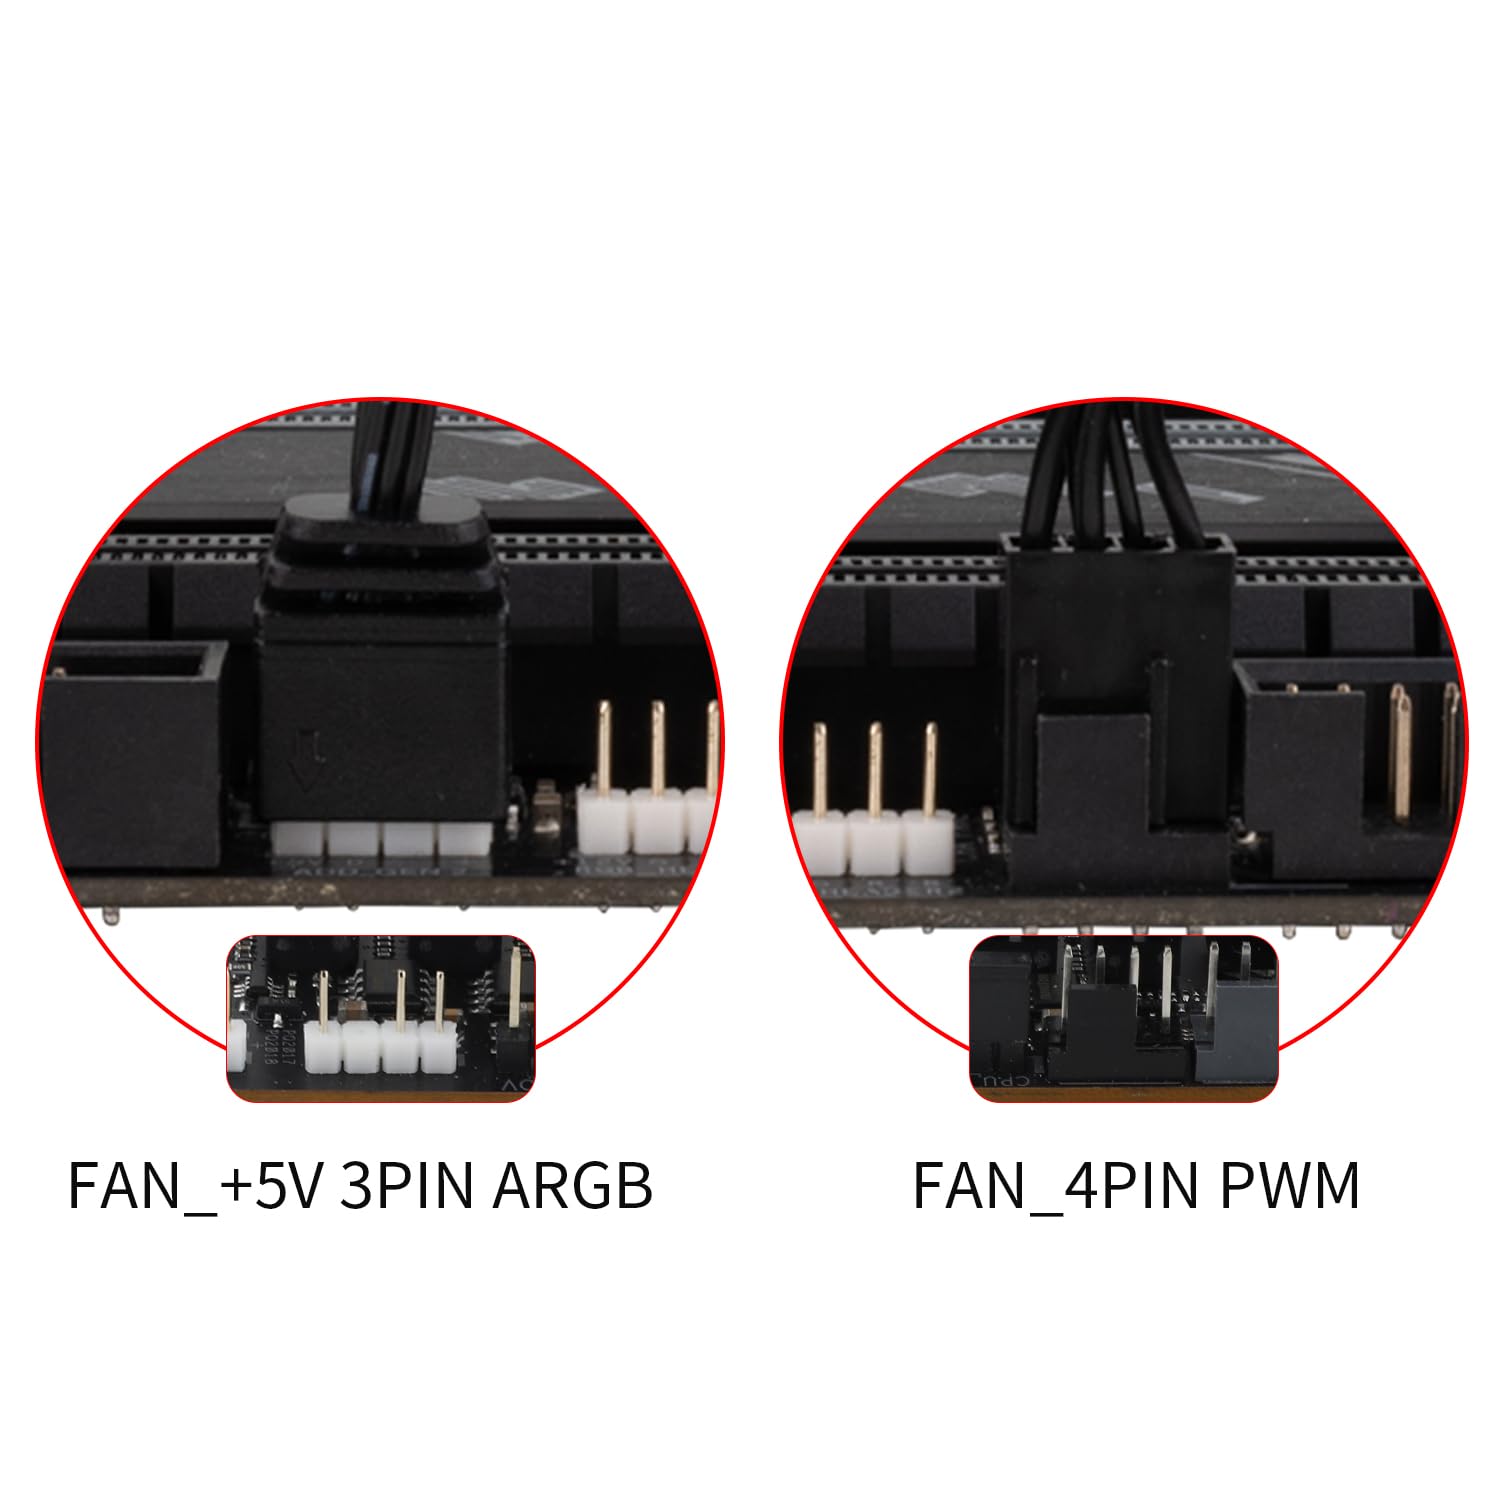
Image: A hand removing the clear protective film from the copper base of the water block.
- Apply Thermal Compound: Apply an appropriate amount of thermal compound onto the CPU's Integrated Heat Spreader (IHS).

Image: Thermal compound being applied to the CPU surface in a pattern to ensure even spread.
- Install Water Block: Align the mounting holes on the water block bracket with the standoffs and gently place the water block onto the CPU. Secure the metal bracket with the four provided nuts, tightening them in a diagonal pattern to ensure even pressure.

Image: The water block being carefully placed onto the CPU, aligning with the standoffs.
- Connect Fan Cables: Connect the fan PWM cables to the fan splitter cable for fan speed synchronization. Connect the fan ARGB cables to sync the lighting signal.

Image: Close-up of fan PWM and ARGB cables being connected to their respective splitter/sync cables.
- Connect to Motherboard: Install the fan splitter cable onto the CPU_FAN socket on the motherboard. Connect the ARGB lighting cable to a 3-pin 5V ARGB socket on the motherboard. Connect the pump power cable to the CPU_OPT or AIO_PUMP socket on the motherboard.
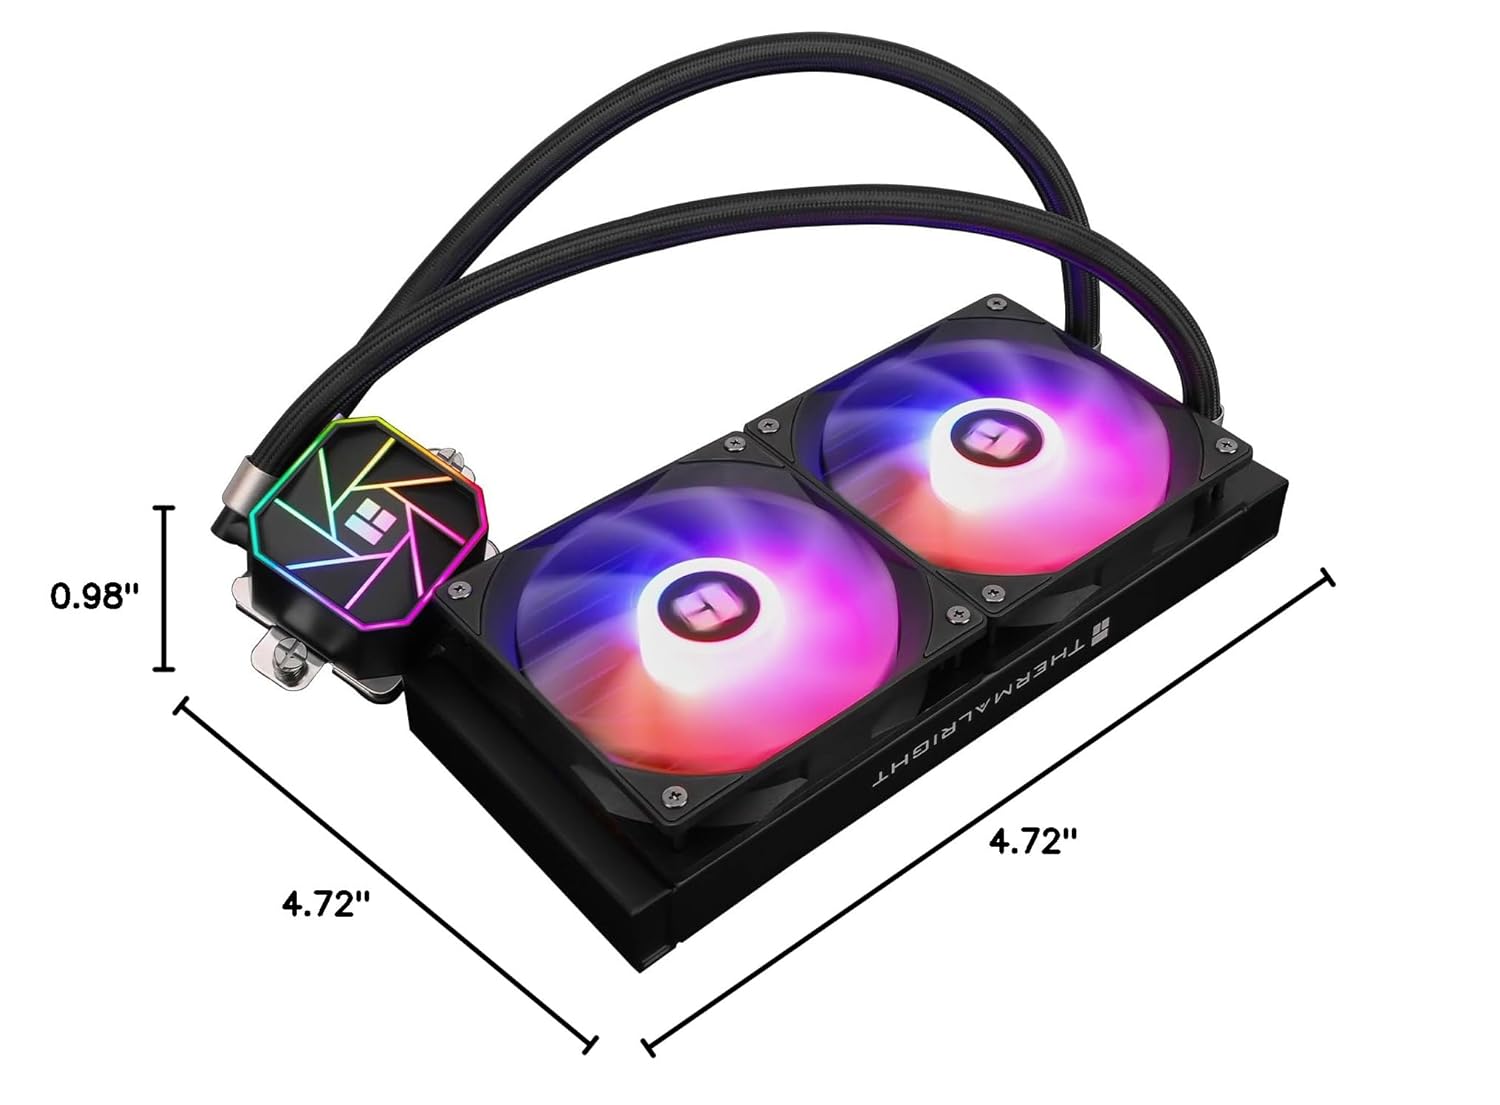
Image: Cables from the cooler being connected to the appropriate headers on the motherboard.
- Mount Radiator: Install the radiator onto your case using the short radiator screws. Ensure the fan exhaust side is adjusted according to your case's airflow configuration.

Image: The radiator and fans installed at the top of a PC case, showing the overall setup.
Step-by-Step Installation (AMD AM5/AM4 Example)
- Prepare Water Block: Remove the protective sticker from the water block's copper base. Align the arrow on the AMD bracket to the water block and rotate to lock it in place.

Image: The AMD mounting bracket being attached to the water block by aligning and rotating.
- Apply Thermal Compound: Apply an appropriate amount of thermal compound onto the CPU's Integrated Heat Spreader (IHS).

Image: Thermal compound being applied to an AMD CPU, similar to the Intel process.
- Install Water Block: Use the buckles on the metal bracket to secure the water block onto the CPU. Tighten the screws on both sides to apply mounting pressure evenly.

Image: The water block being secured onto an AMD CPU using the integrated buckles and screws.
- Connect Cables and Mount Radiator: Follow steps 7 and 8 from the Intel installation guide to connect fan/ARGB/pump cables and mount the radiator in your PC case.
Operating Instructions
Once installed, the Thermalright Aqua Elite 240 V3 operates automatically. The PWM fans will adjust their speed based on the CPU temperature, as detected by your motherboard's CPU_FAN header. The pump operates continuously to circulate coolant.
For ARGB lighting control, ensure the 3-pin 5V ARGB cable is connected to a compatible motherboard header. You can then use your motherboard's RGB software (e.g., ASUS Aura Sync, MSI Mystic Light, Gigabyte RGB Fusion, ASRock Polychrome Sync) to customize lighting effects and synchronize them with other ARGB components.

Image: The water block and fans displaying customizable ARGB lighting effects.
Maintenance
The Thermalright Aqua Elite 240 V3 is a closed-loop all-in-one (AIO) liquid cooler, requiring minimal maintenance. However, regular checks can help ensure optimal performance and longevity:
- Dust Removal: Periodically inspect the radiator fins and fan blades for dust accumulation. Use compressed air to gently clean dust from the radiator and fans. Excessive dust can impede airflow and reduce cooling efficiency.
- Tubing Inspection: Check the water tubes for any signs of kinks, leaks, or damage. While the tubes are protected by polymer sleeves, ensuring they are not excessively bent or pinched is important.
- Pump Noise: Listen for any unusual noises from the pump. A properly functioning pump should operate quietly. Excessive noise might indicate an issue.
- Thermal Paste: The pre-applied thermal paste (or included tube) is designed for long-term use. Re-application is generally not necessary unless the cooler is removed and reinstalled. If re-installing, clean off old thermal paste from both the CPU and the water block base before applying new thermal compound.
Troubleshooting
If you encounter issues with your Thermalright Aqua Elite 240 V3, refer to the following common troubleshooting steps:
- High CPU Temperatures:
- Ensure the water block is securely mounted to the CPU with even pressure. Re-tighten the mounting screws if necessary.
- Verify that thermal compound was applied correctly and evenly.
- Check if the pump power cable is correctly connected to the CPU_OPT or AIO_PUMP header on the motherboard and receiving power.
- Confirm that the fans are spinning and connected to the CPU_FAN header (via splitter) and receiving power.
- Clean any dust buildup on the radiator fins and fan blades.
- Ensure proper airflow within your PC case.
- Fans Not Spinning or ARGB Not Lighting Up:
- Check all fan and ARGB cable connections to the splitter cables and motherboard headers.
- Ensure the 3-pin 5V ARGB header on your motherboard is enabled in the BIOS/UEFI settings.
- Verify that your motherboard's RGB software is installed and configured correctly.
- Confirm that the fan headers on your motherboard are supplying power (check BIOS/UEFI fan control settings).
- Unusual Pump Noise:
- Ensure the pump is positioned lower than the highest point of the radiator to prevent air bubbles from accumulating in the pump.
- Check for any kinks or obstructions in the tubing.
- If the noise persists, contact Thermalright customer support.
Specifications
| Feature | Detail |
|---|---|
| Product Dimensions | 4.72"L x 0.98"W x 4.72"H (Fan dimensions) |
| Brand | Thermalright |
| Power Connector Type | 4-Pin (PWM) |
| Voltage | 12 Volts (DC) |
| Wattage | 4.8 watts |
| Cooling Method | Water |
| Compatible Devices | Desktop CPUs |
| Noise Level | ≤25.6 Decibels (Fan) |
| Material | Aluminum (Radiator) |
| Maximum Rotational Speed | 1500 RPM (Fan) |
| Air Flow Capacity | 66.17 Cubic Feet Per Minute (MAX) |
| Pump Speed | 3300 RPM ±10% |
| Pump Noise | ≤23dBA |
| Fan Bearing Type | S-FDB Bearing |
| Waterblock Lighting | +5V Addressable RGB |
| Supported Sockets | AMD: AM4/AM5, Intel: LGA1150/1151/1155/1156/1200/2011/2066/1700/1851 |

Image: A detailed table outlining the technical specifications of the Aqua Elite 240 V3 cooler.
Warranty and Support
For warranty information, technical support, or service inquiries, please refer to the official Thermalright website or contact their customer service department. Keep your proof of purchase for warranty claims.
Online Resources: Visit the Thermalright official website for product registration, FAQs, and driver downloads.


