Introduction
This manual provides detailed instructions for the setup, operation, and maintenance of your CYSSJF Wireless Call Strobe Light System. This system is designed to provide reliable emergency alerts for seniors and individuals requiring caregiver assistance, featuring waterproof wearable call buttons and a long-range receiver with visual and audible alerts.
What's Included
- 1 Call Bell (Receiver/Strobe Light Unit)
- 2 Waterproof Wearable Call Buttons (1 Wrist SOS, 1 Neck Call)
- User Manual
Specifications
- Model Number: 4L+SW+O1-1+1+1
- Brand: CYSSJF
- Sensor Technology: Contact Sensor
- Power Source: Battery Powered (Buttons), Plug-in Power (Receiver)
- Battery Cell Type: Alkaline (for buttons)
- Item Weight: 8.8 ounces
- Package Dimensions: 4.53 x 4.13 x 3.54 inches
- Control Method: Touch
- Mounting Type: Tabletop Mount (Receiver can also be wall-mounted)
- Wireless Range: Up to 500ft in open areas
- Alerts: Strobe Light (3 colors), Sound Prompts (5 ringtones, 4 volume levels)
Setup
1. Powering On the Receiver
Locate the ON/OFF switch on the back of the receiver unit. Slide the switch to the 'ON' position. The receiver will emit a sound and its lights will flash, indicating it is powered on and ready.
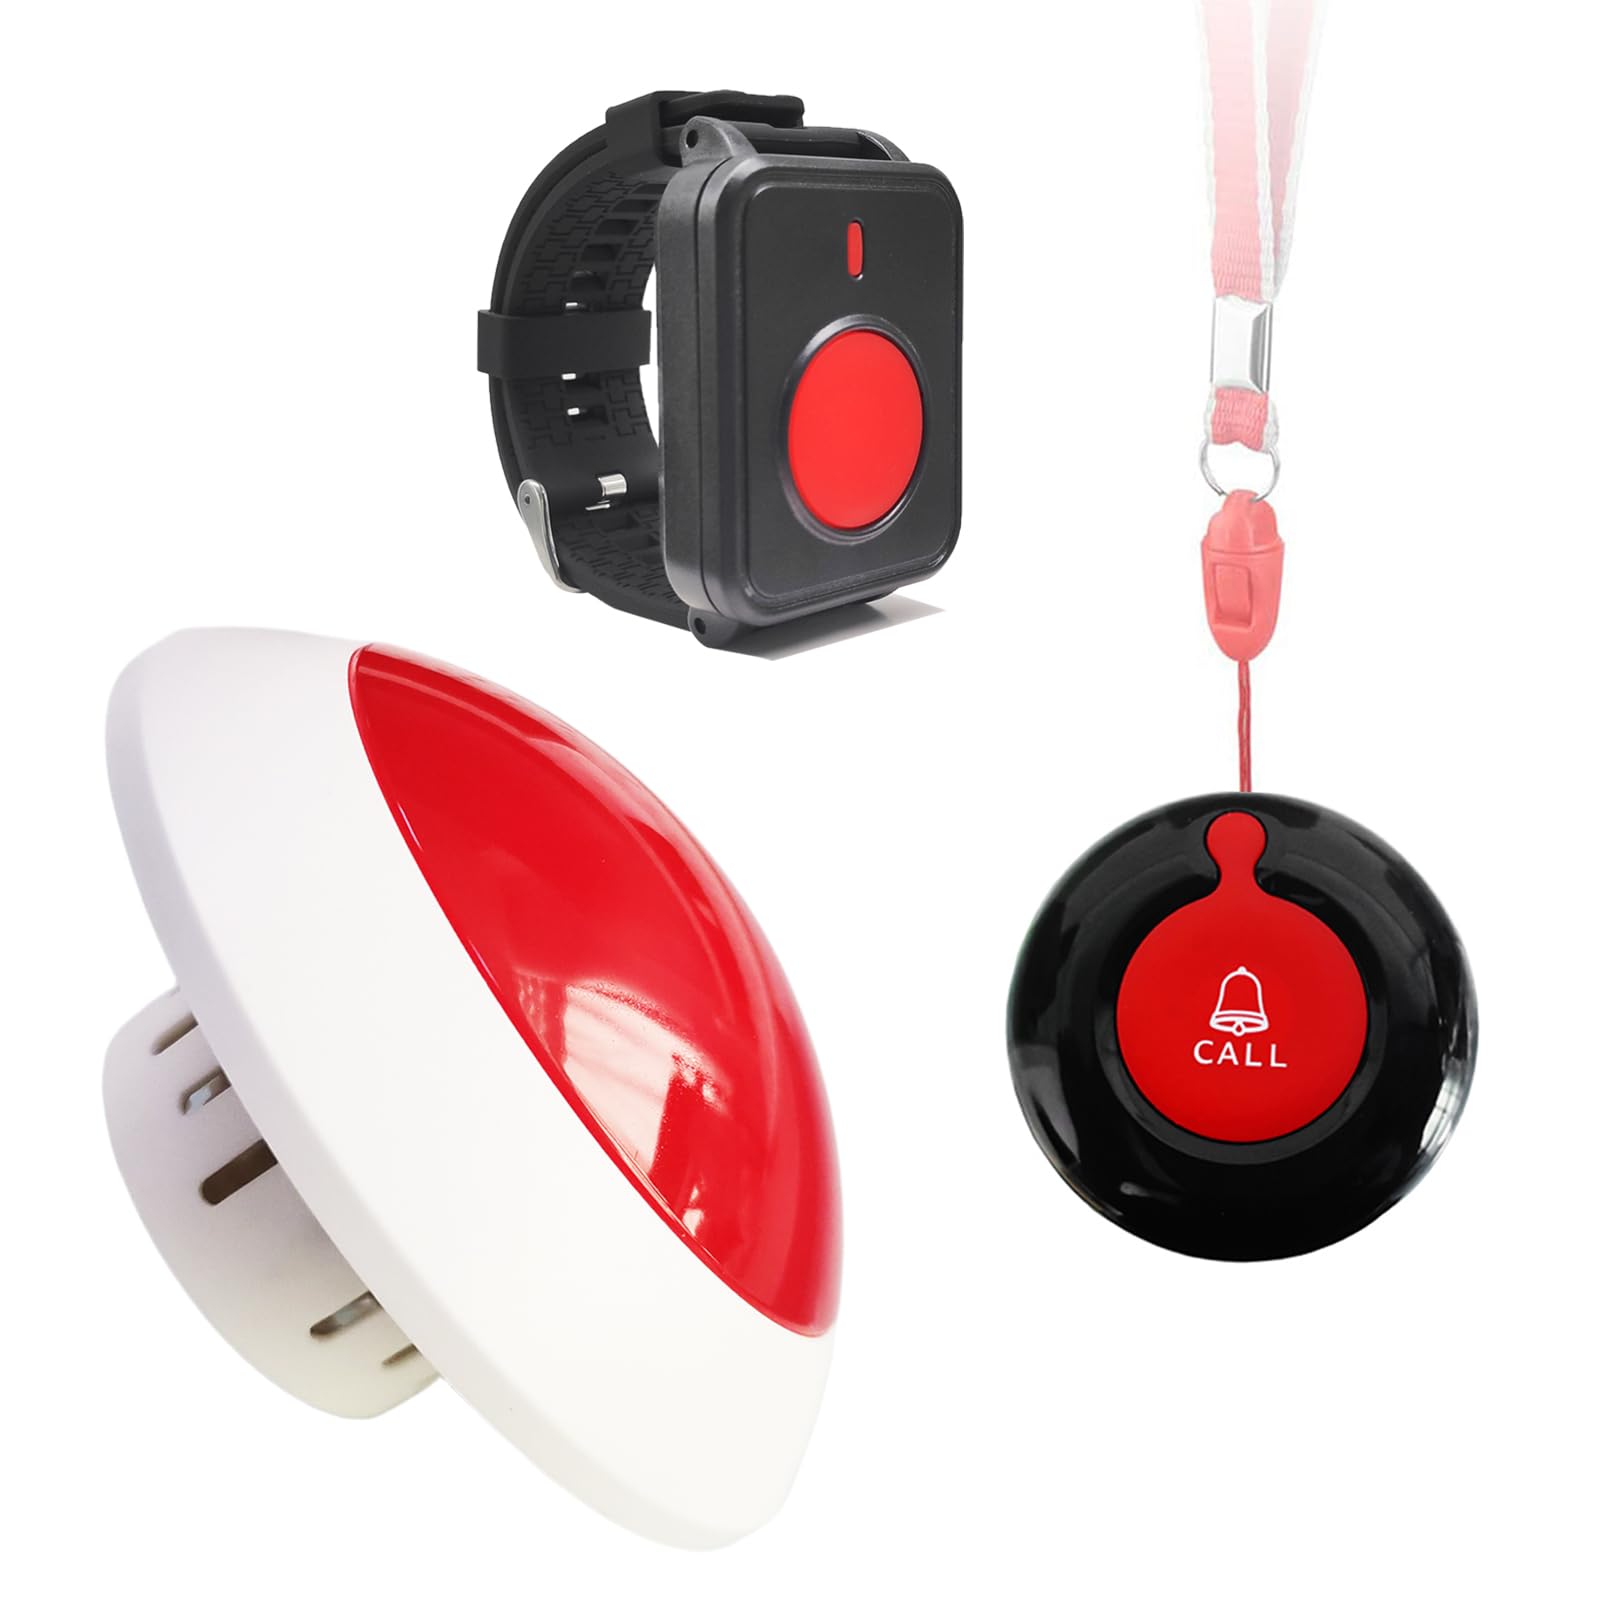
Image: The main receiver unit, showing its red dome and white base. This unit plugs into a power outlet and emits light and sound alerts.
2. Connecting Receiver and Transmitter Buttons
To pair a call button with the receiver:
- Ensure the receiver is powered on.
- On the receiver, press and hold the music note button (often indicated by a musical note icon) until you hear a "Di~Di~Di" sound. This puts the receiver into pairing mode.
- Immediately press the call button on the wrist or neck transmitter. The receiver will confirm successful pairing with a sound or light flash.
- Repeat for any additional call buttons.
Video: Demonstrates the process of connecting the receiver unit with a wearable call button. The video shows how to activate pairing mode on the receiver and then press the call button to establish a connection.
Operating Instructions
1. Initiating a Call
To send an alert, simply press the large red button on either the wrist SOS button or the neck call button. The receiver will activate its strobe light and emit a sound alert.

Image: Illustrates the use of both the wrist-worn and neck-worn call buttons in a home setting, showing the wireless signal reaching the receiver.
2. Adjusting Ringtone and Volume
The receiver offers 5 different ringtones and 4 levels of volume adjustment. To change the ringtone:
- Long press the music note button on the receiver until you hear a "Di~Di~Di" sound.
- Short press the music note button repeatedly to cycle through the available ringtones.
- Once you find your desired ringtone, press the call button on one of the transmitters to confirm and save the selection.
Video: Demonstrates how to change the ringtone on the receiver unit. It shows pressing the music note button to cycle through sounds and then pressing the call button to set the chosen tone.
3. Setting Silent Mode
To set the receiver to silent mode (strobe light only):
- Long press the music note button on the receiver until you hear a "Di~Di~Di" sound.
- Short press the music note button repeatedly until no sound is heard (silent mode).
- Press the call button on one of the transmitters to confirm the silent mode setting. The receiver will now only flash its strobe light when an alert is triggered.
Video: Illustrates how to activate the silent mode feature on the receiver, which disables sound alerts and relies solely on the strobe light for notifications.
4. Strobe Light Color and Prompt Time Settings
The receiver features a bright strobe light with three color options (Red, Green, Blue) and adjustable prompt times.
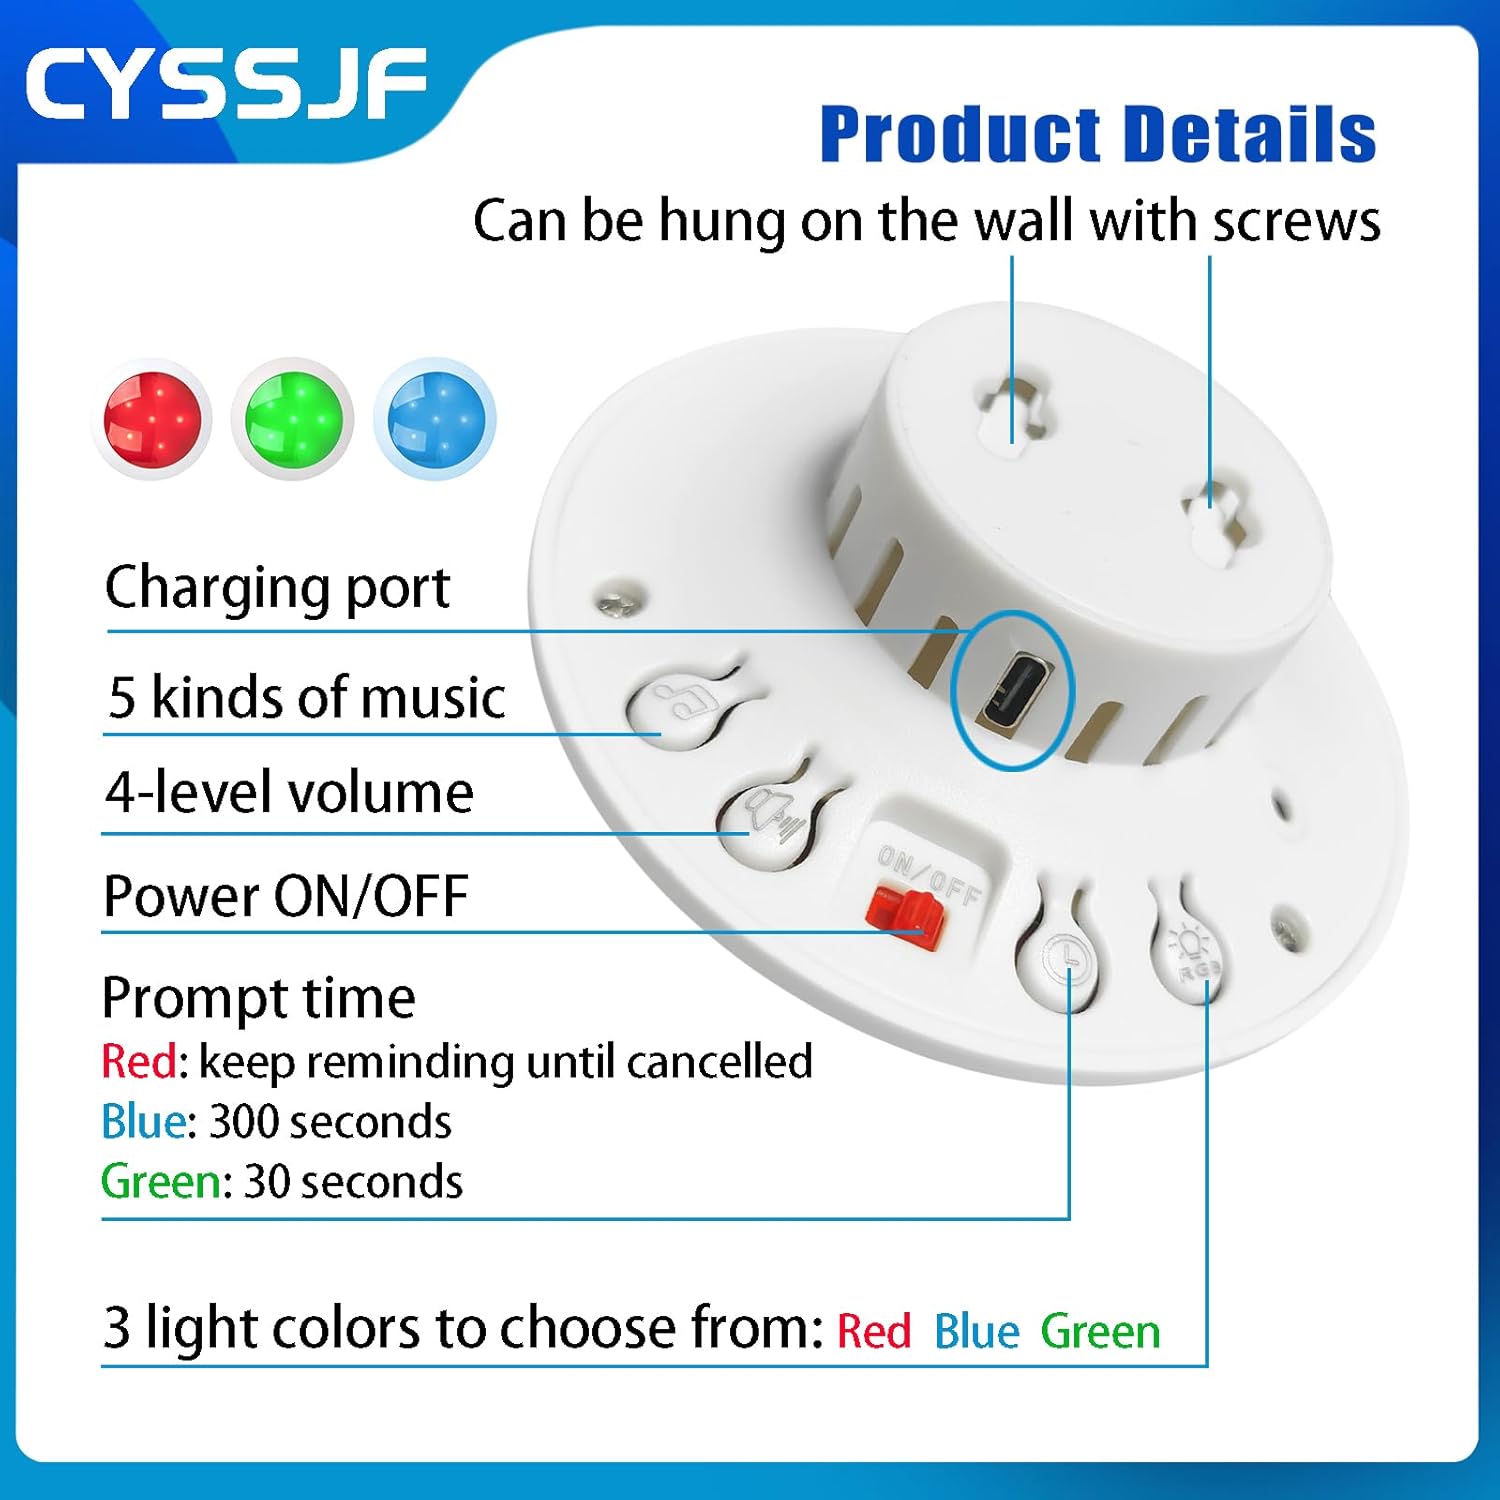
Image: A close-up of the receiver's back, highlighting controls for charging, music selection, volume, power, prompt time settings (Red: keep reminding until cancelled, Blue: 300 seconds, Green: 30 seconds), and three light color choices (Red, Blue, Green).
Maintenance
1. Cleaning
Wipe the receiver and call buttons with a soft, dry cloth. Do not use abrasive cleaners or solvents, as these can damage the device's surface or internal components.
2. Battery Replacement
The wearable call buttons are battery-powered. If a button stops responding or its indicator light is dim, replace the battery according to the instructions provided with the button. Ensure correct battery type and polarity.
3. Storage
When not in use for extended periods, store the system in a cool, dry place away from direct sunlight and extreme temperatures. Ensure the receiver is unplugged and call button batteries are removed if possible.
Troubleshooting
1. No Alert from Receiver
- Check Power: Ensure the receiver is properly plugged into a working power outlet and the ON/OFF switch is in the 'ON' position.
- Check Pairing: Verify that the call button is correctly paired with the receiver. Refer to the "Connecting Receiver and Transmitter Buttons" section for re-pairing instructions.
- Check Battery: For wearable call buttons, ensure the battery is not depleted. Replace if necessary.
- Range: Ensure the call button is within the effective wireless range of the receiver (up to 500ft in open areas). Obstacles like thick walls can reduce range.
- Silent Mode: Confirm the receiver is not in silent mode if you expect an audible alert. Adjust ringtone settings as needed.
2. Call Button Not Responding
- Battery: Replace the battery in the call button.
- Water Damage: Although waterproof, extreme conditions or prolonged submersion can affect functionality. Ensure the button is dry.
- Re-pair: Attempt to re-pair the call button with the receiver.
3. Restoring Factory Settings
If you experience persistent issues or wish to clear all previous settings and pairings, you can restore the receiver to factory settings:
- Ensure the receiver is powered on.
- Press and hold the music note button on the receiver until you hear a "Di~" sound (a longer tone than the pairing sound). This indicates factory reset.
- All previous pairings and settings will be cleared. You will need to re-pair your call buttons.
Video: Shows the procedure for restoring the receiver unit to its factory default settings, which can resolve various operational issues.
Warranty and Support
For warranty information or technical support, please refer to the contact details provided with your product packaging or visit the official CYSSJF website. Keep your purchase receipt for warranty claims.