1. Product Overview
The WeBeqer Q17 Mirror Dash Cam is a comprehensive vehicle recording system designed to enhance driving safety and provide evidence in case of incidents. It features a 10-inch touch screen, 4K UHD front camera, 1080P rear camera, GPS functionality, parking monitoring, and reversing assistance.

Figure 1.1: WeBeqer 4K Mirror Dash Cam with GPS module, rear camera, and 64GB SD card.
This image displays the main mirror dash cam unit, the external GPS module, the rear camera with its cable, and a 64GB WeBeqer branded microSD card, illustrating the primary components of the system.

Figure 1.2: 10-inch Touch Screen and Key Features.
The image highlights the 10-inch touch screen interface of the dash cam, alongside icons representing its core functionalities: 4K UHD Front recording, 1080P Rear recording, GPS, Night Vision, Reversing Assist, Parking Monitor, Loop Recording, and Split Display.
2. Package Contents
Please verify that all items are present and in good condition upon opening the package.
- Mirror Dash Cam Unit (10-inch display)
- 1080P Rear Camera (with 5.5M cable)
- GPS Module
- Car Charger (USB-C power cable)
- 64GB MicroSD Card
- Hardwire Kit (for 24H Parking Monitor)
- User Manual
- SD Card Reader

Figure 2.1: Included Components.
This image illustrates all the components included in the product package: the mirror dash cam, car charger, 1080P rear camera with its cable, GPS module, 64GB SD card, SD card reader, and the user manual.
3. Setup and Installation
3.1. Mirror Dash Cam Installation
- Secure the mirror dash cam over your existing rearview mirror using the provided rubber straps. Ensure it is firmly attached and does not obstruct your view.
- Insert the 64GB MicroSD card into the designated slot on the dash cam. Ensure it clicks into place.
- Connect the USB-C power cable from the dash cam to the car charger, then plug the car charger into your vehicle's cigarette lighter socket. Route the cable neatly along the vehicle's interior trim.
3.2. Rear Camera Installation
- Mount the rear camera at the back of your vehicle, typically above the license plate or inside the rear window. Ensure it has a clear view.
- Route the rear camera cable from the back of the vehicle to the front, connecting it to the rear camera input port on the mirror dash cam.
- For reversing assistance functionality, connect the red wire from the rear camera cable to your vehicle's reverse light power wire. This allows the dash cam to automatically display the rear view with parking guidelines when reverse gear is engaged.
3.3. GPS Module Connection
Connect the GPS module cable to the dedicated GPS port on the dash cam. Position the GPS module on your dashboard or windshield where it has a clear view of the sky for optimal signal reception.
4. Operating Instructions
4.1. Power On/Off
The dash cam will automatically power on and begin recording when your vehicle's ignition is turned on. It will power off automatically when the ignition is turned off.
4.2. Touch Screen Operation
The 10-inch touch screen provides intuitive control over the dash cam's functions.
- Adjusting Viewing Angle: Slide your finger up or down on the screen to adjust the vertical viewing angle of the camera.
- Switching Camera Views: Slide your finger left or right on the screen to switch between the front camera view, rear camera view, or split display.
- Adjusting Brightness: Slide the brightness bar left or right on the screen to adjust the display brightness.
- Reversing Assist: In reverse mode, slide left or right to select the height of the reverse guidelines to suit your vehicle.
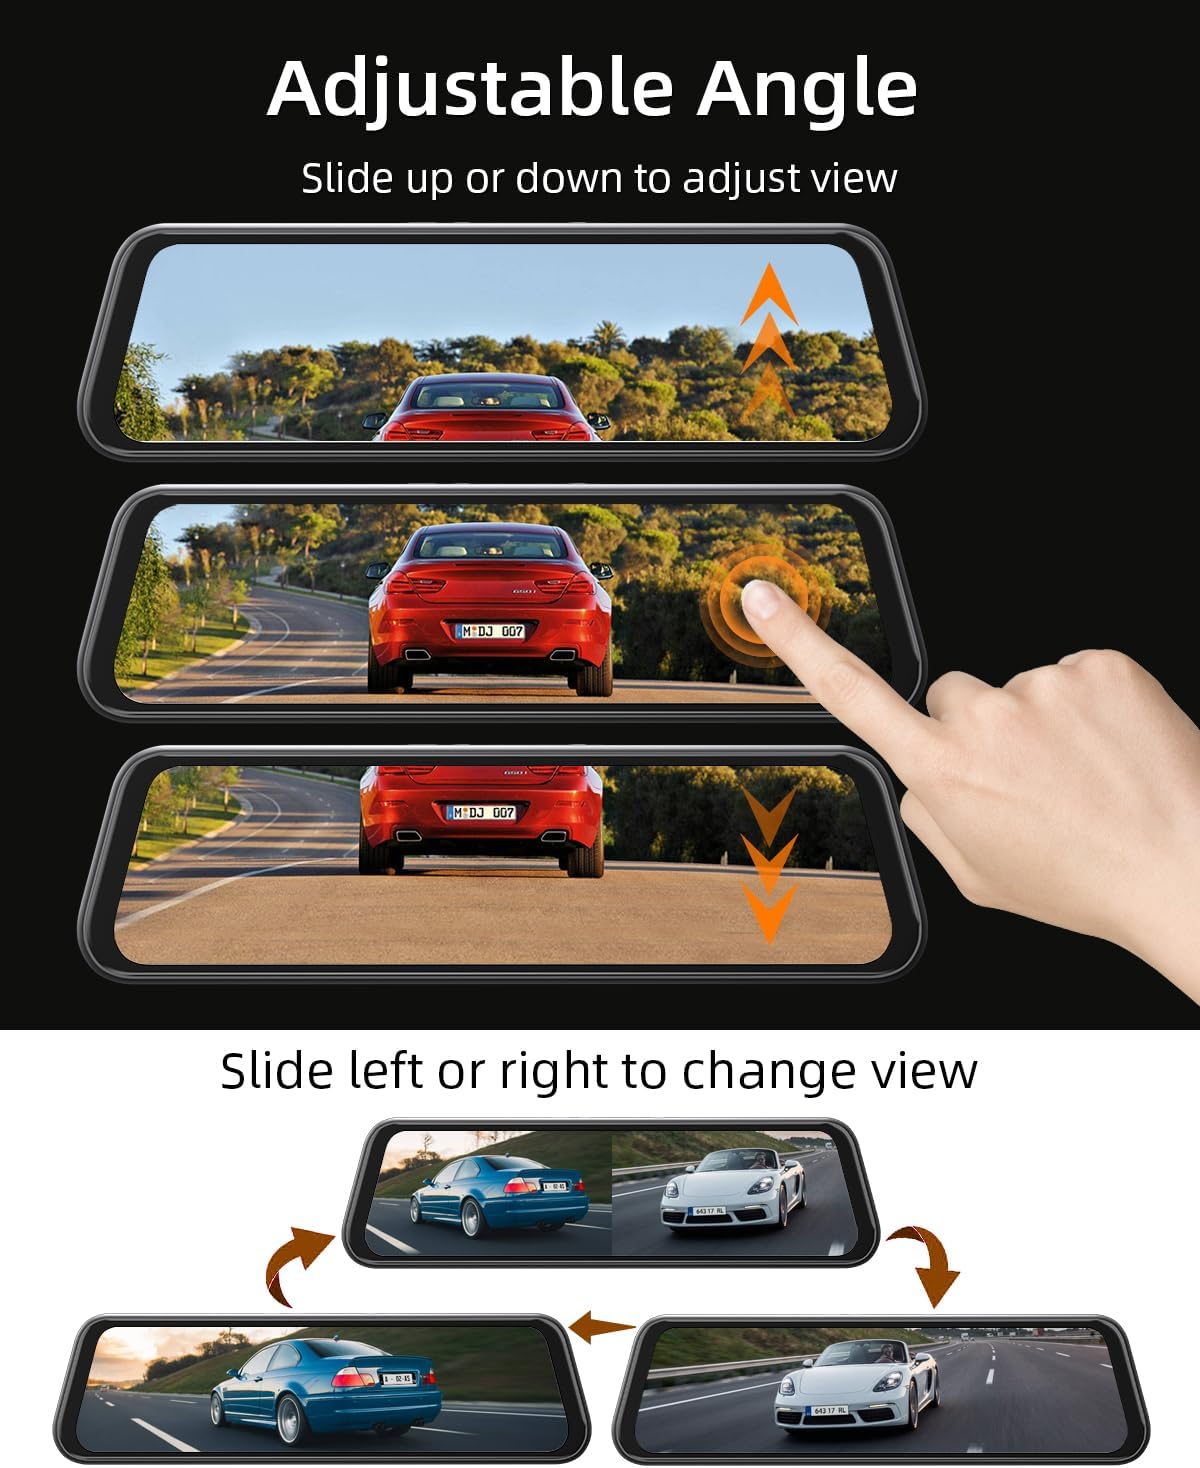
Figure 4.1: Adjusting Camera Angle.
This image demonstrates how to adjust the camera's viewing angle by sliding a finger up or down on the touch screen, and how to switch between front and rear camera views by sliding left or right.

Figure 4.2: WDR Balance Functionality.
This illustration shows the Wide Dynamic Range (WDR) balance feature, which automatically adjusts exposure to prevent overexposure in bright conditions and underexposure in dark conditions, ensuring clear video footage.
4.3. Recording Features
- Loop Recording: The dash cam continuously records, overwriting the oldest footage when the memory card is full. Important footage can be locked to prevent overwriting.
- G-Sensor (Emergency Lock): The built-in G-sensor detects sudden impacts or collisions and automatically locks the current video segment, protecting it from being overwritten.
- 24H Parking Monitor: With the hardwire kit installed, the dash cam can monitor your vehicle for impacts even when parked. It can record continuously at 1 frame per second (time-lapse) for extended periods or trigger normal recording upon impact.
- Night Vision: Enhanced low-light performance ensures clear recordings even in challenging night driving conditions.
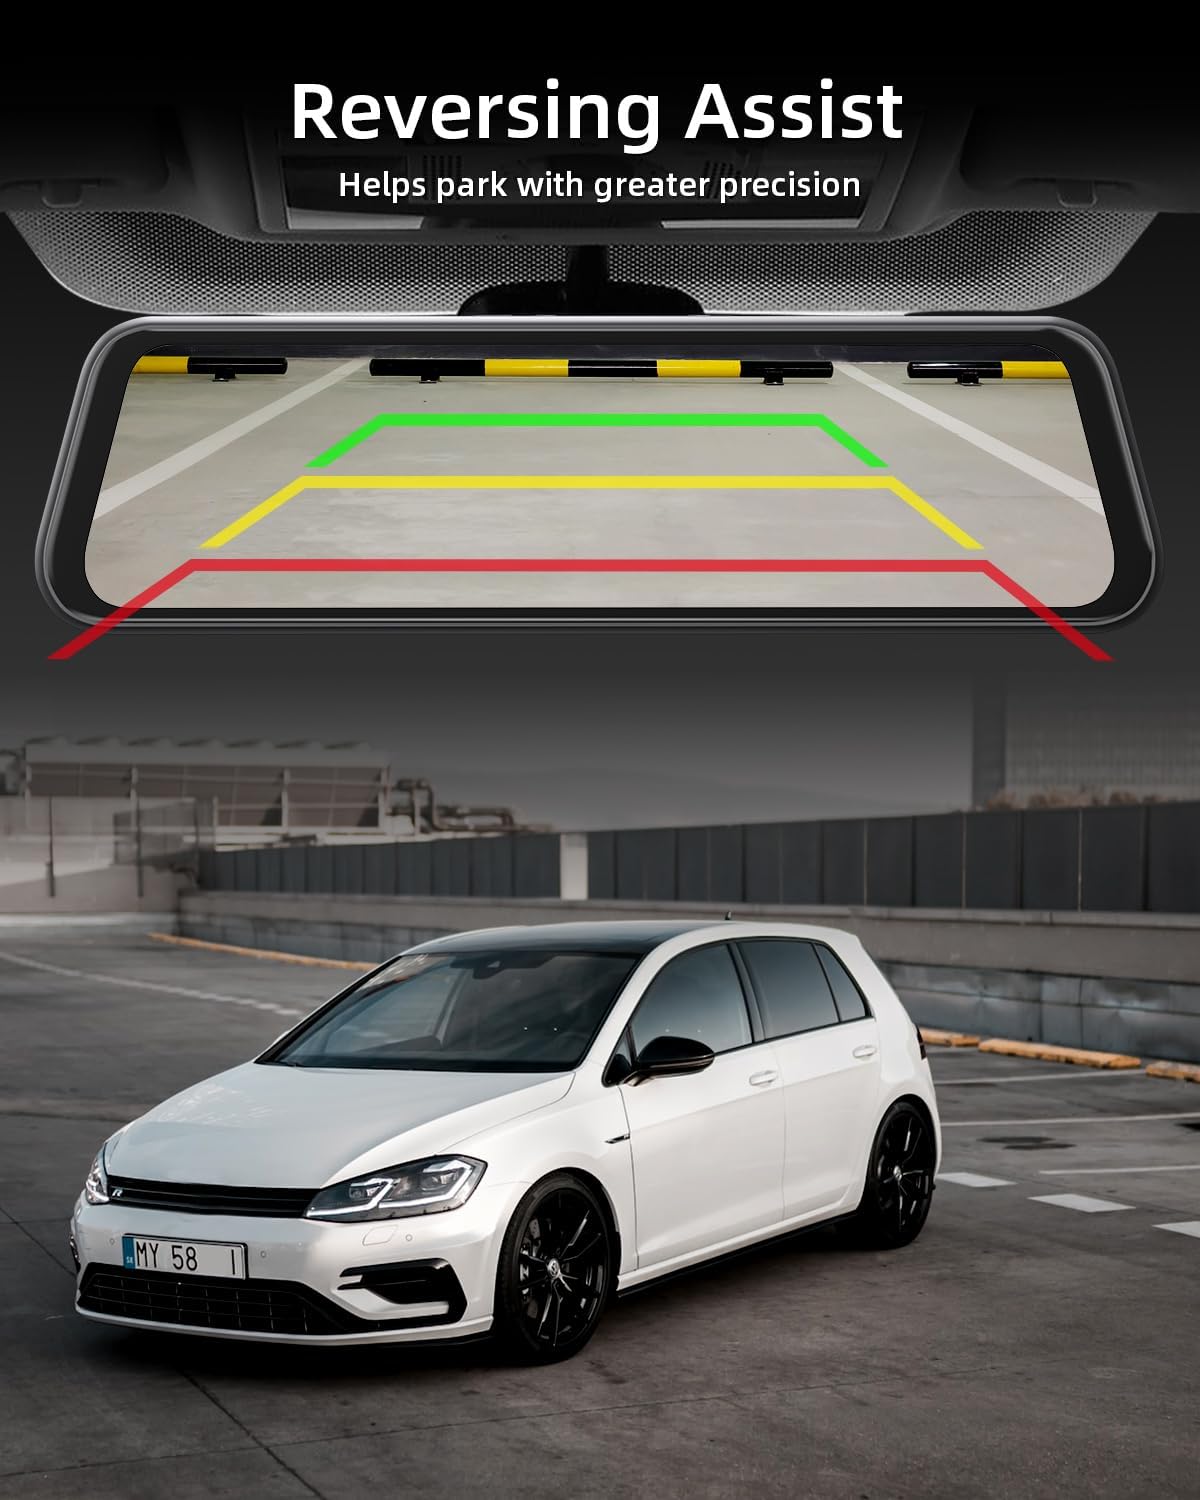
Figure 4.3: 24-Hour Parking Monitor.
This image illustrates the 24-hour parking monitor feature, showing how the dash cam can continuously record at 1 frame per second (time-lapse) for 24 hours, or record normally for 48 minutes, providing surveillance even when the vehicle is parked.

Figure 4.4: Emergency Lock (G-sensor).
The image depicts the emergency lock feature, activated by the G-sensor, which protects valuable footage from being overwritten in the event of a collision or sudden impact, shown with a series of car accident scenarios.
4.4. GPS Functionality
The external GPS module records your vehicle's precise speed and location data, which is embedded into the video files. This data can be reviewed using dedicated PC software (often found on the provided SD card), allowing you to see your driving route on a map alongside the video footage.
Figure 4.5: GPS Recording and Playback.
This image illustrates the GPS functionality, showing a laptop displaying dash cam footage alongside a map with a recorded driving route, indicating the precise direction and location data captured by the GPS module.
4.5. Reversing Assist
When the vehicle is shifted into reverse (and the rear camera is correctly wired to the reverse light), the dash cam automatically displays the rear camera view with adjustable parking guidelines, aiding in safe parking maneuvers.

Figure 4.6: Reversing Assistance.
The image demonstrates the reversing assist feature, showing the mirror dash cam display with colored parking guidelines (red, yellow, green) overlaid on the rear camera view, helping the driver park with greater precision.
5. Maintenance
5.1. SD Card Management
To ensure optimal recording performance and prevent data corruption, it is recommended to format the MicroSD card regularly, approximately once a month. While the device has a format option, some users report needing to format the card via a computer for consistent performance. Use the provided SD card reader for this purpose.
5.2. Cleaning
Gently wipe the dash cam screen and camera lenses with a soft, lint-free cloth. Avoid using abrasive cleaners or solvents that could damage the surfaces.
6. Troubleshooting
| Problem | Possible Cause | Solution |
|---|---|---|
| Dash cam does not power on. | No power supply; loose connection; faulty car charger. | Check car charger connection to cigarette lighter and dash cam. Ensure vehicle ignition is on. Test charger in another vehicle or use a different USB-C cable/charger if available. |
| "Please format SD card" error frequently appears. | SD card corruption; incompatible SD card; full SD card. | Format the SD card using the dash cam's menu. If the issue persists, remove the SD card and format it on a computer using the provided card reader. Consider replacing the SD card with a high-quality, high-speed card if the problem continues. |
| Rear camera not displaying or showing reversed image. | Loose cable connection; incorrect wiring of reverse trigger wire; faulty camera. | Check the connection of the rear camera cable to the dash cam. Ensure the red trigger wire is correctly connected to the vehicle's reverse light power. If the image is reversed, check dash cam settings for a mirror/flip option. |
| GPS signal not acquired or inaccurate. | GPS module obstructed; poor satellite reception. | Ensure the GPS module is placed in an open area with a clear view of the sky (e.g., dashboard, top of windshield). Avoid placing it under metal objects or tinted areas that block signals. Allow a few minutes for signal acquisition after starting the vehicle. |
| Recordings are choppy or missing. | Slow SD card write speed; full SD card; G-sensor sensitivity too high. | Format the SD card. Ensure you are using a high-speed (Class 10 or U3) MicroSD card. Reduce G-sensor sensitivity if recordings are being locked too frequently by minor bumps. |
7. Specifications
| Feature | Detail |
|---|---|
| Model Number | Q17 Rétroviseur Dashcam |
| Screen Size | 10 inches |
| Front Camera Resolution | 4K UHD (2160p) |
| Rear Camera Resolution | 1080P |
| Field of View | Front: 170 degrees, Rear: 120 degrees |
| Connectivity Technology | USB (Type-C), Wireless (for display features) |
| Storage | 64GB MicroSD Card (included) |
| Mounting Type | Rearview Mirror Mount |
| Power Source | Car Charger (USB-C), Hardwire Kit (for parking monitor) |
| Product Dimensions | 2.95 x 10.04 x 0.63 inches |
| Item Weight | 2 pounds |
| Batteries | 1 Lithium Polymer battery (included) |
| Manufacturer | WeBeqer |
| Date First Available | July 20, 2023 |

Figure 7.1: Hardware Upgraded - Type C Interface.
This image highlights the benefits of the upgraded Type-C interface compared to the older Mini USB interface, detailing improvements in data transfer speed, power output, durability, and compatibility.
8. Warranty and Support
For warranty information, technical support, or service inquiries, please refer to the documentation included with your product or contact WeBeqer customer support directly. Contact details can typically be found on the manufacturer's official website or on the product packaging.


