1. Introduction
This manual provides essential information for the proper installation, operation, and maintenance of your new PARTS genuine thermal printhead. This printhead is specifically designed for compatibility with Argox DX4100, DX4200, and DX2300 thermal label printers, offering a 203dpi resolution for clear and precise printing.
Please read these instructions carefully before proceeding with installation or any maintenance to ensure optimal performance and longevity of the product.
2. Product Overview
The PARTS genuine printhead is a critical component responsible for transferring thermal energy to heat-sensitive label media, creating the printed image. Its 203dpi resolution ensures high-quality output for various labeling applications.

Figure 1: Front view of the PARTS genuine thermal printhead, showing the thermal elements and circuit board.
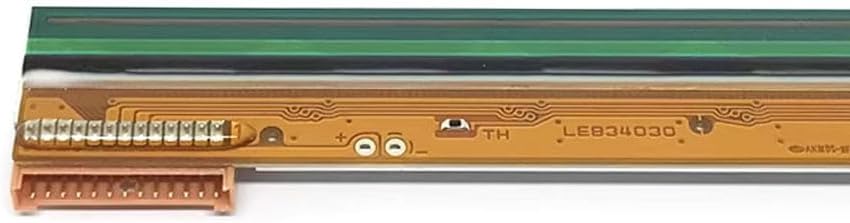
Figure 2: A closer look at the printhead's circuit board, highlighting the intricate connections and components.
Key Features:
- Genuine Component: Ensures compatibility and reliable performance with specified Argox printers.
- Resolution: 203 dots per inch (dpi) for standard print quality.
- Compatibility: Designed for Argox DX4100, DX4200, and DX2300 thermal label printers.
3. Specifications
| Specification | Value |
|---|---|
| Brand | PARTS |
| Printing Technology | Thermal |
| Resolution | 203 dpi |
| Compatible Printer Models | Argox DX4100, DX4200, DX2300 |
| Connectivity Technology | USB (Printer connection, not printhead specific) |
4. Installation Guide
Replacing a printhead requires careful handling and adherence to safety procedures. It is recommended that this procedure be performed by a qualified technician or an individual familiar with printer maintenance.
4.1 Safety Precautions
- Always power off and unplug the printer from the electrical outlet before beginning any installation or maintenance.
- Allow the printer to cool down if it has been recently in use, as the printhead can be hot.
- Avoid touching the printhead's thermal elements directly with bare hands to prevent damage from static electricity or oils. Use gloves if possible.
- Keep the new printhead in its anti-static packaging until ready for installation.
4.2 Installation Steps (General)
- Access the Printhead: Open the printer's top cover and any necessary internal compartments to gain access to the existing printhead. Refer to your specific Argox printer's user manual for detailed instructions on accessing the printhead assembly.
- Disconnect Cables: Carefully disconnect any ribbon cables or connectors attached to the old printhead. Note their orientation for reinstallation.
- Remove Old Printhead: Unscrew or unclip the old printhead from its mounting bracket. Store it safely for disposal.
- Install New Printhead: Gently place the new PARTS printhead into the mounting bracket. Ensure it is seated correctly and secure it with screws or clips.
- Reconnect Cables: Reconnect the ribbon cables and connectors to the new printhead, ensuring they are firmly and correctly attached.
- Close Printer: Close all printer covers and compartments.
- Power On and Test: Plug in the printer and power it on. Perform a test print to verify proper installation and print quality.

Figure 3: Back view of the printhead, displaying mounting points and identification numbers (e.g., 23-82424-013).
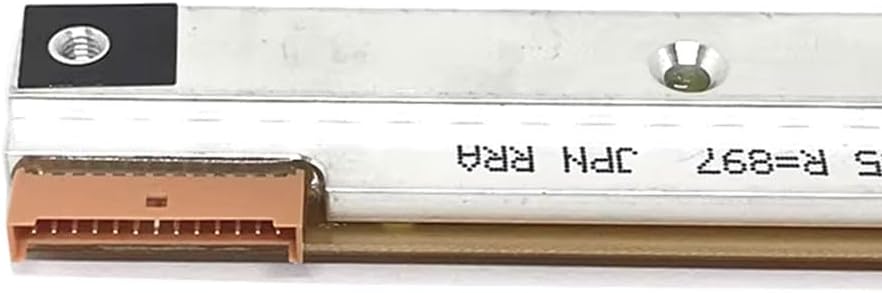
Figure 4: Close-up of one of the printhead's electrical connectors, showing the pin configuration for proper connection.
5. Operating Instructions
Once installed, the printhead operates automatically as part of your Argox thermal label printer. No direct user interaction with the printhead itself is required during normal operation. Ensure your printer drivers are up-to-date and that you are using compatible thermal label media for optimal print quality.
6. Maintenance
Regular maintenance of the printhead is crucial for extending its lifespan and maintaining print quality.
6.1 Cleaning the Printhead
- Frequency: Clean the printhead after every few rolls of labels or whenever print quality degrades (e.g., light spots, streaks).
- Materials: Use a printhead cleaning pen or a lint-free cloth dampened with isopropyl alcohol (99% pure).
- Procedure:
- Power off and unplug the printer.
- Open the printhead assembly.
- Gently wipe the thermal elements of the printhead from one end to the other using the cleaning pen or alcohol-dampened cloth. Do not scrub aggressively.
- Allow the printhead to dry completely (approximately 2-3 minutes) before closing the printer and powering it on.
6.2 General Tips
- Use high-quality, compatible thermal labels to minimize residue buildup on the printhead.
- Avoid using sharp objects near the printhead.
- Ensure the printer environment is clean and free of excessive dust.
7. Troubleshooting
If you experience issues with print quality after installing the new printhead, consider the following:
- No Print/Blank Labels:
- Verify the printhead cables are securely connected.
- Ensure the thermal labels are loaded correctly (thermal side facing the printhead).
- Check printer settings for darkness/density.
- Light or Faded Print:
- Clean the printhead as described in Section 6.1.
- Increase the print darkness setting in your printer driver or software.
- Ensure the thermal labels are not expired or damaged.
- Streaks or Gaps in Print:
- Clean the printhead thoroughly. This often indicates debris or residue on the thermal elements.
- Inspect the printhead for any visible physical damage (e.g., scratches). If damaged, replacement may be necessary.
- Printer Error Messages:
- Refer to your Argox printer's specific user manual for error code definitions and solutions.
- Ensure the printhead is correctly seated and all connections are firm.
8. Warranty and Support
This PARTS genuine printhead comes with a 3-month warranty from the date of purchase. This warranty covers manufacturing defects and ensures the product meets its specified performance standards.
After-Sales Service:
If you encounter any issues or have questions regarding your printhead, please contact our customer support. We are committed to resolving any product problems promptly and ensuring your satisfaction. Customers can return and receive a refund if the purchase is not satisfactory for any reason within the specified return period.
For support, please refer to the contact information provided with your purchase or visit the official PARTS website.


