1. Introduction
This manual provides instructions for the RGBZONE DC 5V USB LED Controller, designed for use with WS2811, WS2812, and WS2812B dream color LED strip lights. The controller features a 21-key RF wireless remote for convenient operation.
Package Contents
- 1 x RF LED Controller
- 1 x RF Remote Control
- 1 x User Manual (this document)

Image 1.1: RGBZONE DC 5V USB LED Controller and 21-Key RF Wireless Remote Control.
2. Specifications
| Feature | Detail |
|---|---|
| Model Number | FB0747 |
| Input Voltage | DC 5V (USB powered) |
| Output Voltage | DC 5V (matches input voltage) |
| Control Method | RF Wireless Remote Control (21-Key) |
| Compatible LED Types | WS2811, WS2812, WS2812B (3-PIN single signal IC chip LED products) |
| Unsupported LED Types | SK6812 RGBW, regular RGB LED without driver IC |
| Maximum Control Pixels | 2048 pixels (factory default 300 pixels) |
| Remote Control Distance | Up to 65ft (15-20 meters) |
| Power Consumption | Controller itself: <30W (for connected lights) |
| Included Components | Controller, Remote, User Manual |
| Remote Battery | 1 x CR2025 3V Lithium Metal battery (included) |
3. Setup and Connection
Follow these steps to connect your RGBZONE LED controller to your LED strip lights and power source.
Connection Diagram
- Connect the 3-PIN JST connector from the controller to your compatible 3-PIN LED strip light. Ensure correct polarity.
- Connect the USB plug of the controller to a DC 5V power source (e.g., USB power adapter, computer USB port, power bank).
- Ensure the LED strip also operates on DC 5V. The controller does not regulate voltage.

Image 3.1: Connection diagram for the LED controller, power adapter, and LED strip.
Plug Type Identification
The controller uses a 3-PIN plug for the LED strip connection and a USB plug for power input.

Image 3.2: Identification of the 3-PIN and USB plug types.
4. Operation
The 21-key RF wireless remote control allows you to manage various lighting modes and settings.
Remote Control Functions
Before first use, remove the plastic sheet from the remote control's battery compartment.

Image 4.1: 21-Key RF Wireless Remote Control layout and functions.
- On/Off: Power on/off the LED strip. (Auto saves settings when off)
- AUTO: Activates auto-play mode, cycling through various effects.
- S+/S-: Adjusts the speed of dynamic modes (10 levels).
- M+/M-: Switches between 366 different color modes.
- Brightness +/-: Adjusts the brightness level (32 levels).
- Color Buttons: Selects static monochrome colors.
Adjusting Color Order (RGB/GRB/BRG)
If the colors displayed by the LED strip do not match the remote control buttons (e.g., pressing Red lights up Green), you need to adjust the color order.
- Connect the LED strip and power supply. Press the Off button to turn off the LED strip.
- Press the AUTO button to enter the setup menu. The first three lights of the LED strip will display the current RGB sequence.
- Press the M- button to adjust the RGB sequence until the first three lights display Red, Green, and Blue in order.
- Press the Off button to save the new color order.

Image 4.2: Steps to adjust the LED strip color order.
1-to-1 Pairing Setup
By default, one remote can control multiple receivers. To set up 1-to-1 pairing (one remote controls only one receiver):
- To enable 1-to-1 pairing: Press the Green color button for 5 seconds. The remote will now only control the paired receiver.
- To cancel 1-to-1 pairing (return to controlling multiple receivers): Press the White color button for 5 seconds. All remote controls can then control the receiver.

Image 4.3: Remote control pairing instructions.
Product Demonstration Video
Video 4.1: This video demonstrates the various color modes and effects achievable with the RGBZONE DC 5V USB LED Controller and its remote control, showcasing dynamic color changes and static selections.
5. Compatibility
The RGBZONE DC 5V USB LED Controller is designed for specific types of addressable LED strip lights.
Supported LED Strip Types
- WS2811 LED lights
- WS2812 LED lights
- WS2812B LED lights
This controller supports all 3-PIN single signal IC chip LED products.

Image 5.1: Examples of compatible LED strip lights.
Unsupported LED Strip Types
- SK6812 RGBW LED lights
- Regular RGB LED lights without a driver IC
6. Troubleshooting
Color Mismatch
If the LED strip displays incorrect colors when a specific color button is pressed on the remote (e.g., pressing Green results in Red light), refer to the "Adjusting Color Order" section (Section 4) to correct the RGB sequence.
Controller Overheating
If the controller becomes very hot during use, it may indicate an overload. The product itself can carry power for LED strips up to 30W. If your LED strip's power consumption exceeds this, provide the light strips with a separate power supply or use amplifiers. This prevents controller overload and potential damage.
Pixel Control Limit
The controller supports a maximum of 2048 pixels. The factory default setting is 300 pixels. If you are using a longer strip with more pixels, you may need to adjust the pixel count setting. Consult the manufacturer's support for detailed instructions on adjusting the pixel count beyond the default.

Image 6.1: Query regarding pixel control adjustment.
7. Safety Guidelines
- Power Supply: Always use a DC 5V power supply that matches the voltage requirements of your LED strip. The controller does not convert voltage. Input 5V = Output 5V.
- Overload Prevention: Do not exceed the maximum power capacity of the controller (30W for connected lights). For higher power LED strips, use a separate power supply or amplifiers.
- Indoor Use: This product is intended for indoor use only.
- Battery Handling: The remote control contains a CR2025 3V Lithium Metal coin cell battery. Ensure proper insertion and removal. Keep batteries out of reach of children.
Remote Battery Removal
To remove or replace the CR2025 battery in the remote control:
- Locate the battery tray on the side or back of the remote.
- Push the small tab or lever inwards to release the tray.
- Gently pull the tray outwards to slide out the battery.
- Replace with a new CR2025 3V battery, ensuring correct polarity, and slide the tray back into place until it clicks.
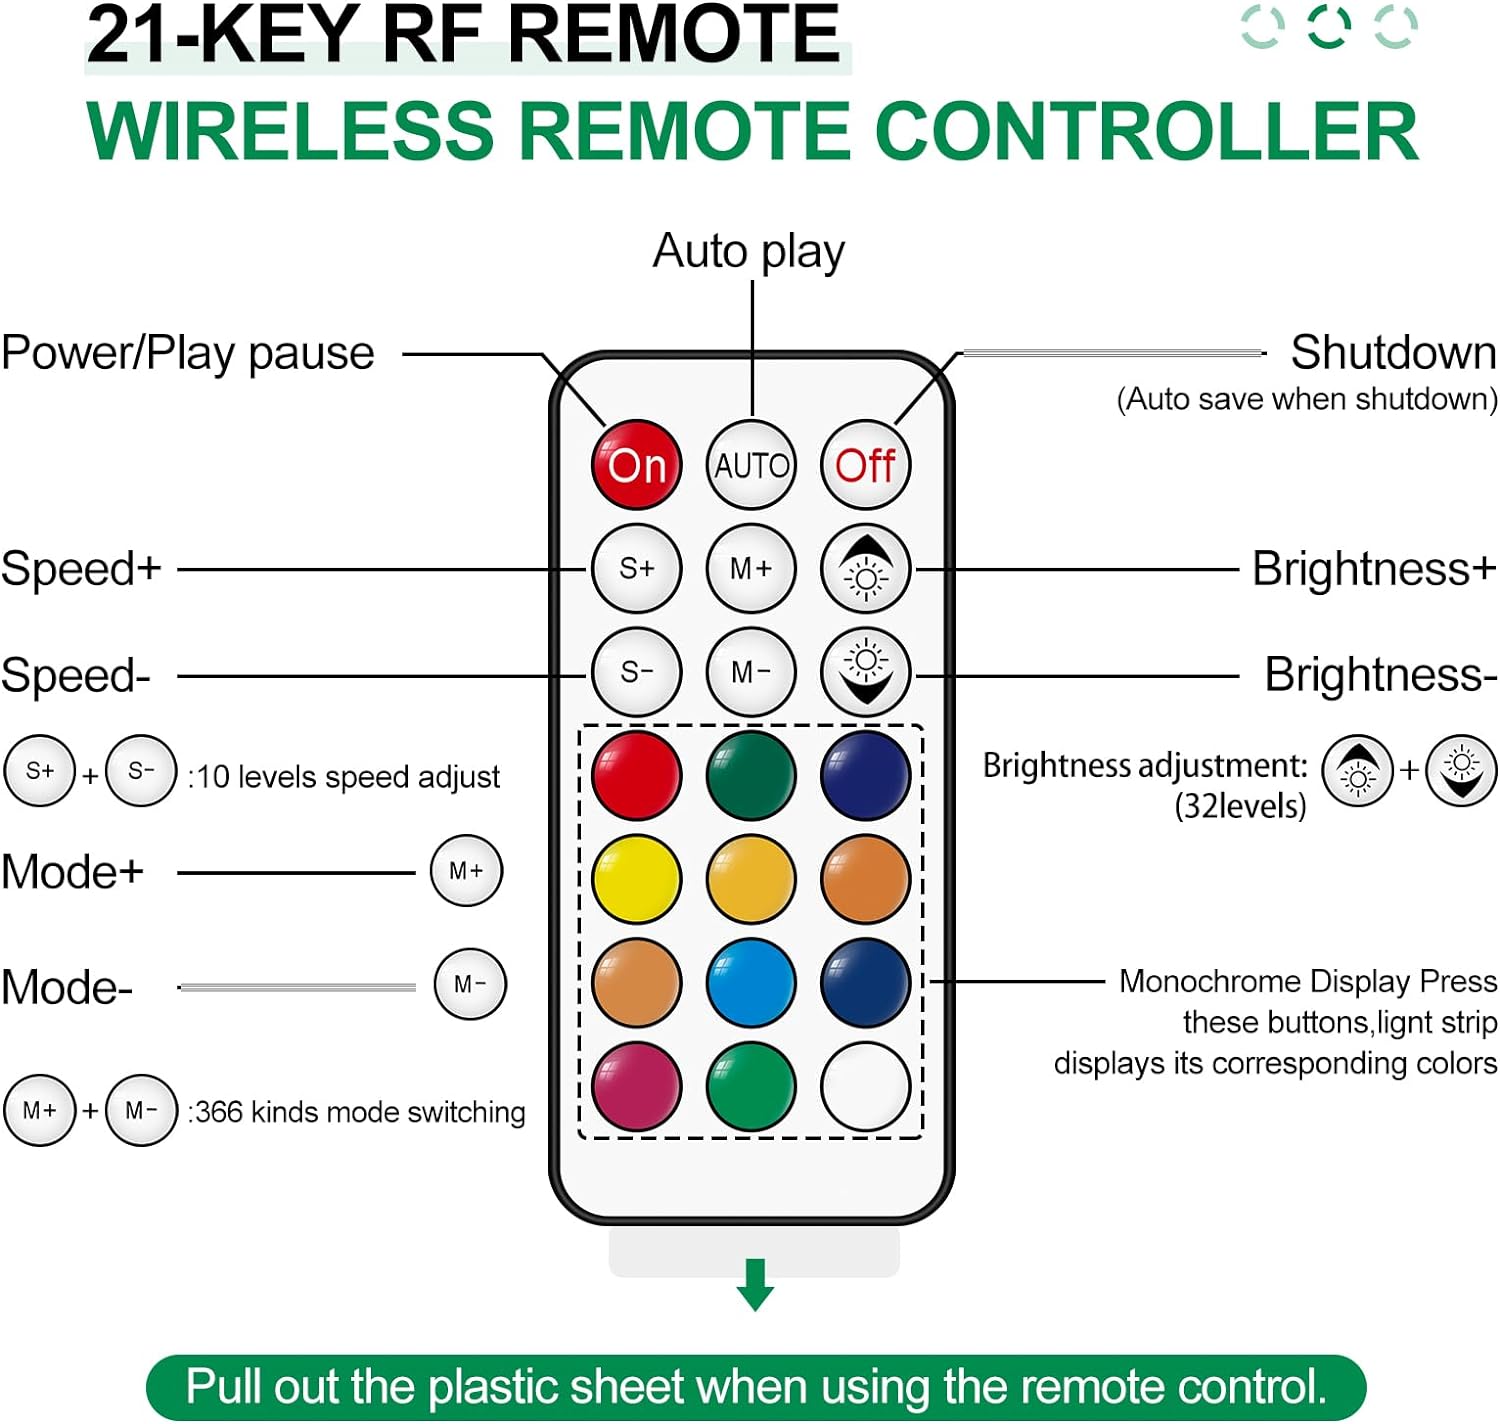
Image 7.1: Instructions for removing the remote control battery.
8. Warranty and Support
For warranty information or technical support, please refer to the product packaging or contact RGBZONE customer service through the retailer where the product was purchased. Keep your purchase receipt for warranty claims.