1. Introduction
This manual provides important information regarding the installation, operation, and maintenance of your Seasons SM12R1 Portable 10000 BTU Air Conditioner. Please read this manual thoroughly before using the appliance to ensure proper operation and to prevent damage.
The Seasons SM12R1 is designed to cool rooms measuring 450 to 550 sq. ft. It features a bucket-less evaporation system, an electronic control panel with a digital display, and an auto-restart function. For ease of mobility, it includes 4 integrated wheels. The unit can be controlled via the integrated electronic control panel or the included LCD remote control.
2. Safety Information
Always follow basic safety precautions when using electrical appliances to reduce the risk of fire, electric shock, and injury to persons.
- Ensure the power supply matches the voltage specified on the unit's rating label (115 Volts).
- Do not operate the unit with a damaged cord or plug.
- Do not block air inlets or outlets. Maintain at least 12 inches of clearance around the unit.
- Do not insert fingers or foreign objects into the air inlets or outlets.
- Keep the unit away from flammable materials and direct sunlight.
- Always unplug the unit before cleaning or servicing.
- This appliance is not intended for use by persons (including children) with reduced physical, sensory or mental capabilities, or lack of experience and knowledge, unless they have been given supervision or instruction concerning use of the appliance by a person responsible for their safety.
3. Product Features
The Seasons SM12R1 Portable Air Conditioner offers several features designed for user comfort and convenience:
- Cooling Capacity: Effectively cools rooms from 450 to 550 sq. ft. with 10000 BTU (ASHRAE) / 9000 BTU (SACC).
- Bucket-less Evaporation System: Reduces the need for frequent draining by evaporating most of the collected moisture.
- Electronic Control Panel with Digital Display: Provides intuitive control and clear status indication.
- Auto Restart: Automatically resumes previous settings after a power outage.
- 24-hour Timer: Allows for scheduled operation.
- Sleep Mode: Adjusts temperature and fan speed for comfortable sleep and energy saving.
- Automatic Vent Angle: Ensures better air distribution throughout the room.
- Integrated Wheels: Four wheels for easy portability between rooms.
- Remote Control: Full-function remote for convenient operation from a distance.
4. Parts Identification

Figure 4.1: Front view of the portable air conditioner, showing the main body and top air vents.

Figure 4.2: Angled view of the portable air conditioner, highlighting its compact design and integrated wheels.

Figure 4.3: Rear view of the portable air conditioner, showing the air intake grilles and exhaust port.

Figure 4.4: Close-up of the electronic control panel with digital display, showing mode, fan, temperature, and power buttons.
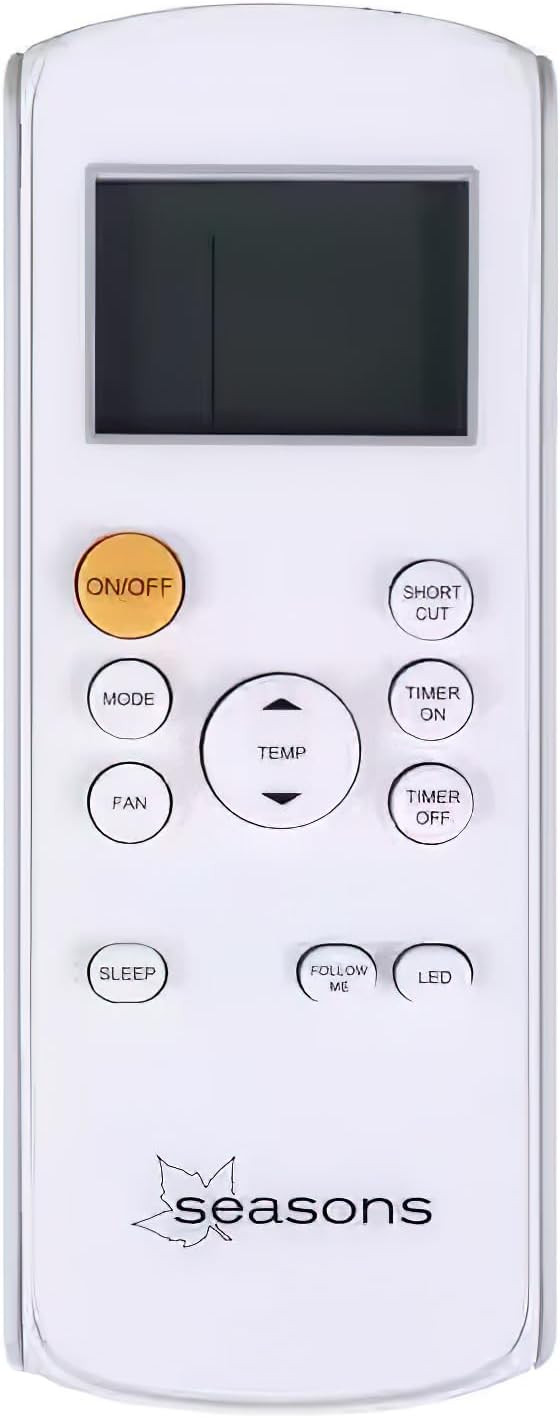
Figure 4.5: The remote control unit, featuring buttons for power, mode, fan speed, temperature adjustment, timer, sleep, and LED display control.

Figure 4.6: Diagram illustrating the overall dimensions of the unit: 27.68 inches (Height) x 13.98 inches (Width) x 13.58 inches (Depth).
What's in the Box:
- Seasons SM12R1 Portable Air Conditioner Unit
- Remote Control
- Window Venting Kit (includes exhaust hose, window slider kit, and adapters)
5. Setup and Installation
Proper installation is crucial for the efficient operation of your portable air conditioner.
5.1 Positioning the Unit
- Place the unit on a flat, stable surface.
- Ensure there is at least 12 inches (30 cm) of space around the unit for proper airflow.
- Position the unit near a window for exhaust hose installation.
5.2 Window Venting Kit Installation
- Assemble the exhaust hose by twisting it onto the hose adapter.
- Connect the other end of the hose adapter to the exhaust outlet on the back of the air conditioner.
- Adjust the window slider kit to fit your window opening (suitable for most vertical sliding and casement-style windows).
- Insert the window exhaust adapter into the opening of the window slider kit.
- Secure the window slider kit in the window frame, ensuring a tight seal to prevent air leakage.
- Connect the exhaust hose to the window exhaust adapter.
5.3 Power Connection
- Plug the power cord (6.2 feet long, Parallel plug type) into a grounded 115V, 60Hz electrical outlet.
- Do not use extension cords or power strips.
6. Operating Instructions
Your Seasons SM12R1 Portable Air Conditioner can be operated using the control panel on the unit or the remote control.
6.1 Control Panel Operation
- Power Button: Press to turn the unit ON or OFF.
- Mode Button: Cycle through operating modes: Cool, Fan, Dry (Dehumidify).
- Fan Speed Button: Adjust fan speed (High, Low). The unit has 2 fan speeds.
- Temperature Up/Down Buttons: Adjust the desired temperature setting.
- Digital Display: Shows the set temperature or error codes.
6.2 Remote Control Operation
The remote control provides full functionality from a distance. Point the remote control towards the receiver on the unit.
- ON/OFF: Turns the unit on or off.
- MODE: Selects operating mode (Cool, Fan, Dry).
- FAN: Adjusts fan speed.
- TEMP ▲/▼: Increases or decreases the set temperature.
- TIMER ON/OFF: Sets the auto-on or auto-off timer.
- SLEEP: Activates Sleep Mode for quiet, energy-efficient operation.
- SHORT CUT: Recalls previous settings.
- FOLLOW ME: Activates a feature where the remote control acts as a thermostat, sensing the temperature at its location.
- LED: Turns the display light on the unit on or off.
6.3 Operating Modes
- Cool Mode: Provides cooling. Set desired temperature and fan speed.
- Fan Mode: Circulates air without cooling. Select desired fan speed.
- Dry Mode (Dehumidify): Removes moisture from the air. Fan speed is typically fixed in this mode.
7. Maintenance
Regular maintenance ensures optimal performance and extends the lifespan of your air conditioner.
7.1 Cleaning the Air Filter
The unit is equipped with a washable filter. A dirty filter can reduce cooling efficiency.
- Unplug the air conditioner from the power outlet.
- Locate the air filter access panel (usually on the back or side of the unit).
- Remove the filter.
- Clean the filter with warm, soapy water. Rinse thoroughly.
- Allow the filter to air dry completely before reinstalling.
- Reinstall the filter and close the access panel.
Recommended cleaning frequency: Every two weeks, or more often if the unit is used frequently or in dusty environments.
7.2 Draining Water (if necessary)
While the unit features a bucket-less evaporation system, in very humid conditions, some water may accumulate. The unit will typically indicate when draining is required (e.g., "FL" error code).
- Turn off and unplug the unit.
- Place a shallow pan or tray under the drain port (located at the bottom rear of the unit).
- Remove the drain plug.
- Allow all accumulated water to drain completely.
- Replace the drain plug securely.
7.3 Cleaning the Unit Exterior
- Wipe the exterior with a soft, damp cloth.
- Do not use harsh chemicals, abrasives, or solvents.
7.4 Storage
If storing the unit for an extended period:
- Drain any accumulated water completely.
- Clean the air filter.
- Run the unit in Fan mode for a few hours to dry the interior.
- Unplug the power cord and coil it neatly.
- Store the unit in a cool, dry place, preferably covered to protect from dust.
8. Troubleshooting
Before contacting customer service, please refer to the following troubleshooting guide.
| Problem | Possible Cause | Solution |
|---|---|---|
| Unit does not turn on. | No power; Power cord unplugged; Circuit breaker tripped; Full water tank. | Check power outlet; Ensure plug is fully inserted; Reset circuit breaker; Drain water tank if "FL" code is displayed. |
| Unit does not cool. | Dirty air filter; Exhaust hose not properly installed; Room too large; Doors/windows open; Temperature setting too high. | Clean air filter; Ensure exhaust hose is securely connected and vented outside; Close doors/windows; Lower set temperature. |
| Unit is noisy. | Unit not on a level surface; Air filter dirty; Obstruction in fan. | Place unit on a flat surface; Clean air filter; Check for and remove any obstructions. |
| "FL" or "P1" error code displayed. | Water tank is full. | Drain the water tank as described in Section 7.2. |
9. Specifications
| Feature | Specification |
|---|---|
| Model Number | SM12R1 |
| Cooling Capacity (ASHRAE) | 10000 BTU |
| Cooling Capacity (SACC) | 9000 BTU |
| Recommended Room Size | 450 to 550 sq. ft. |
| Power Supply | 115 Volts, 60Hz |
| Amperage | 9.1 Amps |
| Wattage | 1000 Watt-hours |
| Noise Level | 55 dBA |
| Refrigerant | R 410A |
| Product Dimensions (HxWxD) | 27.68 x 13.98 x 13.58 inches |
| Item Weight | 52.8 pounds |
| Cord Length | 6.2 feet |
| Filter Type | Washable |
| Control Type | Digital, Remote Control |
| Fan Speeds | 2 |
10. Warranty and Support
For warranty information and customer support, please refer to the documentation included with your purchase or contact Seasons customer service directly. Keep your purchase receipt as proof of purchase for warranty claims.
Note: Protection plans may be available for purchase separately. Refer to your retailer for details on extended warranty options.


