1. Product Overview
The ROCKBROS Road Bike Fenders are designed to provide protection from road spray and debris for 700C road bicycles. Constructed from durable PP material, these fenders feature a quick-release mechanism for easy installation and removal, along with adjustable components for optimal fit and coverage. They are suitable for both front and rear wheel installation.

Image: ROCKBROS Road Bike Fenders installed on a bicycle, demonstrating universal fit for front and rear wheels.
2. What's in the Box
Please verify that all components are present before beginning installation.

Image: Contents of the ROCKBROS Road Bike Fender package, including the mudguard, quick-release brackets, zip ties, anti-slip pads, and hex key.
- 1 x Mudguard
- 2 x Quick-release brackets
- 5 x Zip ties (including one spare)
- 2 x Anti-slip pads
- 1 x 3mm Hex key tool
3. Installation Guide
Follow these steps to install your ROCKBROS Road Bike Fender. The process is similar for both front and rear wheels.
Step-by-Step Installation:
- Attach Anti-slip Pad: Attach the anti-slip pad to the bracket clamp.

Image: Attaching the anti-slip pad to the quick-release bracket.
- Fasten Mudguard Connection: Connect the mudguard to the support rod using the provided screw and tighten with the 3mm hex key.

Image: Securing the mudguard to the support rod with a screw.
- Install Bracket: Position the bracket on your bike frame (seat stay for rear, fork for front) at the desired location.

Image: Placing the quick-release bracket onto the bike frame.
- Secure Bracket with Zip Tie: Use a zip tie to firmly secure the bracket to the bike frame.

Image: Securing the quick-release bracket to the bike frame using a zip tie.
- Trim Zip Tie: Trim any excess part of the zip tie and adjust it inwards for a clean finish.

Image: Trimming the excess zip tie for a neat installation.
- Tighten Support Rod Nut: Adjust the support rod to the appropriate length and tighten the nut.

Image: Adjusting and tightening the support rod to achieve the desired fender length.
- Final Tightening: Ensure all screws at the bracket clamp and mudguard connection are securely tightened using the hex key.

Image: Final tightening of the fender's attachment points.
- Adjust Angle: Adjust the fender to the desired angle relative to your tire.
Installation Video:
Video: Detailed installation guide for the ROCKBROS Road Bike Fender, demonstrating each step from assembly to final adjustment.
4. Operating Instructions
4.1 Multi-angle Adjustment
The fender allows for multiple adjustment points to ensure optimal coverage and fit for your specific bike and tire size. You can adjust the overall angle and the mudguard angle, as well as the length of the support rod.
- Overall Angle Adjustment: Use the overall angle adjustment knob to change the main angle of the fender relative to the wheel.
- Mudguard Angle Adjustment: A separate knob allows for fine-tuning the angle of the mudguard itself.
- Adjustable Support Rod Length: The support rod can be adjusted in length from 28-32 cm to accommodate different wheel clearances.

Image: Visual guide to the various adjustment points on the fender.
Video: Demonstration of adjusting the fender's angle and support rod length for optimal positioning.
4.2 Quick Release Function
The quick-release design allows for easy removal of the fender without tools. Simply twist the silver knob on the quick-release bracket to loosen and detach the fender when not needed, for example, on sunny days.
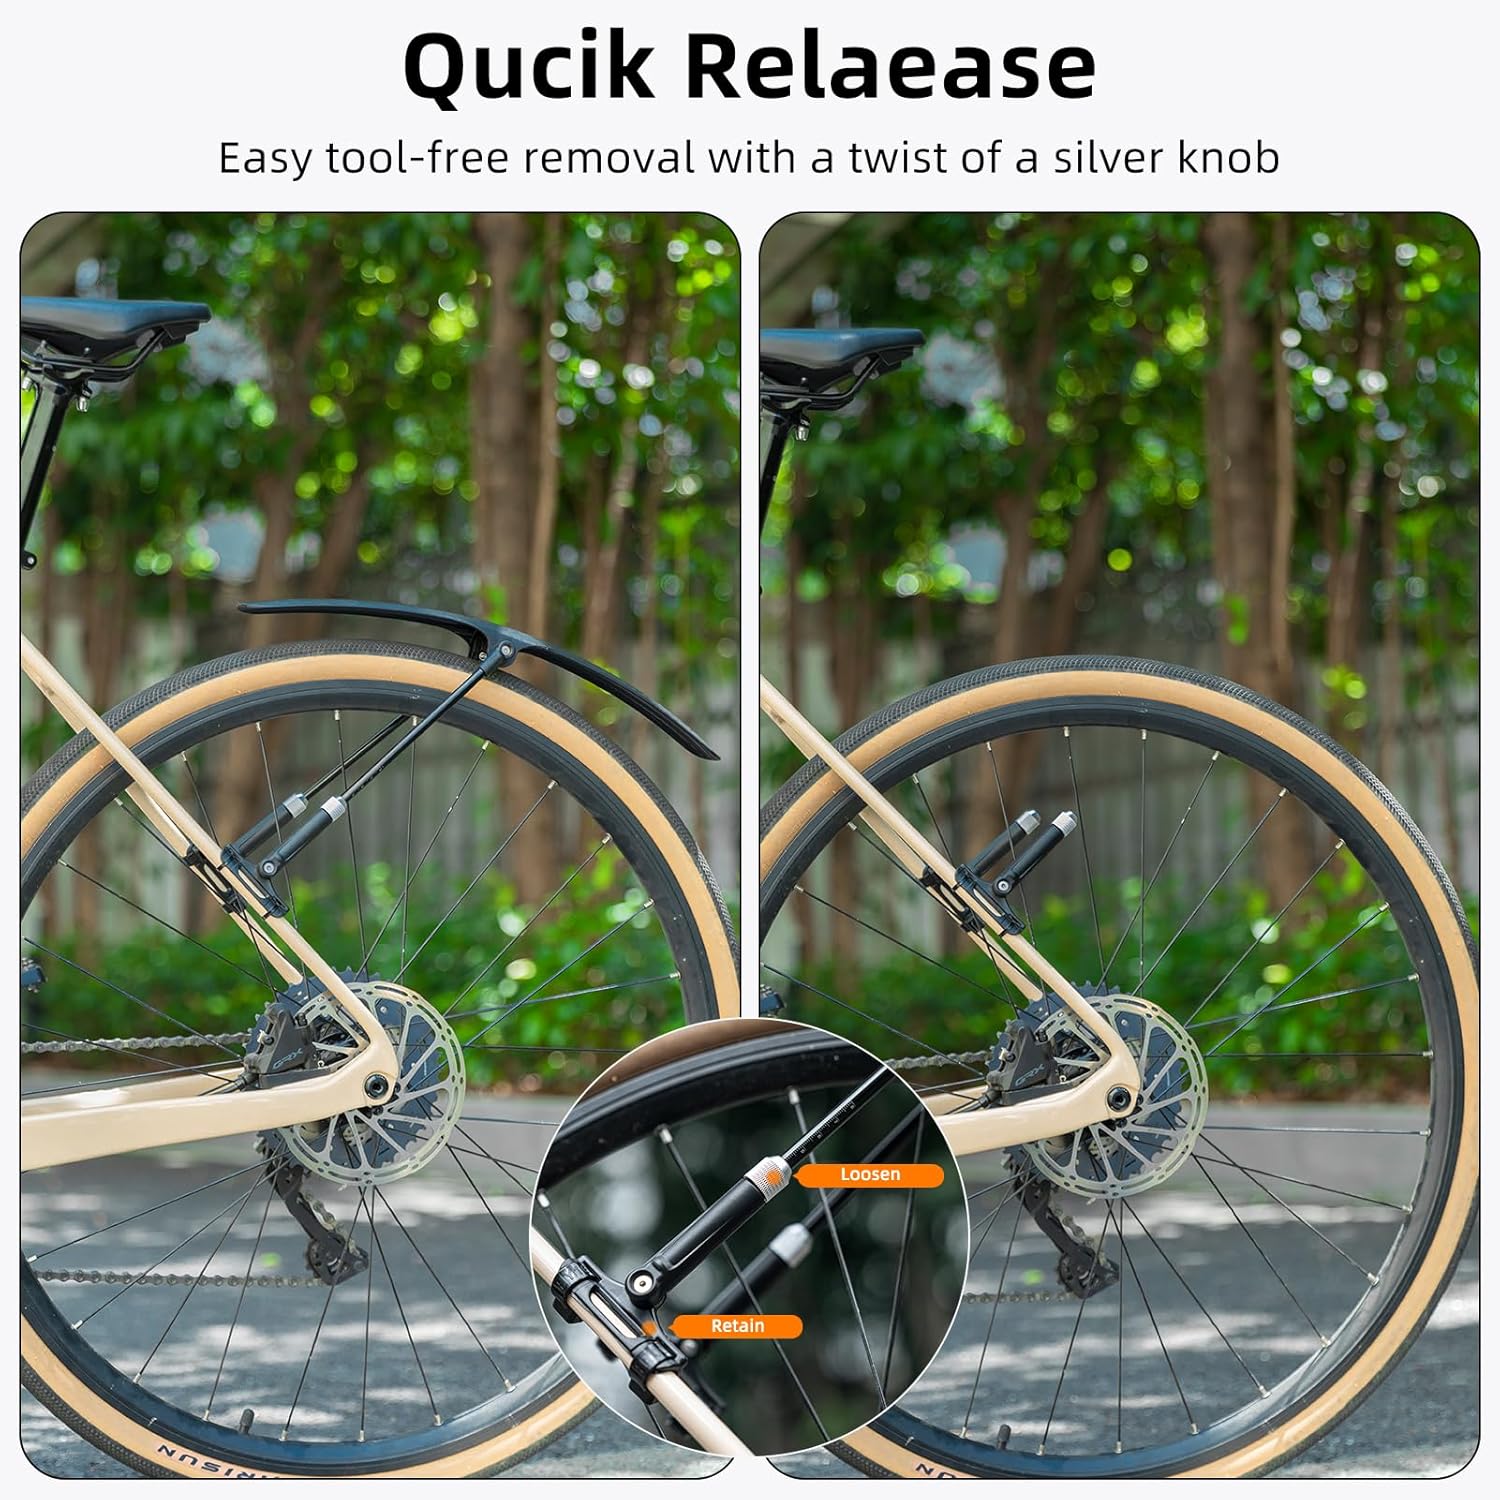
Image: Quick-release mechanism for easy fender removal.
Video: Demonstration of the quick-release feature for detaching the fender from the bike.
5. Maintenance
The ROCKBROS Road Bike Fenders are made from durable PP material, which is waterproof and dirt-resistant, making them easy to clean.
- Cleaning: Simply brush or wipe the fender with a damp cloth to remove dirt and mud.
- Inspection: Periodically check all attachment points and screws to ensure they remain tight and secure.
- Storage: When not in use, store the fenders in a clean, dry place away from direct sunlight to prolong their lifespan.

Image: Cleaning the waterproof and dirt-resistant fender.
6. Troubleshooting
If you encounter issues with your ROCKBROS Road Bike Fenders, refer to the following common solutions:
| Problem | Possible Cause | Solution |
|---|---|---|
| Fender moves or twists during riding. | Attachment screws or zip ties are not sufficiently tightened. | Ensure all screws at the bracket clamp and mudguard connection are tightened with the hex key. Verify zip ties are pulled taut and trimmed. |
| Fender does not provide adequate splash protection. | Incorrect angle or length adjustment. | Adjust the overall angle, mudguard angle, and support rod length to achieve optimal coverage for your tire. Refer to Section 4.1. |
| Difficulty with quick release mechanism. | Mechanism is jammed or not properly aligned. | Ensure the silver knob is fully twisted to the 'loosen' position. Check for any debris obstructing the mechanism. |
7. Specifications
- Material: PP (Polypropylene)
- Compatibility: Designed for 700C road bikes
- Adjustable Support Rod Length: 28-32 cm
- Item Package Dimensions (L x W x H): 17.17 x 2.83 x 1.93 inches
- Package Weight: 0.25 Kilograms
- Color: Black

Image: The fender's durable and flexible PP material.
8. Warranty and Support
ROCKBROS provides a one-year warranty service for this product. For any questions or support needs, please refer to the contact information provided with your purchase or visit the official ROCKBROS website.
For additional information or to explore other products, visit the ROCKBROS Store on Amazon.


