1. Introduction
This manual provides essential information for the safe and effective operation, setup, and maintenance of your HITBOX MIG250 180A 240V 4-in-1 Digital MIG Welder. Please read this manual thoroughly before operating the machine to ensure proper use and to prevent injury or damage.
The HITBOX MIG250 is a versatile inverter welding machine supporting multiple welding processes: MIG (Gas/Gasless), LIFT TIG, and MMA (ARC). It features advanced IGBT technology for efficient and stable welding performance.
2. Safety Instructions
WARNING: Welding can be dangerous. Always follow safety precautions to prevent serious injury or death.
- Electric Shock: Welding current can kill. Do not touch live electrical parts. Wear dry, insulating gloves and protective clothing. Ensure the workpiece is properly grounded.
- Fumes and Gases: Welding fumes and gases can be hazardous to your health. Work in a well-ventilated area. Use a fume extractor if necessary.
- Arc Rays: Arc rays can burn eyes and skin. Wear a welding helmet with appropriate shade filter and protective clothing.
- Fire and Explosion: Welding sparks and hot metal can cause fires. Keep flammable materials away from the welding area. Have a fire extinguisher readily available.
- Burns: Hot metal and equipment can cause severe burns. Wear protective gloves and clothing.
- VRD Function: The built-in VRD (Voltage Reduction Device) function enhances safety, especially during LIFT TIG welding, by reducing open-circuit voltage when not welding.
3. Package Contents
Verify that all items are present upon unpacking:
- HITBOX MIG250 Welding Machine
- MIG MB15 Torch
- Ground Clamp with Cable
- Welding Rod Holder (Electrode Holder) with Cable
- Aluminum Liner
- Gas Hose
- Hose Band
- Wire Feed Wheel (0.6-0.8mm channel)
- Wire Feed Wheel (0.8-1.0mm channel)
- MIG Nozzles (2x)
- Headbands (2x) - Note: This might be a translation error, likely referring to contact tips or similar small parts.
- Pipe - Note: This might be a translation error, likely referring to a gas pipe or similar.
4. Product Overview
Familiarize yourself with the main components and controls of the MIG250 welder.
4.1 Front Panel Controls and Indicators

Image: Front panel of the HITBOX MIG250 welder. It displays digital readouts for voltage and current, control knobs for voltage, current, standard/inductance, and 2T/4T mode selection. Output terminals for MIG torch, solid core wire, and flux core wire are visible.
- Digital Display: Shows welding voltage and current settings.
- Mode Button: Selects welding process (MIG MIX, MIG CO2, FLUX CORED, LIFT TIG, MMA).
- Voltage Knob: Adjusts welding voltage.
- Current Knob: Adjusts welding current.
- Standard/Inductance Knob: Adjusts inductance for MIG welding, affecting arc width and penetration.
- 2T/4T Switch: Selects trigger mode for MIG welding.
- MIG Torch Output: Connection point for the MIG torch.
- Solid Core Gas MIG Welding Terminal: Positive (+) terminal for solid wire MIG with gas.
- Flux Core Gasless MIG Welding Terminal: Negative (-) terminal for flux cored wire MIG without gas.
4.2 Rear Panel Features
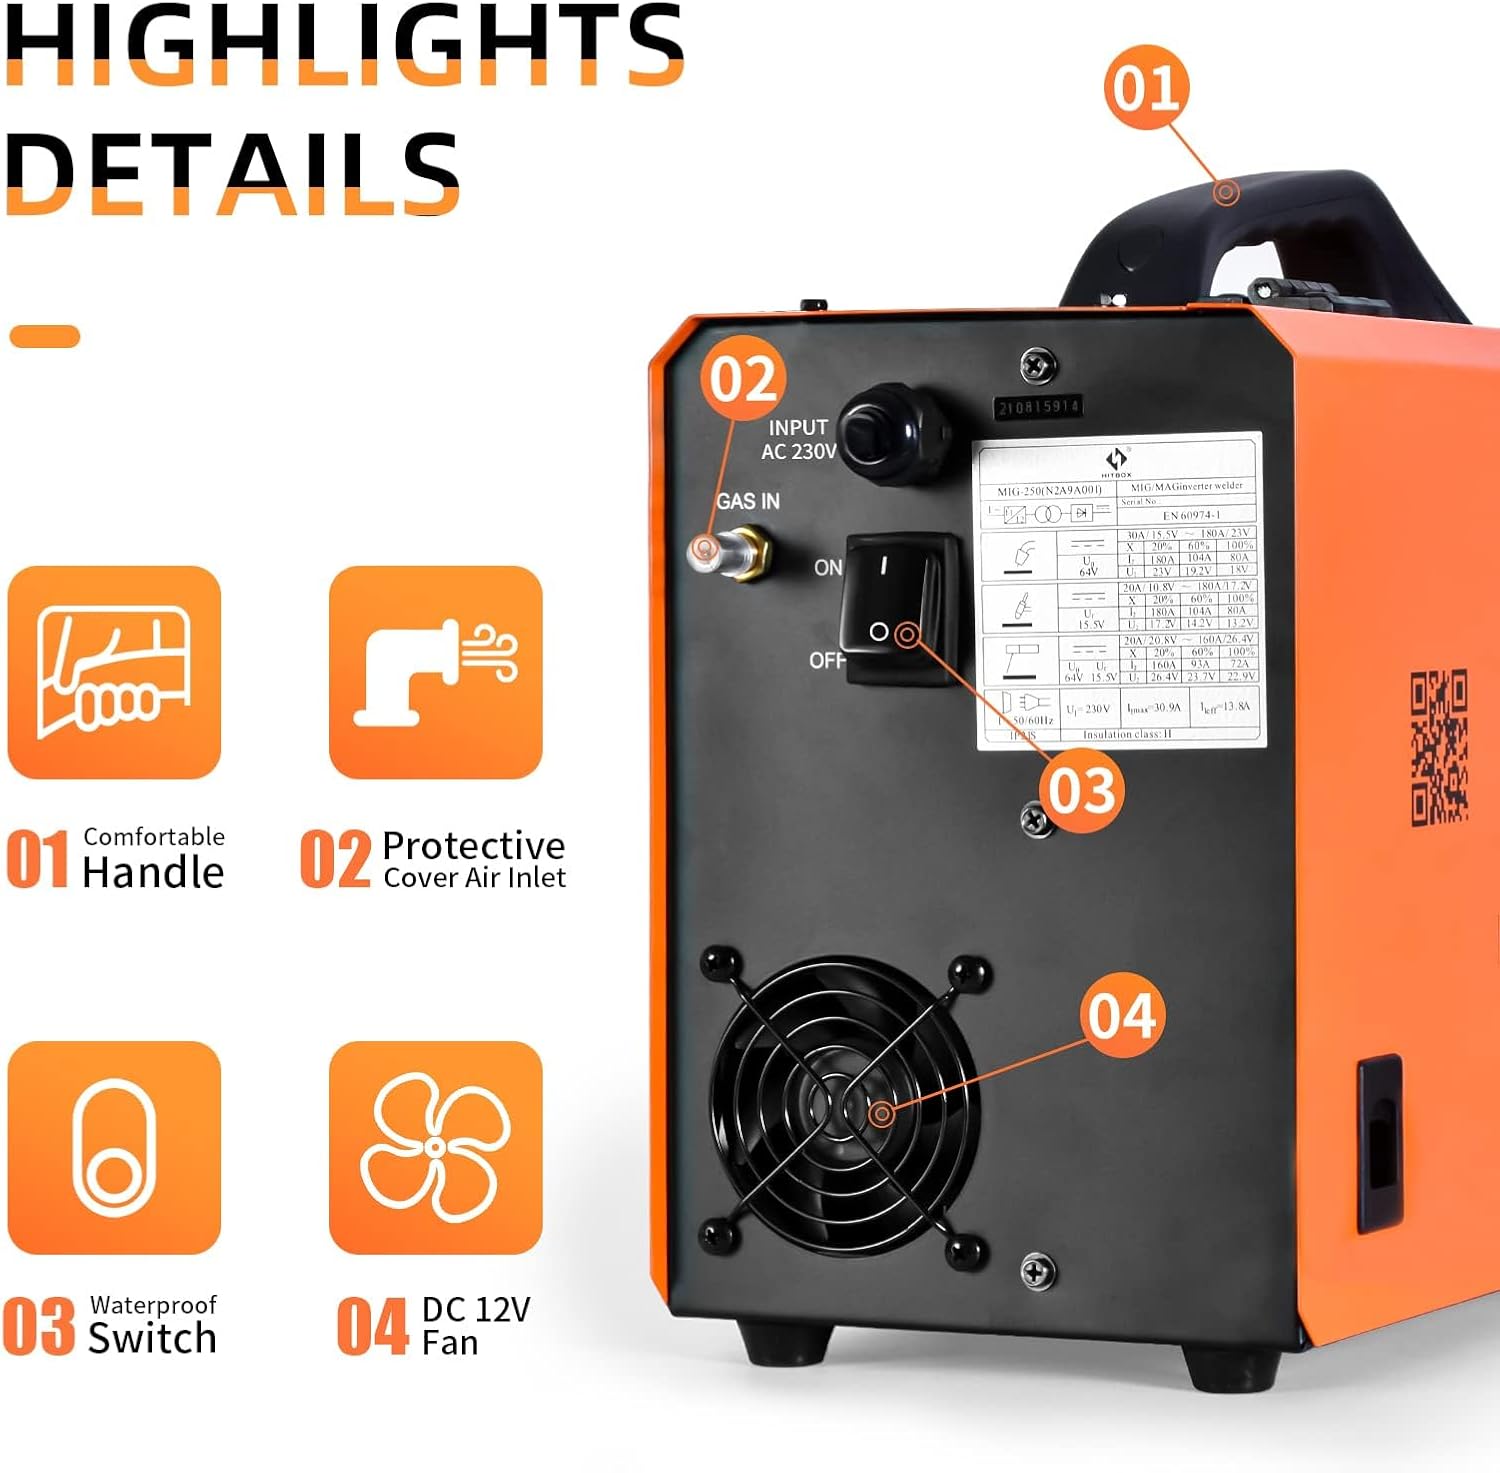
Image: Rear panel of the HITBOX MIG250 welder. Key features include the AC power input, gas inlet, waterproof power switch, and a DC 12V cooling fan. A comfortable handle is visible on top.
- AC Input: Power connection point (240V).
- Gas Inlet: Connection for shielding gas hose (for MIG Gas welding).
- Power Switch: Main ON/OFF switch.
- Cooling Fan: Ensures proper cooling during operation.
5. Setup
5.1 Power Connection
- Ensure the power switch on the rear panel is in the OFF position.
- Connect the power cord to a suitable 240V power outlet.
5.2 Wire Spool Installation
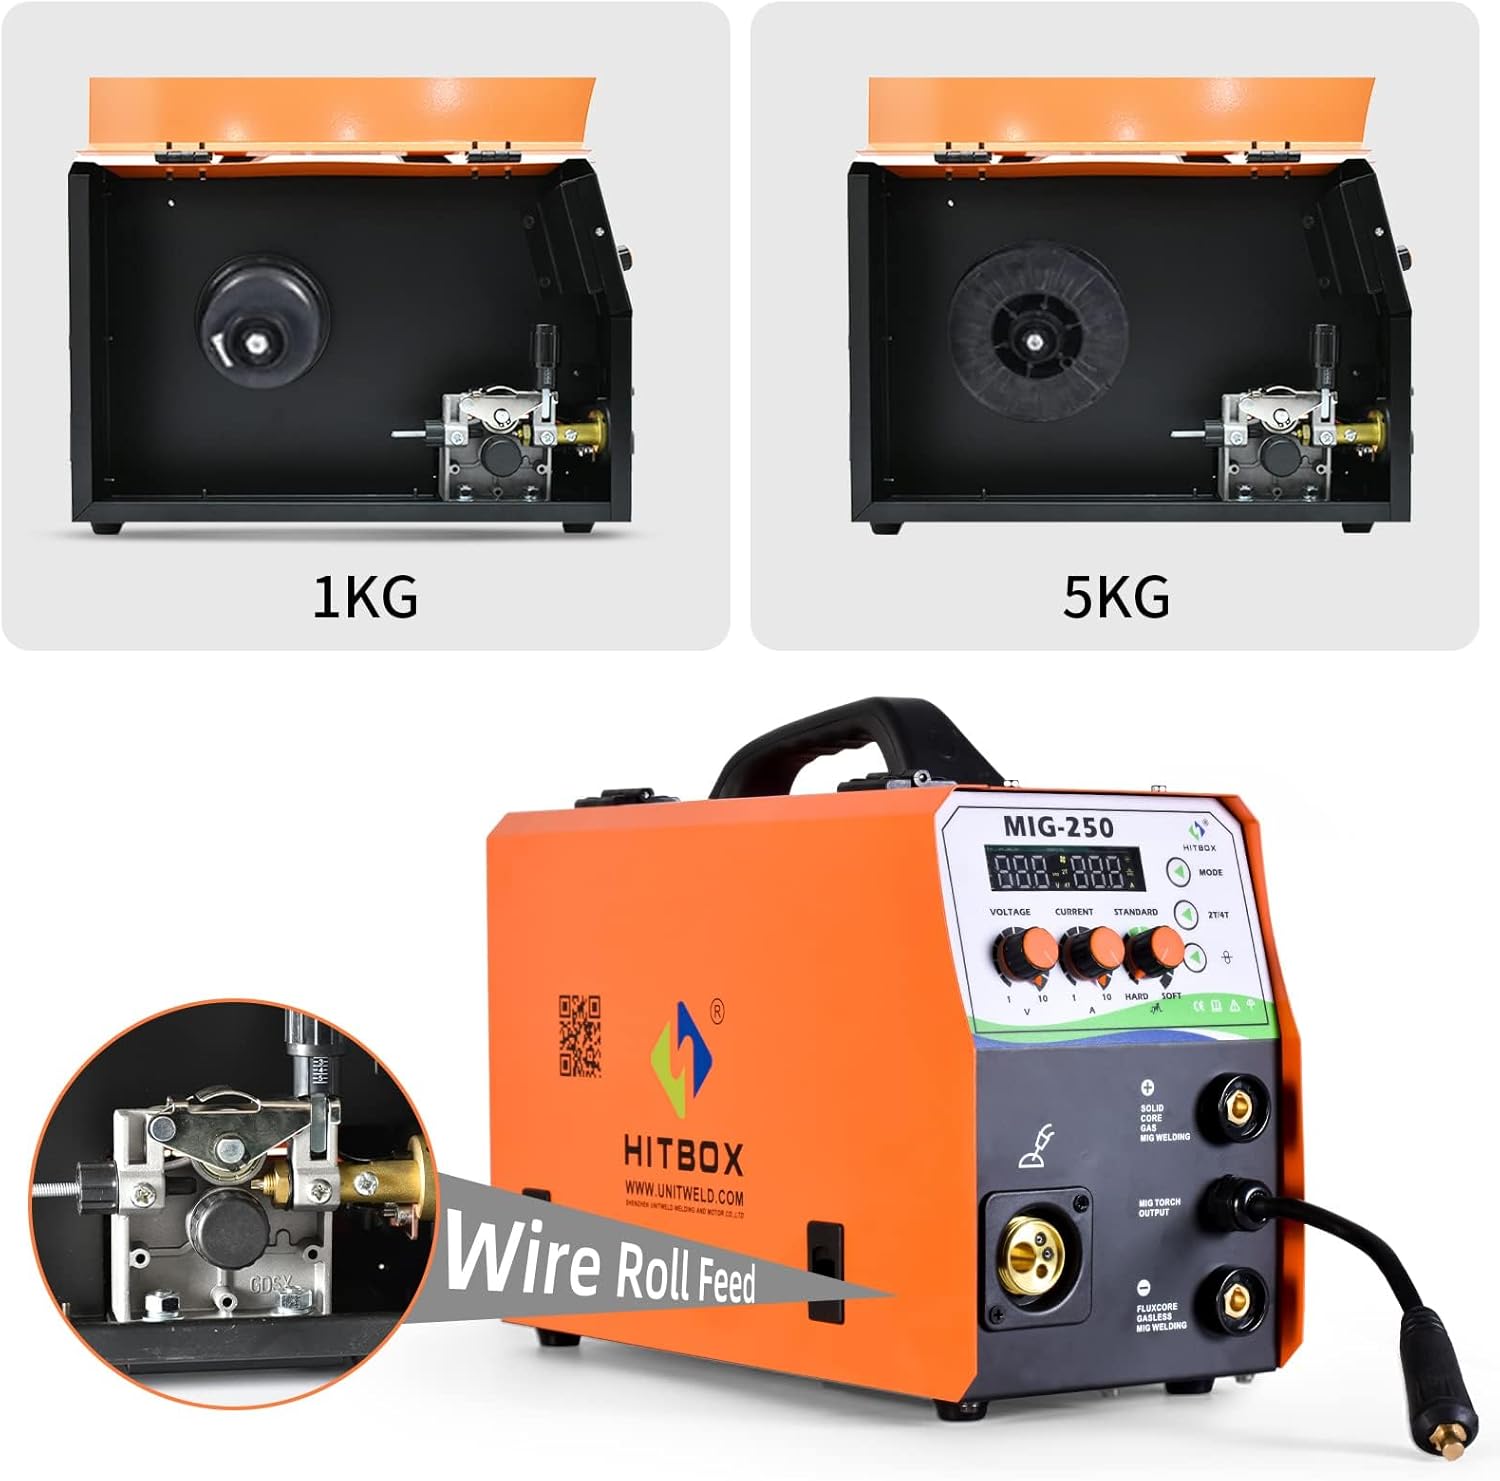
Image: Internal view of the HITBOX MIG250 welder, illustrating the wire spool compartments designed to accommodate both 1KG and 5KG wire spools. A detailed view of the wire feed roller mechanism is also shown.
- Open the wire spool compartment cover.
- Place the wire spool (1KG or 5KG, 0.6-1.0mm diameter) onto the spindle.
- Thread the welding wire through the wire feed mechanism, ensuring it passes through the correct groove on the wire feed roller (match roller groove to wire diameter).
- Close the wire feed roller pressure arm.
- Ensure the MIG torch is connected and the nozzle is removed. Feed the wire through the torch liner by pressing the trigger until it emerges from the torch end.
5.3 Connecting Welding Accessories
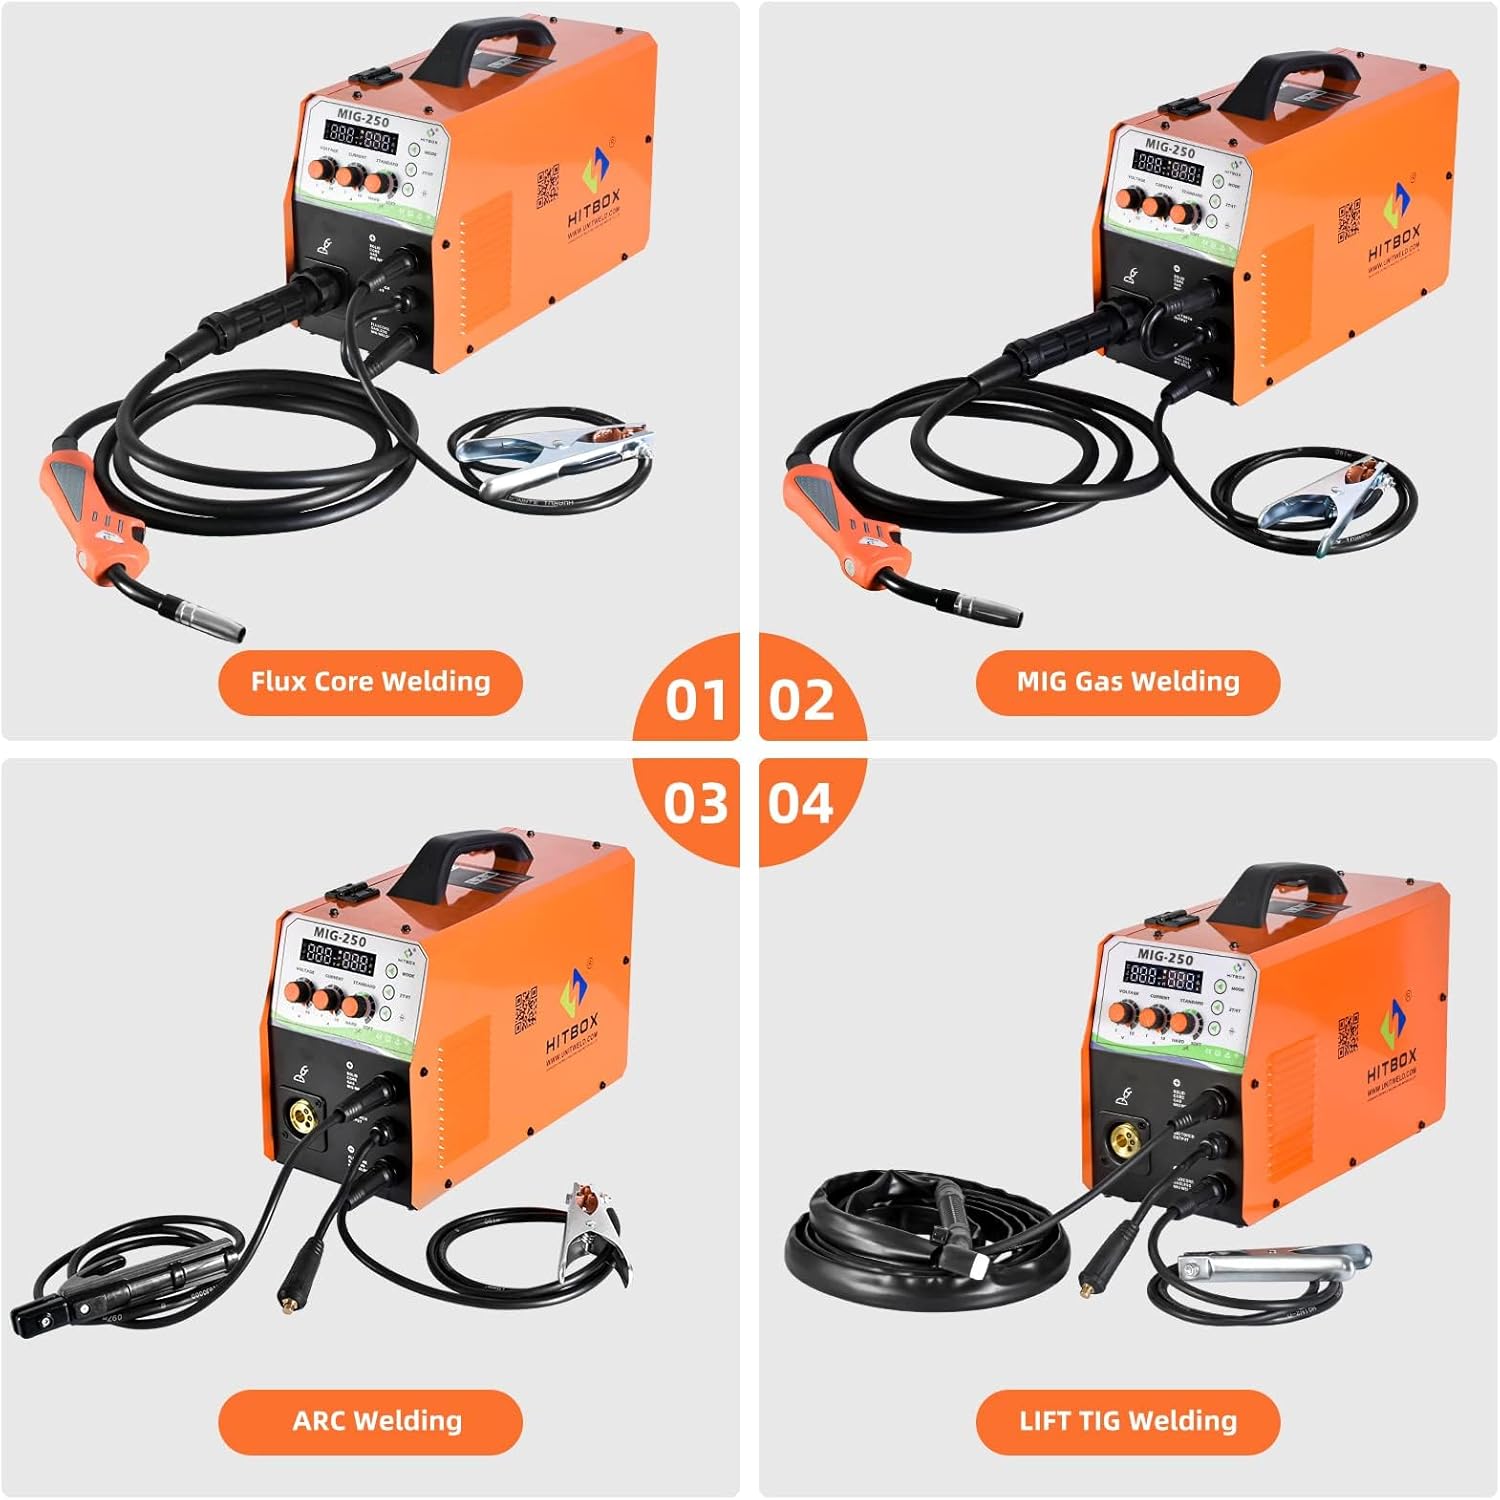
Image: This composite image illustrates four distinct welding configurations with the HITBOX MIG250. From top-left to bottom-right: Flux Core Welding setup, MIG Gas Welding setup, ARC Welding setup, and LIFT TIG Welding setup, showing the appropriate cable and torch connections for each mode.
- MIG Welding (Gasless Flux Cored): Connect the MIG torch to the MIG Torch Output. Connect the ground clamp to the positive (+) terminal.
- MIG Welding (Gas Shielded): Connect the MIG torch to the MIG Torch Output. Connect the ground clamp to the negative (-) terminal. Connect the gas hose from your shielding gas cylinder to the gas inlet on the rear panel.
- MMA (ARC) Welding: Connect the electrode holder to the positive (+) terminal. Connect the ground clamp to the negative (-) terminal.
- LIFT TIG Welding: Connect the TIG torch (not included) to the negative (-) terminal. Connect the ground clamp to the positive (+) terminal.
6. Operating Instructions
6.1 General Operation Steps
- Ensure all connections are secure and correct for the desired welding process.
- Turn on the power switch.
- Select the welding mode using the Mode button.
- Adjust welding parameters (Voltage, Current, Inductance) according to the material thickness and wire/electrode type.
- Begin welding, always wearing appropriate personal protective equipment (PPE).
6.2 MIG Welding (Gas/Gasless)
The MIG250 supports both gas-shielded MIG (MIG CO2/MIX) and gasless flux-cored MIG welding.
- Wire Compatibility: Suitable for 0.6mm, 0.8mm, 0.9mm, 1.0mm solid wire and flux-cored wire.
- One-Knob Technology: For beginners, the unitary synergy technology automatically matches voltage and inductance based on wire feed speed.
- Advanced Adjustment: Skilled welders can fine-tune voltage and inductance for precise control over the melt pool.
- 2T/4T Function:
- 2T (Two-Touch): Press and hold the trigger to weld, release to stop.
- 4T (Four-Touch): Press and release to start welding, press and release again to stop. Ideal for long welding passes.
6.3 LIFT TIG Welding
The LIFT TIG function provides a stable arc start without high-frequency interference.
- Ensure TIG torch and ground clamp are connected as per Section 5.3.
- Select LIFT TIG mode.
- Touch the tungsten electrode to the workpiece, then lift it slightly to initiate the arc.
- The VRD light will illuminate during LIFT TIG to prevent tungsten sticking.
6.4 MMA (ARC) Welding
Supports welding with various electrode types.
- Ensure electrode holder and ground clamp are connected as per Section 5.3.
- Suitable for 1.6mm to 4.0mm electrodes (e.g., 6013, 7018).
- Features Hot Start, Anti-Stick, and Arc Force stabilization for improved arc performance.
- VRD is active by default in ARC mode, even if the indicator light is not on.
7. Maintenance
Regular maintenance ensures optimal performance and extends the lifespan of your welding machine.
- Cleaning: Periodically clean the machine's exterior and internal components (using compressed air) to remove dust and metal particles. Ensure the machine is unplugged before cleaning.
- Wire Feed Mechanism: Inspect the wire feed rollers and liner for wear or blockages. Clean or replace as needed.
- Cables and Connections: Check all cables, torches, and clamps for damage. Replace any worn or damaged parts immediately.
- Cooling Fan: Ensure the cooling fan is free from obstructions and operating correctly.
8. Troubleshooting
This section addresses common issues you might encounter. For problems not listed here, contact customer support.
| Problem | Possible Cause | Solution |
|---|---|---|
| No power to the machine. | Power switch off, power cord disconnected, circuit breaker tripped. | Check power switch, ensure cord is plugged in, reset circuit breaker. |
| No arc or weak arc. | Improper ground connection, incorrect settings, worn consumables, wrong polarity. | Ensure good ground connection, adjust current/voltage, replace contact tip/electrode, check polarity for MIG mode. |
| Wire feed issues (MIG). | Incorrect wire feed roller, clogged liner, tangled wire, insufficient tension. | Match roller to wire diameter, clean/replace liner, untangle wire, adjust tension. |
| Overheating protection activated. | Exceeded duty cycle, poor ventilation. | Allow machine to cool down, ensure adequate airflow around the unit. |
9. Specifications
| Parameter | Value |
|---|---|
| Model | MIG250 |
| Rated Input Power | 5.9 KW |
| Rated Input Current | 26.2 A |
| Input Voltage | 240 Volts |
| Welding Current Range (MMA) | 30-180 A |
| Welding Current Range (TIG) | 20-180 A |
| Welding Current Range (MIG) | 30-180 A |
| Welding Voltage Range (MIG) | 11-26 V |
| Overall Efficiency | 75% |
| Enclosure Class | IP21S |
| Insulation Class | H |
| Suitable Wire Diameter (MIG) | 0.6 / 0.8 / 0.9 / 1.0 mm |
| Suitable Electrode Diameter (MMA) | 1.6 - 4.0 mm |
| Wire Spool Capacity | 1KG / 5KG |
| Dimensions (L x W x H) | 50 x 26 x 45 cm (19.7 x 10.2 x 17.7 inches) |
| Item Weight | 12.7 Kilograms (28 lbs) |
| Material | Stainless Steel |
| Manufacturer | Shenzhen Unitweld Welding and Motor Co., Ltd. |

Image: Dimensions of the HITBOX MIG250 welder, indicating a length of 15.7 inches (40 cm), a width of 7.8 inches (20 cm), and a height of 11 inches (28 cm).
10. Warranty and Support
The HITBOX MIG250 welding machine comes with a 2-year warranty from the date of purchase.
For any issues, questions, or technical support, please contact HITBOX customer service. Our 24-hour online customer service team is available to assist you.
Manufacturer Website: www.unitweld.com


