
1. Safety Information
Please read and understand all instructions before beginning assembly and use. Failure to follow these instructions may result in injury or damage to the product.
- Keep all small parts and packaging materials away from children.
- Assemble the bed on a soft, clean surface to prevent scratches.
- Ensure all bolts and screws are securely tightened before use. Periodically check and re-tighten as necessary.
- Do not stand on the bed frame or hydraulic lift mechanism.
- Use caution when operating the hydraulic lift system. Keep hands and fingers clear of moving parts.
- Do not exceed the maximum weight capacity of 600 lbs.
- Only use the recommended mattress thickness of 10 inches.
- Unplug the LED and USB power cords before cleaning or moving the bed.
2. Package Contents
Verify that all components are present before assembly. If any parts are missing or damaged, contact customer support.
- Headboard (Tufted PU Upholstered)
- Footboard (Tufted PU Upholstered with LED strip)
- Side Rails (PU Upholstered)
- Hydraulic Lift Mechanism (2 units)
- Bed Slats (Plywood, 24 pieces)
- Center Support Beam
- Hardware Pack (bolts, screws, washers, Allen wrench)
- LED Light Strip and Controller
- USB Charging Port Assembly
- Fabric Base for Storage Area
- Instruction Manual

Image: Overview of bed components before assembly.
3. Setup and Assembly Instructions
Assembly typically requires two adults. Estimated assembly time: 1-2 hours. Tools required: Included Allen wrench, Phillips head screwdriver (not included).
3.1 Unpacking and Preparation
- Clear a spacious area for assembly.
- Carefully unpack all boxes and lay out components on a soft surface to prevent damage.
- Identify all parts against the package contents list.
3.2 Frame Assembly
- Attach the side rails to the headboard and footboard using the provided bolts and washers. Do not fully tighten bolts until the entire frame is assembled.
- Insert the center support beam into the designated slots on the headboard and footboard.
- Once the main frame is loosely assembled, gently tighten all bolts.
3.3 Hydraulic Lift Mechanism Installation
- Attach the hydraulic lift mechanisms to the side rails and the bed frame according to the diagrams. Ensure they are oriented correctly.
- Securely fasten all bolts for the hydraulic system.
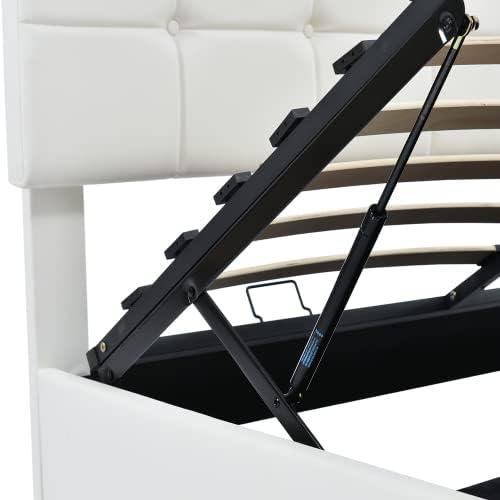
Image: Detailed view of the hydraulic lift mechanism.
3.4 Slat Installation
- Place the plywood bed slats evenly across the frame.
- Secure the slats using the provided fasteners. Ensure all 24 slats are properly installed for optimal mattress support.

Image: Bed frame with all slats in place.
3.5 LED and USB Connection
- Connect the LED light strip to its controller and power adapter.
- Connect the USB charging port assembly to its power source.
- Route the power cords neatly and plug them into a suitable wall outlet.
4. Operating Instructions
4.1 Hydraulic Lift Storage System
The hydraulic lift system allows easy access to under-bed storage.
- To Open: Remove the mattress from the bed. Grasp the handle or edge of the bed frame at the footboard and lift upwards. The hydraulic pistons will assist in raising the frame.
- To Close: Gently push the bed frame downwards until it fully closes. Ensure no objects or body parts are in the way.
- Note: The hydraulic system is designed to work with a mattress in place. It may be difficult to lower the frame without the weight of a mattress.

Image: Bed frame with the hydraulic storage compartment open.
4.2 LED Lighting System
The integrated LED lighting system offers various customization options.
- Control: The LED lights can be controlled via a remote control (if included) or a smartphone application (iOS/Android). Refer to the separate LED controller manual for specific app download and pairing instructions.
- Functions:
- Color Selection: Choose from 16 colors.
- Brightness Adjustment: Adjust light intensity.
- Timing Settings: Set schedules for lights to turn on/off.
- Dynamic Modes: Strobe, Gradient, Jump effects at various speeds.
- Music/Game Sync: Lights can synchronize with music or game audio (via app).

Image: Bed with LED lights and a smartphone displaying the control app.
4.3 USB Charging Port
A USB charging port is located on the headboard for convenient device charging.
- Ensure the bed's power cord is plugged into a wall outlet.
- Connect your USB charging cable to the port on the headboard and to your device.
5. Maintenance
- Cleaning: Wipe the upholstered surfaces with a damp cloth. For stubborn stains, use a mild upholstery cleaner and follow the product instructions. Avoid harsh chemicals or abrasive cleaners.
- Hardware: Periodically check all bolts and screws to ensure they remain tight. Re-tighten as needed to maintain stability and prevent squeaking.
- Hydraulic System: The hydraulic pistons are generally maintenance-free. If you notice any issues with lifting or lowering, refer to the troubleshooting section. Do not attempt to lubricate the pistons.
- Electrical Components: Keep the LED light strip and USB port free from dust. Ensure power cords are not pinched or damaged.
6. Troubleshooting
| Problem | Possible Cause | Solution |
|---|---|---|
| Bed is squeaking. | Loose hardware. | Check and tighten all bolts and screws on the frame and slats. |
| LED lights are not working. | Power cord unplugged, faulty connection, remote/app issue. | Ensure power cord is securely plugged in. Check connections between LED strip, controller, and power adapter. Replace batteries in remote or re-pair app if applicable. |
| USB charging port is not working. | Bed power cord unplugged, faulty connection. | Ensure the bed's main power cord is plugged in. Check the connection of the USB port assembly. |
| Hydraulic lift is difficult to open/close. | No mattress weight (difficult to close), mechanism obstruction, faulty piston. | Ensure mattress is on the bed when closing. Check for obstructions. If a piston is faulty, contact support. |
7. Specifications
| Product Type | Upholstered Platform Bed with Storage |
| Model Number | 05 |
| Size | Queen |
| Overall Dimensions (L x W x H) | 83" x 64.9" x 44" |
| Material | MDF, Plywood, PU Leather, Engineered Wood |
| Color | White + PU |
| Weight Capacity | 600 lbs |
| Recommended Mattress Thickness | 10 inches |
| Box Spring Required | No |
| Number of Slats | 24 |
| Hydraulic Storage Height | 11.4 inches |
| LED Power Cord Length | 1.2 meters |
| USB Power Cord Length | 1.4 meters |
| Assembly Required | Yes |

Image: Dimensional diagram of the Anwick Queen Lift Up Storage Bed.
8. Warranty and Support
8.1 Product Warranty
This Anwick product is covered by a one-year limited warranty from the date of purchase. This warranty covers manufacturing defects in materials and workmanship under normal use. It does not cover damage resulting from improper assembly, misuse, abuse, accidents, or normal wear and tear.
To make a warranty claim, please retain your proof of purchase.
8.2 Customer Support
For assistance with assembly, missing parts, warranty claims, or any other inquiries, please contact Anwick customer support:
- Email: support@anwick.com
- Phone: 1-800-XXX-XXXX
- Website: www.anwick.com/support
Please have your model number (05) and proof of purchase ready when contacting support.