Introduction
Thank you for choosing the GEARSTONE Foldable Magnetic Exercise Bike. This manual provides essential information for the safe assembly, operation, and maintenance of your exercise bike. Please read this manual thoroughly before use and keep it for future reference.
Important Safety Information
- Consult your physician before starting any exercise program.
- Always warm up before exercising and cool down afterwards.
- Ensure all bolts and nuts are securely tightened before each use.
- Place the exercise bike on a flat, stable surface.
- Keep children and pets away from the equipment during use.
- The maximum user weight capacity for this bike is 120 kg (264 lbs).
- Stop exercising immediately if you feel faint, dizzy, or experience pain.
- Wear appropriate exercise clothing and footwear.
Package Contents
Carefully unpack the box and ensure all parts are present. Refer to the diagram below for a visual representation of the components.

Figure 1: Package Contents. This image displays the various components and tools included with your exercise bike, such as the main frame, pedals, seat, backrest, and assembly tools.
The package should include:
- Main Frame Assembly
- Left and Right Pedals
- Seat and Backrest
- Handlebar with LCD Monitor
- Stabilizer Bars (Front and Rear)
- Hardware Kit (bolts, nuts, washers)
- Assembly Tools (wrench, Allen key)
- User Manual
Setup and Assembly
Follow these steps to assemble your GEARSTONE Foldable Magnetic Exercise Bike. It is recommended to have two people for assembly.
- Attach Stabilizer Bars: Secure the front and rear stabilizer bars to the main frame using the provided bolts and nuts. Ensure they are firmly tightened for stability.
- Install Pedals: Identify the left (L) and right (R) pedals. The left pedal screws counter-clockwise, and the right pedal screws clockwise. Thread them into the crank arms and tighten securely.
- Mount Seat and Backrest: Insert the seat post into the main frame and adjust to your desired height. Secure it with the locking pin. Attach the backrest to the seat support.
- Attach Handlebar and Monitor: Connect the handlebar assembly to the main frame. Ensure all cables for the LCD monitor and pulse sensors are properly connected. Secure the handlebar with the designated bolts.
- Final Check: Before first use, double-check all connections and ensure all bolts and nuts are tightened.

Figure 2: Assembly Steps. This diagram illustrates the key stages of assembling the exercise bike, from attaching the base supports to installing the seat and pedals.
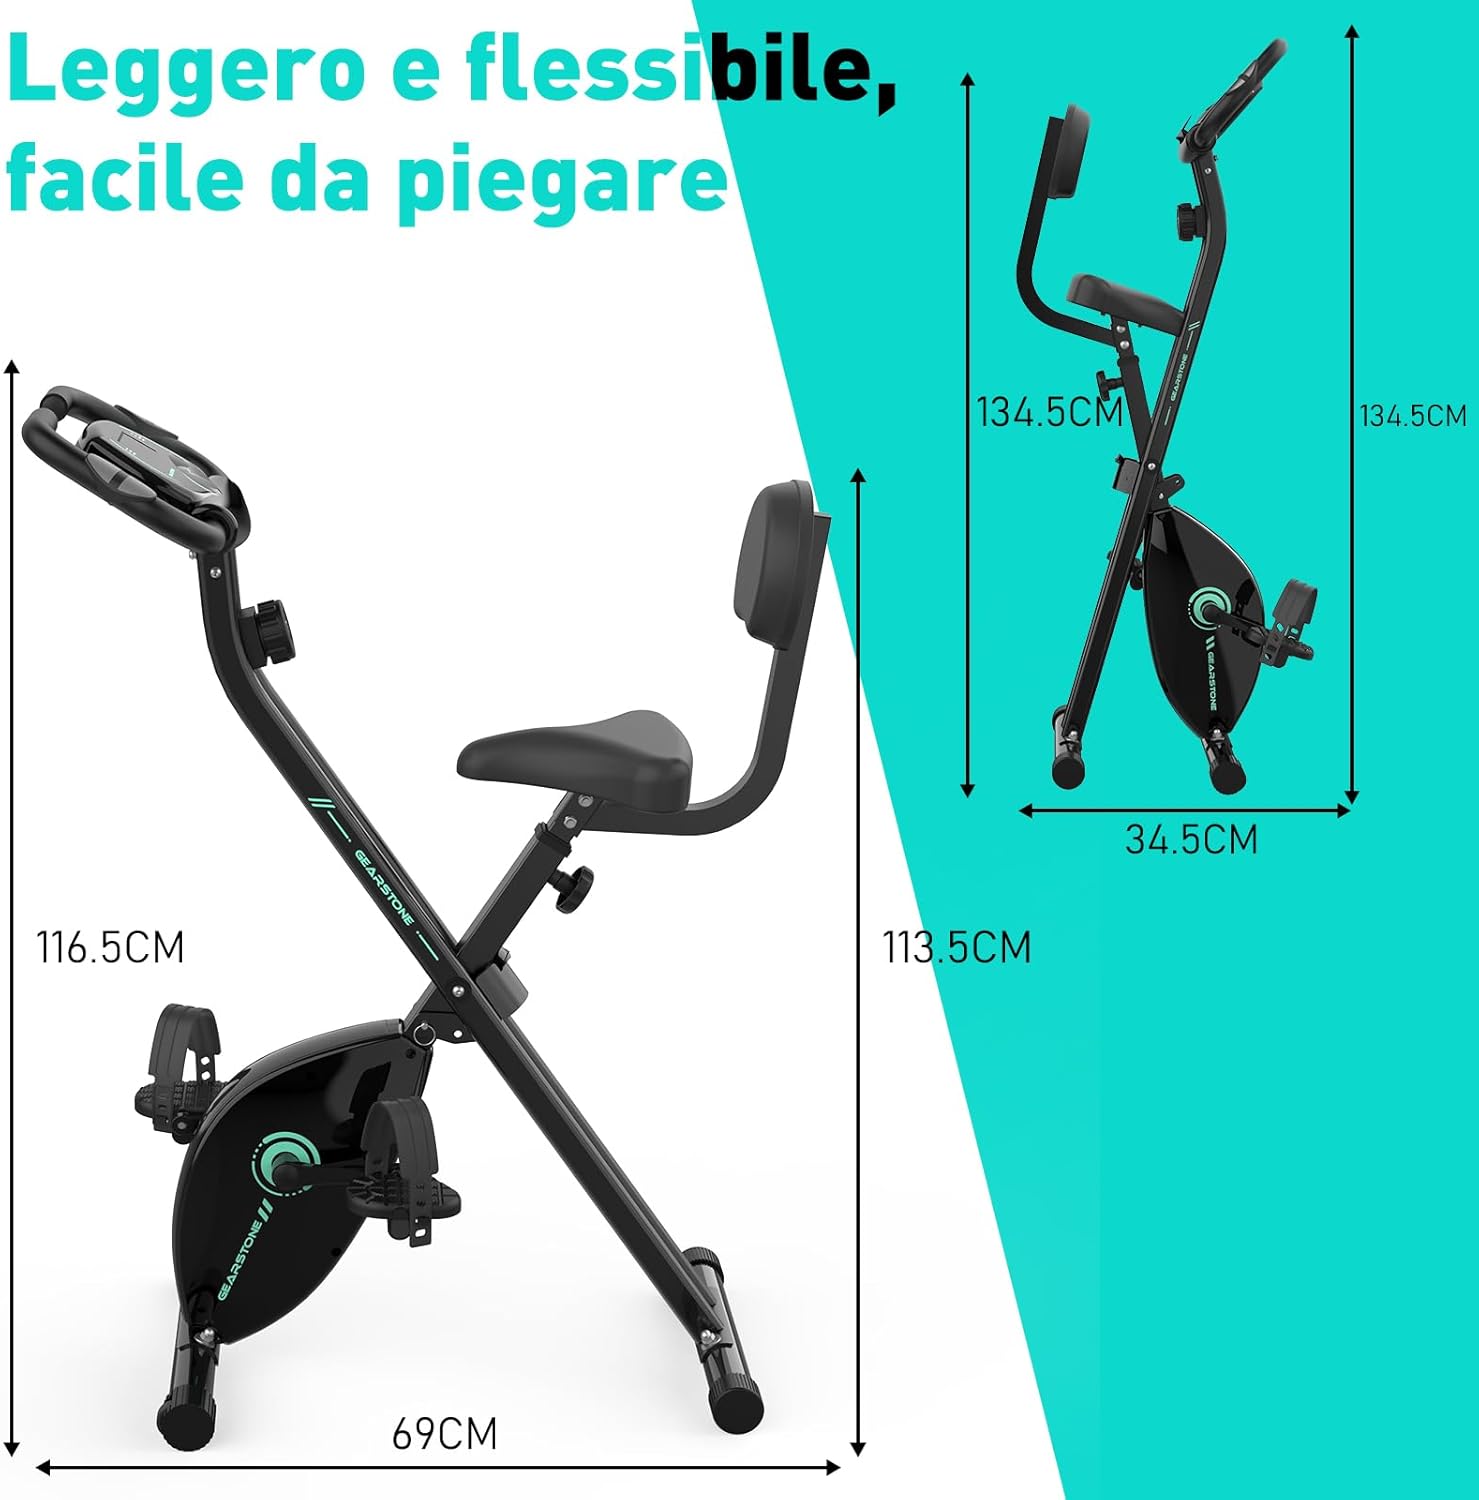
Figure 3: Assembled Bike Dimensions. This image shows the fully assembled exercise bike with its dimensions, highlighting its compact and foldable nature.
Operating Instructions
Adjusting Seat Height
The seat height can be adjusted to five different levels to accommodate various user heights. Loosen the adjustment knob located on the seat post, slide the seat to the desired height, and then tighten the knob securely. Ensure your knees have a slight bend at the bottom of the pedal stroke.

Figure 4: Seat and Resistance Adjustment. This image highlights the knob for adjusting magnetic resistance and the mechanism for adjusting seat height.
Adjusting Resistance
The bike features 8 levels of magnetic resistance. Turn the resistance knob, located below the LCD monitor, clockwise to increase resistance and counter-clockwise to decrease it. Start with a lower resistance and gradually increase as your fitness improves.
Using the LCD Monitor
The LCD monitor displays key workout data. It is battery-powered. The monitor automatically turns on when you start pedaling or press a button.
- SCAN: Automatically cycles through all display functions every few seconds.
- TIME: Displays the duration of your workout.
- SPEED: Shows your current cycling speed.
- DISTANCE: Displays the distance covered during your current workout.
- CALORIES: Estimates the calories burned during your workout.
- ODOMETER (ODO): Displays the total accumulated distance.
- PULSE: Shows your heart rate when holding the pulse sensors on the handlebars.
To reset the monitor, press and hold the button for a few seconds, or remove and reinsert the batteries.

Figure 5: LCD Monitor Display. This image provides a detailed view of the LCD monitor and its various data display functions.

Figure 6: Resistance Control and Monitor Interaction. This image illustrates how to adjust the resistance level and interact with the LCD monitor's buttons.
Using the Phone Holder
A phone holder is integrated into the LCD monitor panel. Place your smartphone or tablet securely in the holder to enjoy videos or music during your workout.
Folding the Bike for Storage
To fold the bike, loosen the main folding knob (usually located near the base of the frame). Carefully fold the frame inwards until it locks into its compact position. This design allows for easy storage and space-saving.
Maintenance
- Cleaning: Wipe down the bike with a damp cloth after each use to remove sweat and dust. Do not use abrasive cleaners.
- Inspection: Regularly inspect all bolts, nuts, and moving parts for tightness and wear. Tighten any loose fasteners.
- Lubrication: The magnetic resistance system and belt drive are generally maintenance-free. Do not lubricate internal components unless specifically instructed by customer support.
- Storage: Store the bike in a cool, dry place away from direct sunlight and extreme temperatures.
- Battery Replacement: Replace the LCD monitor batteries when the display becomes dim or unresponsive.
Troubleshooting
| Problem | Possible Cause | Solution |
|---|---|---|
| No display on LCD monitor | Batteries are dead or incorrectly installed. | Replace batteries or ensure they are installed with correct polarity. |
| Inaccurate pulse reading | Hands not firmly on sensors; sensors are dirty. | Ensure firm contact with both pulse sensors. Clean sensors with a dry cloth. |
| Bike is unstable or wobbles | Loose bolts; uneven surface. | Check and tighten all assembly bolts. Move the bike to a flat, level surface. |
| Resistance not changing | Resistance cable disconnected or damaged. | Inspect the resistance cable connection. If damaged, contact customer support. |
| Unusual noise during operation | Loose parts; friction from moving components. | Check all bolts and nuts for tightness. Ensure no foreign objects are caught in moving parts. If noise persists, contact customer support. |
Specifications
| Feature | Detail |
|---|---|
| Model Name | cyclette pieghevole |
| Brand | GEARSTONE |
| Resistance Mechanism | Magnetic |
| Resistance Levels | 8 adjustable levels |
| Drive System | Belt |
| Main Material | Steel, Metal, Foam/Leather |
| Maximum Weight Capacity | 120 Kilograms (264 lbs) |
| Product Dimensions (L x W x H) | 69 x 39 x 116.5 cm (27.2 x 15.4 x 45.9 inches) |
| Item Weight | 15.6 Kilograms (34.4 lbs) |
| Power Source (Monitor) | Battery Powered (Batteries not included) |
| Special Features | Foldable design, LCD monitor, Pulse sensors, Phone holder, Adjustable seat (5 levels) |
Warranty and Support
GEARSTONE provides a one-year warranty for this product from the date of purchase. This warranty covers manufacturing defects and material faults under normal use.
If you encounter any issues with your exercise bike or have questions regarding its operation or maintenance, please do not hesitate to contact our customer support team. Provide your purchase details and a description of the issue for prompt assistance.
Contact Support: Please refer to your purchase documentation or the retailer's website for the most up-to-date contact information (e.g., email address or support portal).
Additional Information
For more information about GEARSTONE products and fitness tips, visit our official website or social media channels.


