
1. Important Safety Instructions
Read all safety warnings and instructions before operating this paint sprayer. Failure to follow the warnings and instructions may result in electric shock, fire, and/or serious injury.
- Work Area Safety: Keep the work area clean and well-lit. Cluttered or dark areas invite accidents. Do not operate power tools in explosive atmospheres, such as in the presence of flammable liquids, gases, or dust.
- Personal Safety: Always wear eye protection (safety glasses or goggles), respiratory protection (mask or respirator), and protective gloves when operating the paint sprayer. Avoid wearing loose clothing or jewelry.
- Electrical Safety: This is a cordless tool. Ensure the battery is securely attached before operation and removed during cleaning or maintenance. Use only compatible batteries as specified.
- Product Use and Care: Do not force the paint sprayer. Use the correct paint sprayer for your application. Do not use the sprayer if the switch does not turn it on and off. Disconnect the battery pack before making any adjustments, changing accessories, or storing power tools.
- Paint Safety: Always refer to the paint manufacturer's safety data sheet (SDS) for specific handling, ventilation, and disposal instructions. Ensure adequate ventilation when spraying.
2. Package Contents
Verify that all items are present in your package:
- 1 x YEX-BUR Cordless Paint Sprayer
- 1 x 1000ml Spray Container
- 4 x Copper Nozzles (1.0mm, 1.8mm, 2.5mm, 3.0mm)
- 6 x Paint Filters
- 1 x Viscosity Cup
- 1 x Nozzle Cleaning Needle
- 1 x Cleaning Brush
- 30 x Protective Gloves
- 1 x User Manual

Figure 2.1: Included Components and Accessories
3. Product Overview
Familiarize yourself with the components of your YEX-BUR Cordless Paint Sprayer:
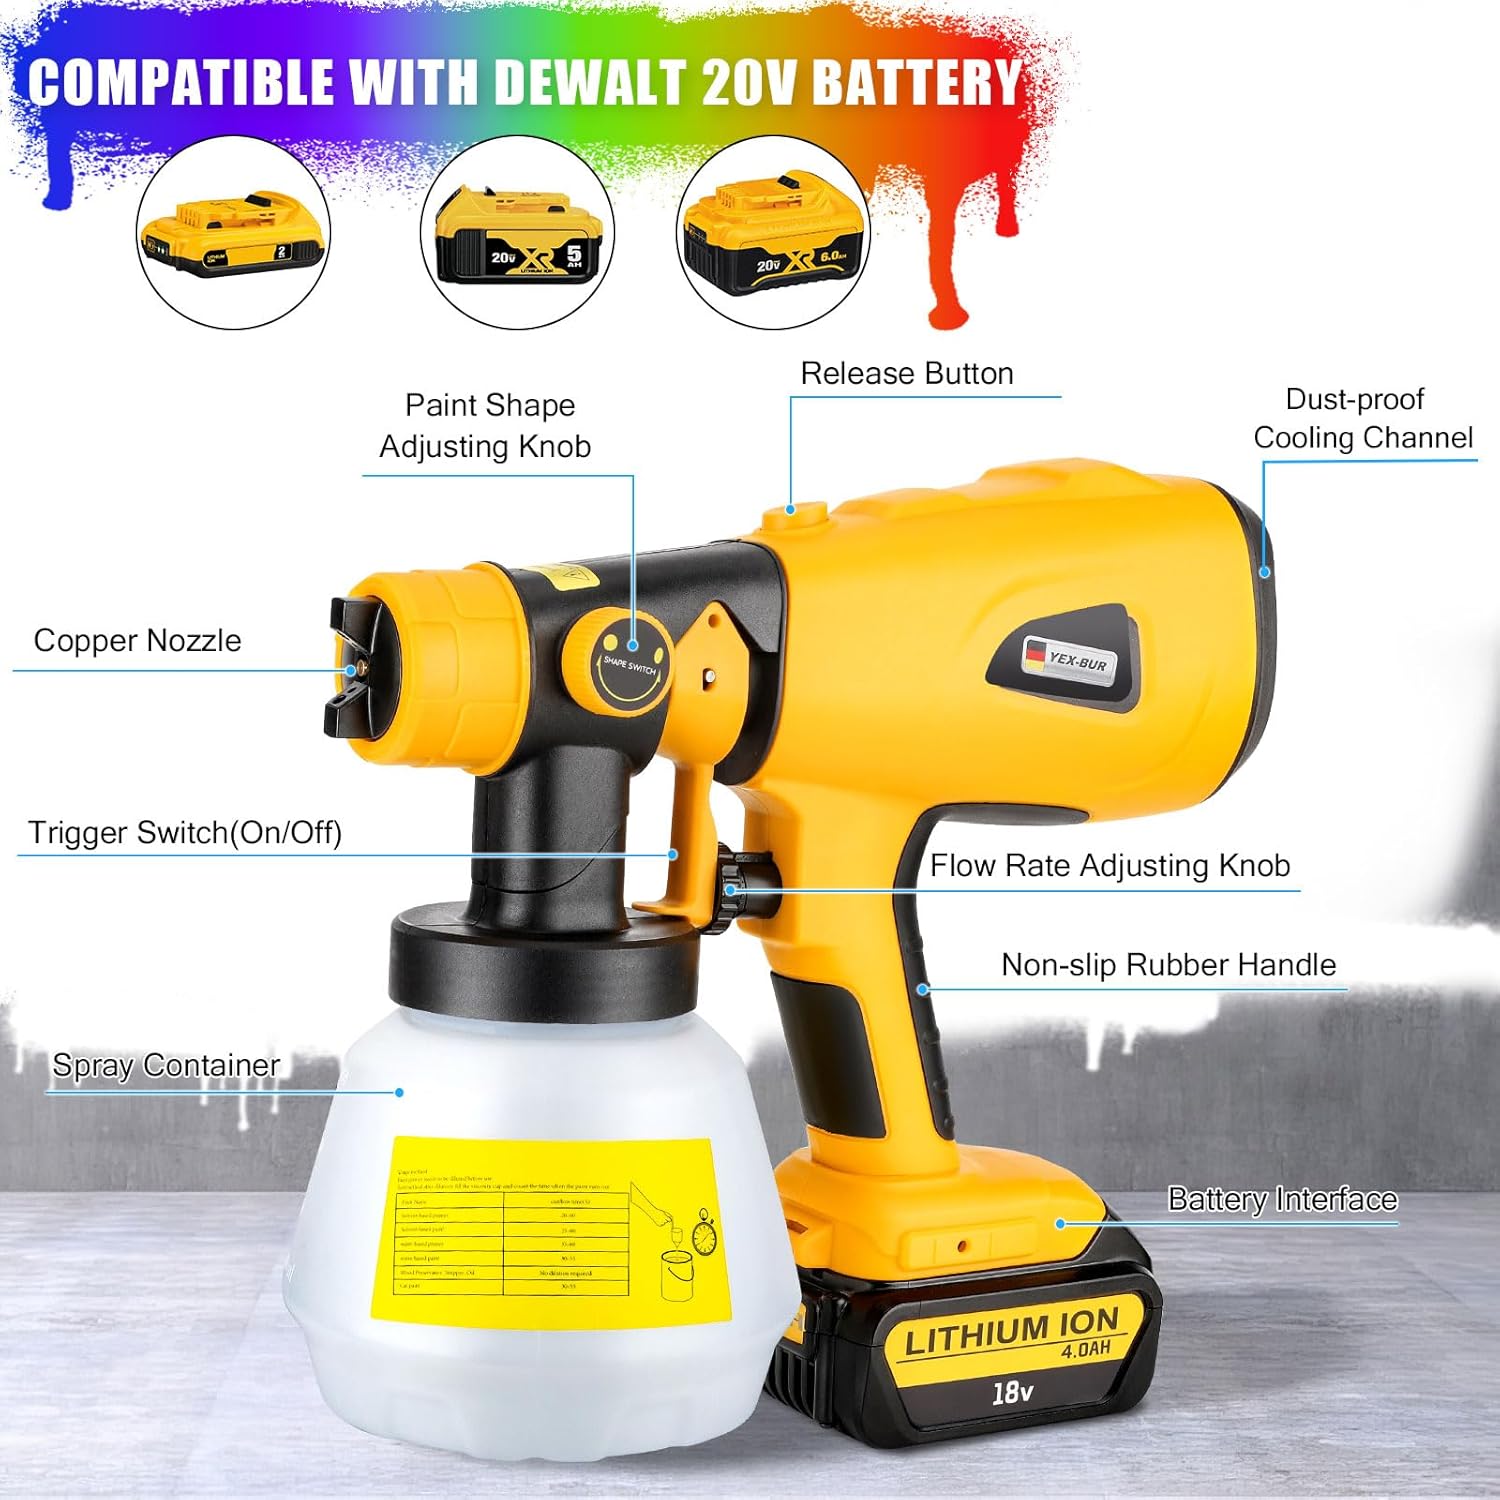
Figure 3.1: Paint Sprayer Components
- Copper Nozzle: Dispenses paint. Four sizes included for various applications.
- Paint Shape Adjusting Knob: Rotates to change spray pattern (circular, vertical, horizontal).
- Release Button: For quick assembly and disassembly of the front section.
- Trigger Switch (On/Off): Activates and deactivates the sprayer.
- Flow Rate Adjusting Knob: Controls the volume of paint sprayed.
- Non-slip Rubber Handle: Provides a secure grip.
- Spray Container: Holds the paint material (1000ml capacity).
- Battery Interface: Connects to compatible Dewalt 20V/60V batteries (battery not included).
- Dust-proof Cooling Channel: Helps maintain motor temperature during operation.
4. Setup
4.1 Battery Installation
- Ensure the paint sprayer is off and the trigger is not engaged.
- Align a compatible Dewalt 20V Lithium Ion Battery (e.g., DCB206, DCB204, DCB181, DCB182, DCB200, DCB203, DCB205-2, DCB204-2, DCB206-2, DCB208, DCB201) with the battery interface on the sprayer.
- Slide the battery into place until it clicks securely.
4.2 Paint Preparation and Viscosity Test
Proper paint viscosity is crucial for optimal spraying results. Always dilute paint according to the paint manufacturer's recommendations and test viscosity using the included cup.
- Stir the paint thoroughly.
- Dip the viscosity cup into the paint and fill it completely.
- Lift the cup and measure the time it takes for the paint to completely drain out. Refer to the table below for recommended outflow times.
- If the outflow time is too long, dilute the paint with the appropriate thinner (water for water-based paints, mineral spirits for oil-based paints) in small increments, stirring well after each addition, and re-test until the desired viscosity is achieved.

Figure 4.1: Recommended Paint Viscosity (Outflow Time)

Figure 4.2: Paint Dilution and Filling Process
4.3 Filling the Spray Container
- Unscrew the spray container from the sprayer body.
- Pour the prepared paint into the container. Do not overfill.
- Securely screw the spray container back onto the sprayer body.
4.4 Nozzle Selection and Spray Pattern Adjustment
Select the appropriate nozzle size and spray pattern for your project.
- Nozzle Sizes:
- 1.0mm: For thin materials like stains and sealers.
- 1.8mm: For general purpose paints and lacquers.
- 2.5mm (Pre-installed): For medium viscosity paints like latex and enamel.
- 3.0mm: For thicker materials and primers.
- Spray Patterns: Rotate the Paint Shape Adjusting Knob to select one of three patterns:
- Circular (45°): For small areas, edges, and corners.
- Vertical (90°): For horizontal surfaces.
- Horizontal (180°): For vertical surfaces.

Figure 4.3: Nozzle Sizes and Spray Patterns
5. Operating Instructions
5.1 Pre-Spraying Check
- Ensure the work area is properly ventilated and protected from overspray.
- Wear all necessary personal protective equipment (PPE).
- Perform a test spray on a piece of scrap material to check the spray pattern and flow rate. Adjust as needed.
5.2 Spraying Technique
- Hold the sprayer approximately 8-12 inches (20-30 cm) from the surface.
- Maintain a consistent distance and speed for even coverage.
- Move your entire arm, not just your wrist, to ensure a smooth, even stroke.
- Overlap each pass by about 50% to avoid streaks.
- Release the trigger at the end of each pass to prevent paint buildup.

Figure 5.1: Examples of Paint Sprayer Applications
6. Maintenance
Proper cleaning and maintenance after each use will extend the life of your paint sprayer and ensure consistent performance.
6.1 Cleaning After Use
- Disconnect Power: Always remove the battery pack before cleaning.
- Empty Container: Unscrew the spray container and pour any remaining paint back into its original can.
- Initial Rinse: Fill the container with the appropriate cleaning solution (water for water-based paints, mineral spirits for oil-based paints). Reattach the container.
- Flush Sprayer: Reinsert the battery and spray the cleaning solution into a waste container until clear liquid emerges.
- Disassemble: Remove the battery. Press the release button and twist the front section to detach it. Unscrew the nozzle and air cap.
- Thorough Cleaning: Use the included cleaning brush and needle to clean all paint-contacting parts: the container, suction tube, nozzle, air cap, and sprayer body. Pay special attention to small holes and crevices.
- Rinse and Dry: Rinse all cleaned parts with fresh water (if using water-based cleaner) and allow them to dry completely before reassembly.

Figure 6.1: Step-by-Step Cleaning Process
6.2 Storage
Store the clean, dry paint sprayer in a cool, dry place, out of reach of children. Ensure the battery is removed for long-term storage.
7. Troubleshooting
Refer to this section for common issues and their solutions.
| Problem | Possible Cause | Solution |
|---|---|---|
| No spray or weak spray | Clogged nozzle; paint too thick; low battery; suction tube blocked. | Clean nozzle with needle; dilute paint; charge/replace battery; clean suction tube. |
| Uneven spray pattern | Partially clogged nozzle; incorrect nozzle selection; inconsistent spraying technique. | Clean nozzle thoroughly; select appropriate nozzle; practice consistent technique. |
| Paint spitting or dripping | Paint too thin; nozzle loose; air cap not tightened; low paint level. | Thicken paint slightly; ensure nozzle and air cap are tight; refill paint container. |
| Sprayer does not turn on | Battery not installed correctly; battery discharged; faulty switch. | Reinstall battery; charge battery; contact support if switch is faulty. |
8. Specifications
| Feature | Specification |
|---|---|
| Brand | YEX-BUR |
| Model Number | YX-SG05-DW |
| Power Source | Battery Powered (Compatible with Dewalt 20V/60V Lithium Ion Batteries) |
| Power | 200W |
| Rated Speed | 42000rpm |
| Tank Volume | 1000 ml |
| Max Viscosity | 80 Din-s |
| Air Flow | 160 L/min |
| Spray Width | 8-12 inches |
| Nozzle Sizes | 1.0mm, 1.8mm, 2.5mm, 3.0mm (Copper) |
| Spray Patterns | Circular, Vertical, Horizontal |
| Low Voltage Protection | Automatically stops below 15V |
| Product Dimensions | 10.9 x 3.74 x 9.13 inches |
| Item Weight | 1.16 kg (2.55 lbs) |
9. Warranty and Support
For warranty information or technical support, please refer to the documentation included with your purchase or contact YEX-BUR customer service directly. If you have any questions regarding your product, please contact us via your order details on the platform where it was purchased. Our technical and after-sales teams are available to assist you.