1. Introduction
This manual provides comprehensive instructions for the safe and effective operation of the OWON HDS2202S handheld device. The HDS2202S integrates a 2-channel digital oscilloscope, a waveform generator, and a 20,000-count true-RMS multimeter into a single portable unit. Designed for various applications including outdoor maintenance, rapid on-site measurement, automobile maintenance, and power detection, this instrument offers versatility and convenience.
Please read this manual thoroughly before using the device to ensure proper handling, prevent damage, and achieve optimal performance.
2. Safety Information
To prevent electric shock or personal injury, and to avoid damage to the instrument or connected equipment, observe the following safety precautions:
- General Safety: Always use the device according to the instructions provided. Do not operate the device if it appears damaged or is not functioning correctly.
- Power Source: Use only the specified power adapter or a compatible power bank for charging. Ensure the battery is correctly installed.
- Measurement Limits: Do not exceed the maximum input ratings for voltage and current specified for the oscilloscope and multimeter functions. Refer to the specifications section for details.
- Probes and Leads: Use only probes and test leads supplied with the instrument or recommended by the manufacturer. Ensure they are in good condition before use.
- Environment: Operate the device in a dry environment. Avoid exposure to moisture, extreme temperatures, or corrosive gases.
- Servicing: Do not attempt to service or disassemble the device unless explicitly instructed in this manual. Servicing should only be performed by qualified personnel.
- Battery Safety: The device uses an 18650 lithium battery. Handle batteries with care. Do not short-circuit, incinerate, or expose batteries to high temperatures.
⚠WARNING: To avoid electrical shock, remove test leads before opening the case. To prevent damage or injury, install quick-acting fuses with amperage/voltage ratings shown.

Image: Rear view of the HDS2202S device, displaying the battery compartment cover and a safety warning label. The label advises removing test leads before opening the case and using specified fuses to prevent electrical shock or injury.
3. Package Contents
Verify that all items listed below are present in your package. If any items are missing or damaged, contact your dealer immediately.
- OWON HDS2202S Handheld Device
- USB Type-C Cable
- Power Adapter (may vary by region)
- Oscilloscope Probes (2)
- Multimeter Test Leads
- User Manual (this document)
- 18650 Lithium Battery (pre-installed or separate)

Image: The retail packaging for the OWON HDS2202S, illustrating the device and highlighting its three primary functions: oscilloscope, multimeter, and waveform generator.
4. Device Overview
The OWON HDS2202S features a compact design with a 3.5-inch color LCD display and intuitive controls.
4.1 Front Panel and Display

Image: Front view of the OWON HDS2202S, displaying its 3.5-inch color LCD screen and the arrangement of function buttons and navigation keys.
- Display: 3.5-inch high-resolution, high-contrast color LCD (320x240 pixels) for clear waveform and measurement data.
- Function Buttons (F1-F4): Context-sensitive buttons for menu navigation and setting adjustments.
- Mode Button: Switches between Oscilloscope, Multimeter, and Waveform Generator modes.
- Navigation Keys: Up, Down, Left, Right arrows for menu selection and parameter adjustment.
- System Button: Accesses system settings and utility functions.
- Save Button: Saves waveforms, screenshots, or measurement data.
- Auto Button: Automatically adjusts oscilloscope settings for optimal waveform display.
- Power Button: Turns the device on or off.
4.2 Side and Top Panels

Image: A detailed diagram of the OWON HDS2202S, highlighting its physical dimensions (198mm height, 96mm width, 38mm depth) and the locations of the oscilloscope input, waveform generator output, calibration signal output, and USB Type-C charging/communication interface.
- Oscilloscope Input (CH1, CH2): BNC connectors for connecting oscilloscope probes.
- Waveform Generator Output: Connector for outputting generated waveforms.
- Calibration Signal Output (1kHz): Provides a 1kHz square wave for probe compensation.
- USB Type-C Interface: For charging the device and connecting to a PC for data transfer and software updates.
- Multimeter Input Connectors (VΩΩC, mA, COM, A): Jacks for connecting multimeter test leads.
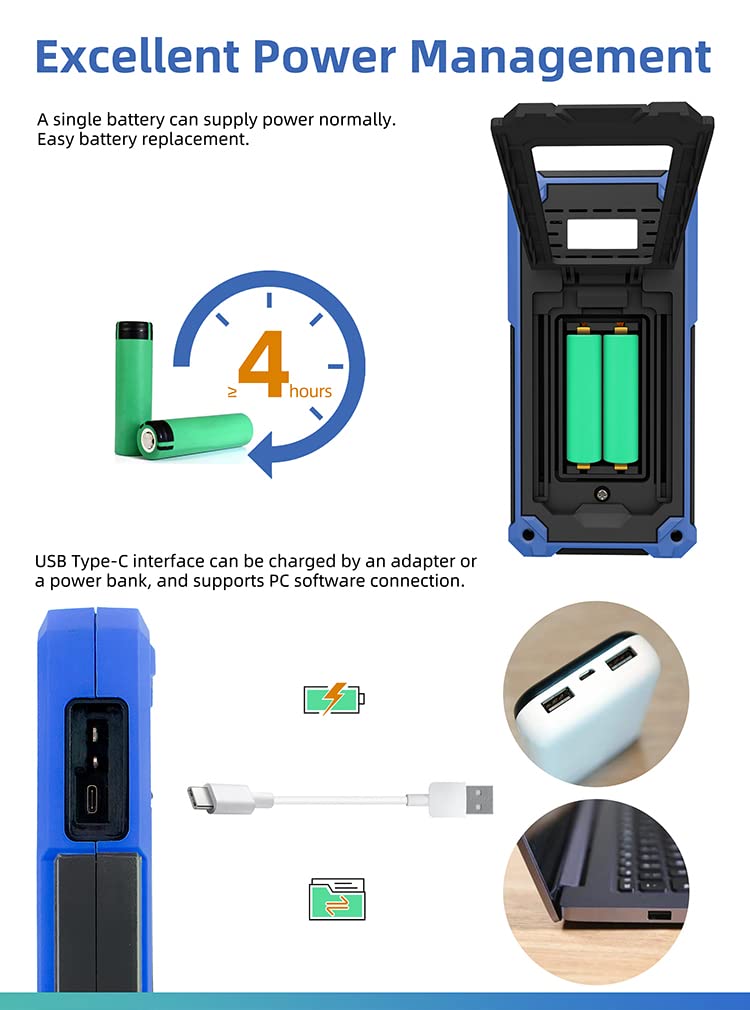
Image: Four close-up views of the HDS2202S: the 3.5-inch digital color LCD display, the oscilloscope input BNC connectors, the calibration signal output and USB Type-C interface, and the multimeter input connectors.
5. Setup
5.1 Battery Installation and Charging
The HDS2202S is powered by an 18650 lithium battery, providing approximately 6 hours of continuous operation on a full charge.
- Battery Installation: If the battery is not pre-installed, open the battery compartment cover on the rear of the device. Insert the 18650 lithium battery, ensuring correct polarity. Close the cover securely.
- Charging: Connect the supplied USB Type-C cable to the device's USB-C port and the other end to the power adapter or a compatible power bank. The charging indicator will illuminate. A full charge typically takes several hours.

Image: Illustration demonstrating the battery compartment for 18650 lithium batteries and the USB Type-C port for charging via an adapter or power bank, also showing PC connectivity.
5.2 Initial Power On
Press and hold the Power button until the OWON logo appears on the screen. The device will boot into the last used mode or a default mode.
5.3 Probe Compensation (Oscilloscope)
Before taking accurate measurements with the oscilloscope, it is recommended to compensate the probes.
- Connect an oscilloscope probe to one of the BNC input channels (CH1 or CH2).
- Connect the probe tip to the 1kHz calibration signal output terminal and the probe ground clip to the ground terminal.
- Press the Auto button. The device will display a square wave.
- Adjust the compensation screw on the probe until the square wave corners are flat (neither overshot nor undershot).
6. Operating Instructions
The HDS2202S offers three primary functions: Oscilloscope, Multimeter, and Waveform Generator. Use the Mode button to switch between these functions.
6.1 Oscilloscope Function
The oscilloscope mode allows for visual analysis of electrical signals.
- Connecting Probes: Connect oscilloscope probes to CH1 or CH2 BNC inputs.
- Auto Setup: Press the Auto button for automatic scaling and positioning of the waveform.
- Manual Adjustments: Use the navigation keys and function buttons (F1-F4) to adjust vertical scale (Volts/Div), horizontal scale (Time/Div), trigger level, and position.
- Measurement: The device supports 7 types of auto measurements (frequency, period, amplitude, max, min, mean, PK-PK) and cursor measurements.
- Acquisition Modes: Supports Normal, Peak Detect, and Average acquisition modes. Peak Detect is useful for capturing glitches.
- XY Mode: For displaying Lissajous figures, useful for phase comparisons.

Image: Two oscilloscope screen captures demonstrating different acquisition modes. The left shows "Peak Detect" for capturing signal anomalies, and the right shows "High Refresh, Deep Storage" for detailed waveform analysis.
6.2 Multimeter Function
The multimeter mode provides precise measurements of various electrical parameters.
- Connecting Test Leads: Connect the multimeter test leads to the appropriate input jacks (VΩΩC, mA, COM, A).
- Measurement Types: Measures AC/DC voltage, AC/DC current, resistance, diode, capacitance, and continuity.
- Auto-Ranging: The device features auto-ranging for most measurements, simplifying operation.
- Data Hold: Press the Save button (or designated function button) to hold the current measurement on the display.
- Relative Measurement: Use this function to measure the difference between a current reading and a stored reference value.
6.3 Waveform Generator Function (HDS2202S Specific)
The HDS2202S model includes a built-in waveform generator.
- Output Types: Generates sine, square, ramp, pulse, and special waveforms.
- Frequency Range: Up to 25MHz with 0.1Hz frequency resolution.
- Amplitude: Maximum 5Vpp output amplitude.
- Settings: Use the navigation keys and function buttons to adjust waveform type, frequency, amplitude, and offset.
6.4 Data Saving and PC Connection
- Saving Data: Press the Save button to store waveforms, screenshots, or measurement data to the internal memory.
- PC Software: Connect the device to a computer via the USB Type-C port. Use the OWON PC software (available for download from the official OWON website) to transfer data, perform remote control, and facilitate secondary development via SCPI commands.
7. Maintenance
7.1 Cleaning
Clean the device regularly with a soft, damp cloth. Do not use abrasive cleaners or solvents. Ensure the device is powered off and disconnected from all power sources and test leads before cleaning.
7.2 Battery Care
To prolong battery life, avoid fully discharging the battery frequently. If the device will not be used for an extended period, charge the battery to approximately 50% and store it in a cool, dry place. Recharge every few months to prevent deep discharge.
7.3 Fuse Replacement
If the multimeter current measurement function fails, the internal fuse may need replacement. Refer to the safety warning on the back of the device for fuse specifications. Fuse replacement should only be performed by qualified personnel or an authorized service center.
8. Troubleshooting
| Problem | Possible Cause | Solution |
|---|---|---|
| Device does not power on. | Low or depleted battery; faulty battery installation. | Charge the battery. Ensure the battery is correctly installed with proper polarity. |
| No waveform displayed in oscilloscope mode. | Probe not connected; incorrect vertical/horizontal settings; trigger issues. | Ensure probes are connected. Press Auto. Adjust Volts/Div, Time/Div, and trigger level. |
| Multimeter current measurement fails. | Blown fuse. | Replace the fuse according to safety instructions. |
| Device not recognized by PC. | Incorrect USB cable; driver not installed; PC software issue. | Use the supplied USB-C cable. Install the latest OWON PC software and drivers. |
9. Specifications
The following table outlines the key specifications for the OWON HDS2202S.

Image: A specification table for the OWON HDS200 Series, detailing models like HDS242, HDS272S, HDS2102S, and HDS2202S, with their respective bandwidths, sample rates, multimeter counts, and signal generator capabilities.
| Feature | Specification (HDS2202S) |
|---|---|
| Bandwidth | 200 MHz |
| Channels | 2 |
| Real-time Sample Rate | 1 GSa/s |
| Record Length | 8K |
| Waveform Refresh Rate | 10,000 wfms/s |
| Display | 3.5-inch (320x240) Color LCD |
| Multimeter Counts | 20,000 counts (True RMS) |
| Waveform Generator Output | 25 MHz (Sine, Square, Ramp, Pulse, Special) |
| Battery | 18650 Lithium Battery (approx. 6 hours operation) |
| Interface | USB Type-C |
| Dimensions | 9.84 x 5.91 x 7.09 inches (approx. 250 x 150 x 180 mm) |
| Weight | 1.1 Pounds (approx. 0.5 kg) |
10. Warranty and Support
OWON products are designed and manufactured to high-quality standards. For warranty information, please refer to the warranty card included with your product or visit the official OWON website.
For technical support, troubleshooting assistance, or service inquiries, please contact OWON customer support through their official website or the contact information provided in your product documentation.
Manufacturer: OWON


