1. Product Overview
The Raynic Weather Radio is a versatile emergency device designed to provide essential communication and utility functions during power outages and emergencies. It features multiple power sources, including solar, hand crank, and internal rechargeable battery, along with AM/FM/SW/NOAA weather band reception. Integrated features include a flashlight, reading lamp, SOS siren, and a power bank for charging external devices.

Figure 1.1: Raynic Weather Radio (Green) with phone charging via USB.
2. Components Included
Upon unboxing, please verify that all the following components are present:
- 1 x Raynic Emergency Weather Radio with Built-in Li-ion Battery
- 1 x Handy Braid Belt
- 1 x Carabiner
- 1 x Compass
- 1 x Micro USB Charger Cable
- 1 x User Manual (this document)
3. Setup
3.1 Initial Battery Preparation
Before first use, it is essential to remove the plastic tab located in the battery compartment. This tab prevents battery discharge during shipping. Locate the battery compartment cover, open it, and carefully remove the insulating plastic tab from the battery terminals. Close the compartment securely.
3.2 Charging the Radio
The Raynic Weather Radio offers five methods for charging its internal 5000mAh Li-ion battery:
- USB Charge: Connect the provided Micro USB cable to the radio's USB input port and to a standard USB power adapter (not included) or computer USB port.
- Solar Panel: Place the radio with its solar panel facing direct sunlight. This method is primarily for maintaining charge or slow charging in emergency situations.
- Hand Crank: Extend the hand crank handle and rotate it clockwise or counter-clockwise at a steady pace (approximately 130-150 RPM) to generate power.
- AAA Batteries: Insert 3 AAA batteries (not included) into the designated compartment. This serves as an alternative power source when the internal Li-ion battery is depleted.
- AC Power: Use a compatible AC adapter (not included) with the Micro USB cable for wall charging.
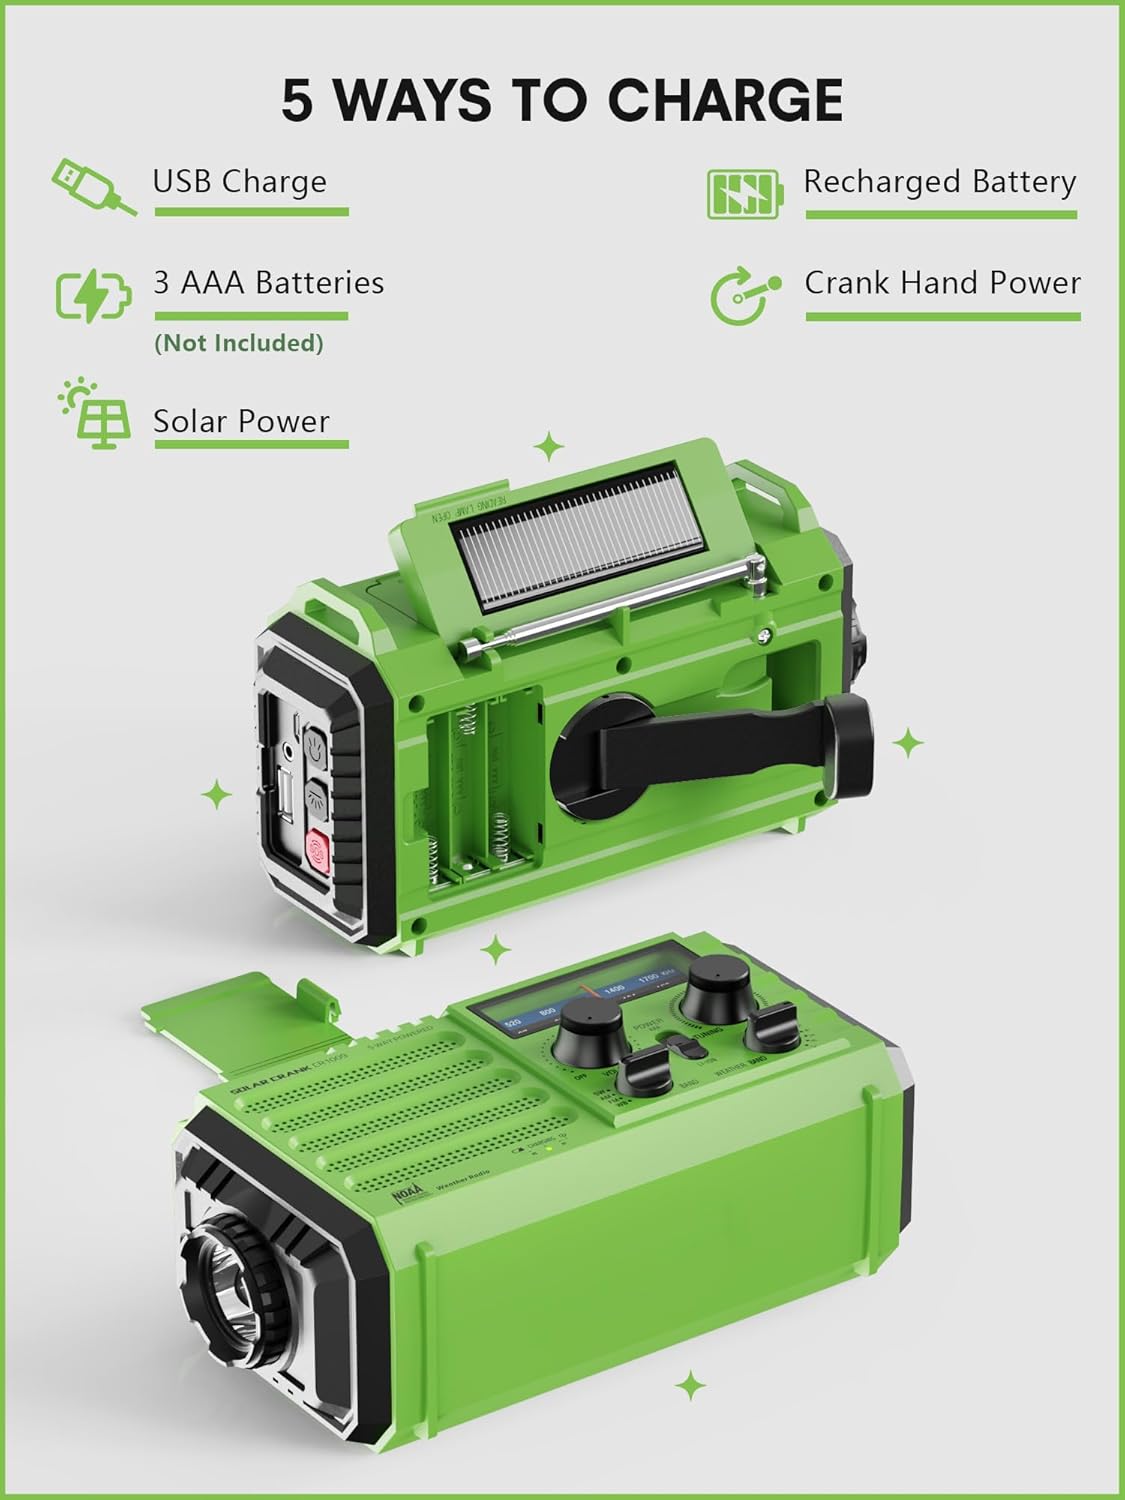
Figure 3.1: Five charging methods for the Raynic Weather Radio.

Figure 3.2: Battery compartment and internal rechargeable battery.
4. Operating Instructions
4.1 Power On/Off and Volume Control
Rotate the VOLUME knob clockwise to power on the radio and increase the volume. Rotate counter-clockwise to decrease volume and power off the radio.
4.2 Radio Tuning (AM/FM/SW/NOAA)
Extend the telescopic antenna for optimal reception. Use the BAND switch to select between SW (Shortwave), AM, FM, or WB (Weather Band) modes. Rotate the TUNING knob to find desired stations or weather channels.
- AM: 520-1700 KHz
- FM: 87.5-108 MHz
- SW: 7-19 MHz
- WB (NOAA Weather Band): 7 preset channels (162.400 MHz, 162.425 MHz, 162.450 MHz, 162.475 MHz, 162.500 MHz, 162.525 MHz, 162.550 MHz).

Figure 4.1: Radio tuning controls and frequency ranges.

Figure 4.2: Official NOAA Weather Radio recognition.
4.3 NOAA Weather Alert Function
The radio is designed to receive emergency warnings for various life-threatening weather events. To receive alerts, the radio must be powered on and manually tuned to a local NOAA weather station. When an alert is broadcast, the radio will activate to deliver the warning.
4.4 Flashlight and Reading Lamp
The radio includes a 3W integrated flashlight and a 2.5W reading lamp for illumination during power cuts or in dark environments.
- Flashlight: Located on the side of the radio. Press the flashlight button to cycle through modes: Power Saving (150LM) and Brightest (300LM).
- Reading Lamp: Located on the top panel. Press the reading lamp button to cycle through modes: Power Saving (150LM) and Brightest (300LM).

Figure 4.3: Flashlight and reading lamp in use.

Figure 4.4: Flashlight brightness options.

Figure 4.5: Reading lamp brightness options.
4.5 SOS Alarm Function
In an emergency, activate the SOS alarm by pressing the dedicated SOS button. This will emit a loud 116dB siren and activate a flashing red light to signal for help.

Figure 4.6: SOS alarm button and indicator.

Figure 4.7: SOS siren and flashing red light in action.
4.6 Charging External Devices (Power Bank)
The built-in 5000mAh Li-ion battery can be used to charge external USB devices, such as cell phones, via the USB output port. Connect your device's charging cable to the radio's USB output port.
4.7 Headphone Jack
A 3.5mm headphone jack is provided for private listening. Connect standard headphones to this port to enjoy radio broadcasts without disturbing others.

Figure 4.8: Location of the 3.5mm headphone jack.

Figure 4.9: Using the headphone jack for private listening.
5. Battery Information and Runtime
The Raynic Weather Radio is equipped with a 5000mAh rechargeable Li-ion battery, providing extended operational times for its various functions:
- Radio (50% volume): Approximately 13 hours of continuous operation.
- Reading Light (150LM): Approximately 19-22 hours of continuous operation.
- Flashlight (150LM): Approximately 35-40 hours of continuous operation.

Figure 5.1: Battery capacity and estimated runtimes.
6. Portability and Durability Features
The radio is designed for portability and resilience in outdoor and emergency environments:
- Compact Design: With dimensions of 6.8 x 3.7 x 2.9 inches and a weight of 1 pound, it is suitable for carrying in a backpack or emergency kit.
- IPX3 Waterproof: Provides protection against spraying water, making it suitable for use in light rain or damp conditions.
- Integrated Compass: A small compass is included on the strap for navigation assistance.
- Carabiner and Braid Belt: Comes with a carabiner for easy attachment to backpacks and a portable braid belt for carrying.

Figure 6.1: Portable and compact design for travel.

Figure 6.2: Essential multi-function for outdoor use.
7. Maintenance
To ensure the longevity and optimal performance of your Raynic Weather Radio, follow these maintenance guidelines:
- Cleaning: Wipe the radio with a soft, damp cloth. Do not use harsh chemicals or abrasive cleaners.
- Storage: Store the radio in a cool, dry place away from direct sunlight and extreme temperatures. If storing for extended periods, ensure the internal battery is partially charged (around 50%) and recharge it every 3-6 months to prevent deep discharge.
- Battery Care: Avoid fully depleting the internal Li-ion battery frequently. Recharge it as soon as possible after use.
- Hand Crank: Operate the hand crank smoothly and avoid excessive force to prevent damage to the internal mechanism.
8. Troubleshooting
If you encounter issues with your Raynic Weather Radio, refer to the following common problems and solutions:
| Problem | Possible Cause | Solution |
|---|---|---|
| Radio does not turn on. | Battery tab not removed; battery depleted; AAA batteries inserted incorrectly or depleted. | Ensure plastic tab is removed from battery compartment. Charge the internal battery using USB, solar, or hand crank. Check and replace AAA batteries if used. |
| Poor radio reception. | Antenna not extended; weak signal area; interference. | Fully extend the telescopic antenna. Reposition the radio for better signal. Move away from electronic devices causing interference. |
| Cannot charge external devices. | Radio battery too low; incorrect cable; device not compatible. | Ensure the radio's internal battery has sufficient charge. Use the correct USB cable for your device. Some high-power devices may not be fully supported. |
| Hand crank is stiff or not charging. | Improper rotation speed; internal mechanism issue. | Rotate the hand crank at a steady, moderate pace. If the issue persists, contact customer support. |
9. Specifications
| Feature | Detail |
|---|---|
| Product Dimensions | 6.8 x 3.7 x 2.9 inches (17.3 x 9.4 x 7.4 cm) |
| Item Weight | 1 pound (0.45 kg) |
| Model Number | 528e28c4-d70d-46bc-b505-029056c0971b |
| Battery Type | 1 Lithium Polymer battery (built-in), 3 AAA batteries (not included) |
| Battery Capacity | 5000mAh / 18500mWh |
| Connectivity Technology | USB |
| Tuner Technology | AM/FM/SW/NOAA |
| Power Sources | Corded-Electric, Solar, Rechargeable Battery, Hand Crank, AAA battery |
| Radio Bands Supported | 4-Band |
| Special Features | Rechargeable, Portable, Flashlight, Reading Lamp, SOS Siren, Power Bank, IPX3 Waterproof |
| Color | Green |
10. Warranty and Support
This product is manufactured by Raynic Electronics. For specific warranty details and customer support, please refer to the information provided with your purchase or visit the official Raynic website. Standard return policy allows for returns within 30 days for refund or replacement.
For further assistance, you may contact Raynic Electronic, the seller, through their Amazon storefront or official contact channels.
Seller: Raynic Electronic


