
1. Introduction
This manual provides essential instructions for the safe and effective operation and maintenance of your EMSON Bullseye Pro Max Portable Tire Inflator. Please read this manual thoroughly before first use and retain it for future reference. This device is designed for inflating various items such as car tires, bicycle tires, sports balls, and other inflatables requiring up to 150 PSI.
2. Package Contents
Verify that all items listed below are included in your package:
- 1x Bullseye Pro Max Portable Tire Inflator Unit
- 1x 3-meter Car Charger (12V DC)
- 1x Home Charger (110/120V AC/DC)
- 1x Carrying Bag
- 1x Inflation Sports Needle
- 2x General Nozzle Attachments
- 1x Spare Fuse (15A)
- 1x User Manual (this document)

The Bullseye Pro Max portable tire inflator, its carrying bag, charging cables, and various nozzle attachments are displayed alongside its product box.
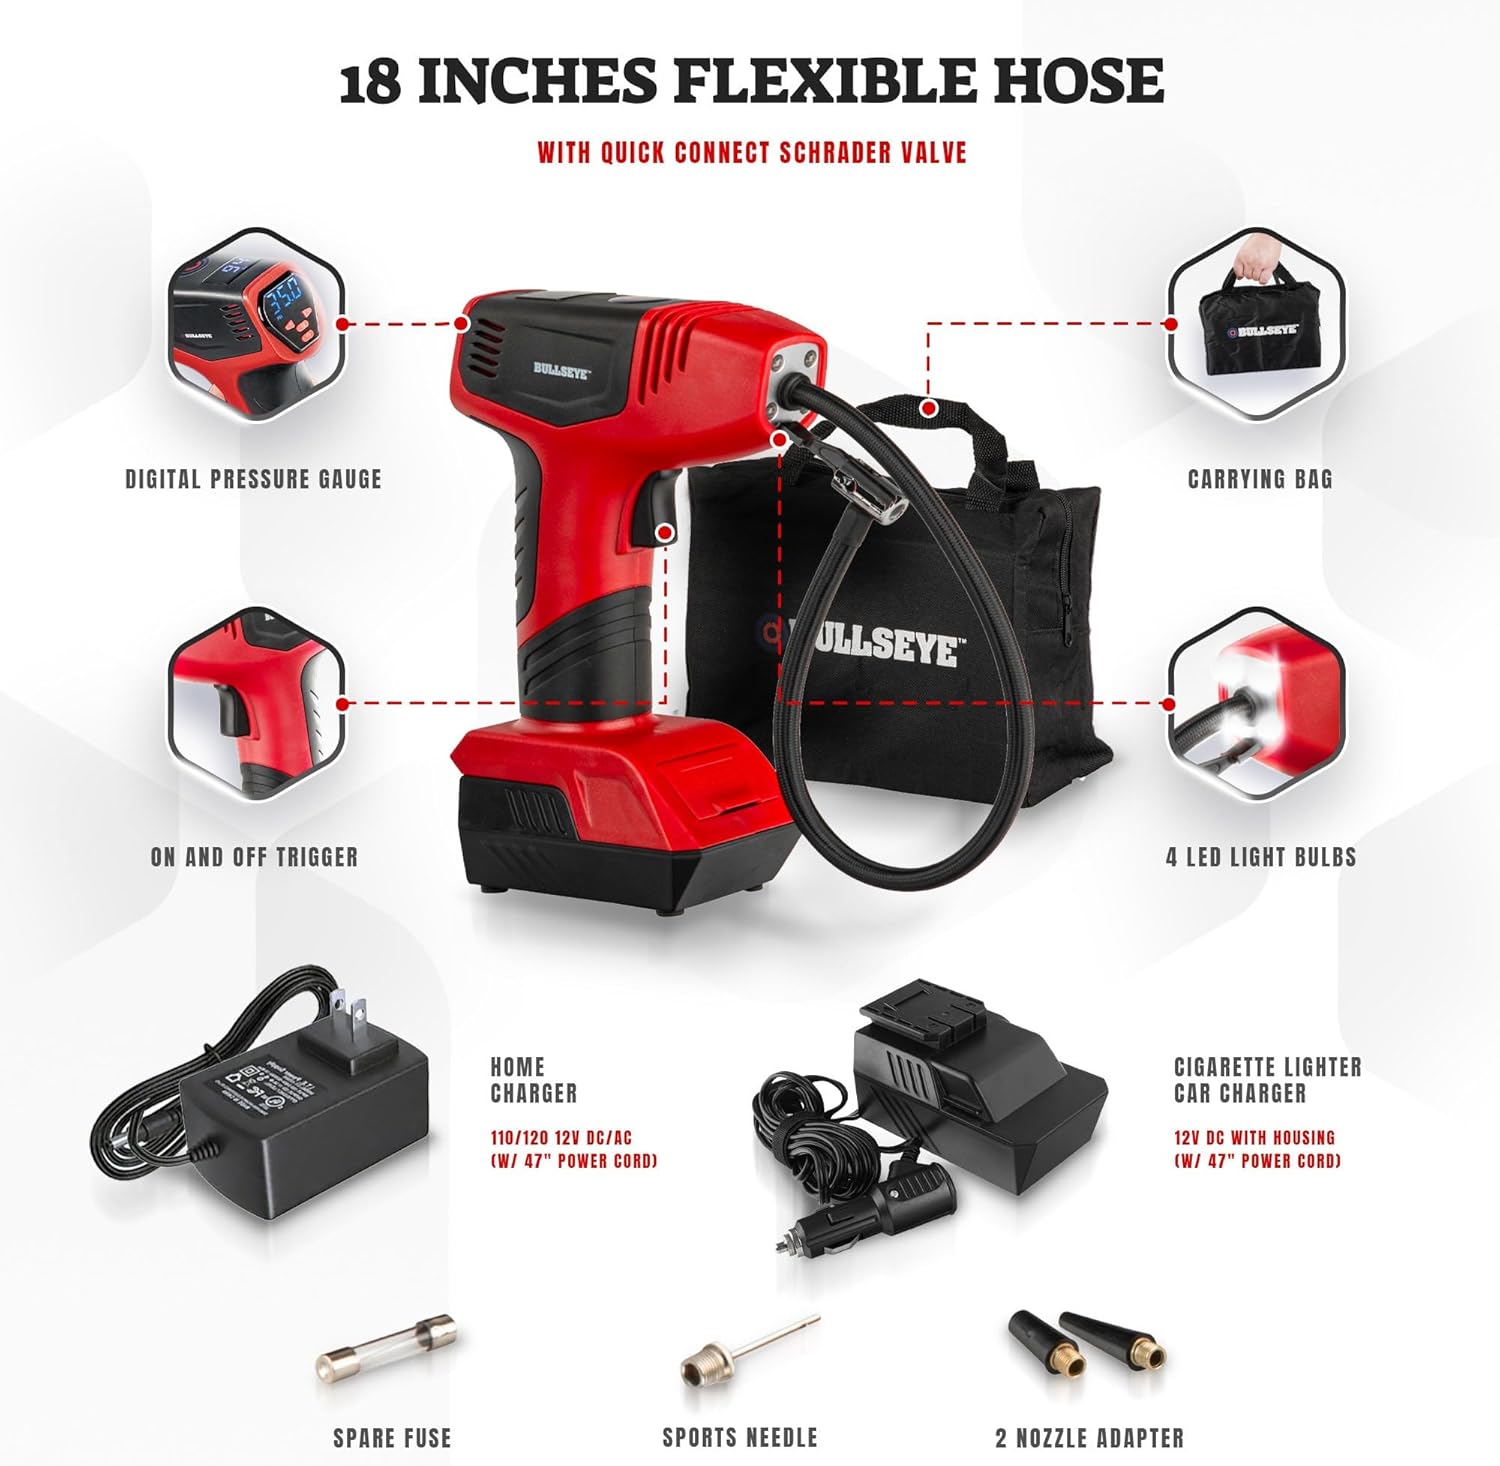
An exploded view diagram detailing the main unit, digital gauge, trigger, carrying bag, home charger, car charger, spare fuse, sports needle, and two nozzle adapters.
3. Product Features
- Pre-set Function with Auto Shut-Off: Set your desired pressure, and the inflator will automatically stop once reached.
- High Pressure Capability: Maximum of 150 PSI, capable of inflating a tire from 24psi to 34psi in under 2 minutes.
- Efficient Airflow: Delivers 25 liters of air per minute.
- Rechargeable and Versatile Power: Equipped with a detachable Lithium-Ion battery. Includes both a home charger and a 12V DC cigarette lighter car charger for flexible power options.
- Digital Display and Controls: Easy-to-read LED screen displays current tire pressure and battery level. User-friendly buttons for precise pressure adjustment.
- Integrated LED Lighting: Four built-in powerful LED lights illuminate the work area, enabling use in low-light conditions.
- Compact and Portable: Lightweight design (approx. 1.9 lbs) with an included storage bag for easy transport and storage.
- Multiple Measurement Units: Supports KPA, PSI, BAR, and KG/CM.
- Quick Connect Schrader Valve: Features an 18-inch flexible hose for convenient connection.
4. Safety Information
Always observe the following safety precautions when using the Bullseye Pro Max Portable Tire Inflator:
- Read all instructions before operating the device.
- Wear appropriate eye protection during operation.
- Keep children and pets away from the inflator during use.
- Do not leave the inflator unattended while it is operating.
- Ensure the correct pressure setting for the item being inflated to avoid over-inflation, which can cause bursting and serious injury. Refer to the item's manufacturer recommendations.
- Do not operate the inflator in wet conditions or near flammable liquids or gases.
- Allow the unit to cool down after extended use to prevent overheating.
- Store the inflator in a dry, secure place away from extreme temperatures.
- Do not attempt to modify or repair the unit yourself. Contact qualified service personnel.
5. Setup
5.1 Charging the Battery
Before first use, fully charge the Lithium-Ion battery. The battery can be charged using either the home charger or the car charger.
- Using the Home Charger: Connect the home charger to a standard wall outlet and then to the charging port on the battery pack. The battery indicator on the inflator will show charging status.
- Using the Car Charger: Plug the car charger into your vehicle's 12V DC cigarette lighter socket and then to the charging port on the battery pack. This option allows for charging on the go or powering the inflator directly if the battery is depleted.
Ensure the battery pack is securely attached to the inflator unit after charging.

The inflator is shown with its two charging methods: a car cigarette lighter adapter and a standard home wall adapter, highlighting its versatility.
5.2 Attaching the Hose and Nozzle
- Screw the flexible hose securely onto the inflator's air outlet.
- Select the appropriate nozzle attachment for the item you wish to inflate (e.g., sports needle for balls, general nozzle for inflatables).
- Attach the selected nozzle to the end of the flexible hose.
6. Operating Instructions
6.1 Powering On and Setting Pressure
- Press and hold the Power ON/OFF button for 2 seconds to turn on the inflator. The LED display will light up.
- The display will show the current pressure unit (e.g., PSI). Press the 'M' button to cycle through available units (KPA, PSI, BAR, KG/CM) and select your preferred unit.
- Use the '+' and '-' buttons to set your desired target pressure. The display will show the set pressure.

A detailed view of the inflator's digital screen, displaying pressure readings and the intuitive control buttons for setting desired PSI.
6.2 Inflating an Item
- Connect the hose with the appropriate nozzle to the item's valve stem. Ensure a secure connection to prevent air leakage.
- Pull the trigger to begin inflation. The display will show the real-time pressure as it increases.
- The inflator will automatically shut off once the pre-set target pressure is reached.
- Release the trigger and disconnect the hose from the item's valve.
- Press and hold the Power ON/OFF button for 2 seconds to turn off the inflator.

A person holds the Bullseye Pro Max inflator connected to a car tire, demonstrating its use for vehicle tire inflation.
6.3 Using the LED Light
The Bullseye Pro Max features a built-in LED light for use in dark environments.
- To turn on the LED light, press the light button located on the top of the unit.
- Press the button again to turn off the light.

The inflator's integrated LED light is shown brightly illuminating a tire valve, demonstrating its utility for nighttime or low-light use.
6.4 Instructional Video
An official product video demonstrating the Bullseye Pro Max portable tire inflator's versatility for various inflation needs, including car tires, sports balls, and pool floats.
7. Maintenance
7.1 Cleaning
Wipe the inflator with a damp cloth to remove dirt and debris. Do not use harsh chemicals or abrasive cleaners. Ensure the unit is dry before storage.
7.2 Battery Care
To prolong battery life, avoid fully discharging the battery frequently. Charge the battery regularly, even if the inflator is not in use for extended periods. Store the battery in a cool, dry place.
7.3 Storage
Store the inflator and its accessories in the provided carrying bag in a cool, dry place, away from direct sunlight and extreme temperatures. Ensure the unit is turned off before storage.
7.4 Fuse Replacement
The inflator includes a spare 15A fuse. If the unit stops functioning unexpectedly, the fuse may need replacement. Consult a qualified technician if you are unsure how to replace the fuse.
8. Troubleshooting
If you encounter issues with your Bullseye Pro Max, refer to the following common problems and solutions:
| Problem | Possible Cause | Solution |
|---|---|---|
| Inflator does not turn on. | Battery is depleted or not properly connected. | Charge the battery fully. Ensure the battery pack is securely attached. |
| Inflator runs but does not inflate. | Hose or nozzle not securely connected; valve stem issue. | Check all connections for tightness. Ensure the item's valve stem is not damaged. |
| Inaccurate pressure reading. | Loose connection; unit not calibrated. | Ensure a tight connection to the valve. If issues persist, contact support. |
| Unit overheats and shuts off. | Extended continuous use. | Allow the inflator to cool down for at least 15-20 minutes before resuming use. |
If these solutions do not resolve the issue, please contact EMSON customer support.
9. Specifications
| Specification | Value |
|---|---|
| Brand | EMSON |
| Model Name | Bullseye Pro Max |
| Item Model Number | 1745 |
| Maximum Operating Pressure | 150 PSI |
| Air Flow Capacity | 25 Liters Per Minute |
| Power Source | Battery Powered (Lithium Ion) |
| Voltage | 12 Volts |
| Wattage | 22.2 Watts |
| Noise Level | 53 Decibels |
| Product Dimensions (L x W x H) | 6.5" x 3.5" x 10.16" |
| Item Weight | 1.9 lbs (product), 3.7 lbs (shipping) |
| Hose Length | 18 Inches |
| Material | Acrylonitrile Butadiene Styrene |

The inflator is pictured with its key dimensions labeled, showing its compact and ergonomic design.
10. Warranty and Support
For specific warranty information, please refer to the warranty card included with your product or visit the official EMSON website. Keep your purchase receipt as proof of purchase for any warranty claims.
If you require technical assistance, have questions about your product, or need to report a defect, please contact EMSON customer support through their official channels. Contact information can typically be found on the product packaging or the manufacturer's website.

