1. Product Overview
The Proster PST227-US is a pin-type moisture meter designed to accurately measure the moisture content of various materials, including wood and building materials. It features a tricolor backlit LCD display, audible alerts, and adjustable alarm settings to provide clear and immediate feedback on moisture levels. This device is an essential tool for professionals and DIY enthusiasts for detecting hidden moisture and preventing potential damage.

Figure 1.1: Proster PST227-US Moisture Meter with protective cap removed, showing probes, LCD display, control buttons, and included accessories (carrying pouch, AAA batteries).
Package Contents:
- Proster PST227-US Moisture Meter
- Protective Cap
- Carrying Pouch
- 3 x AAA Batteries
- Instruction Manual (this document)
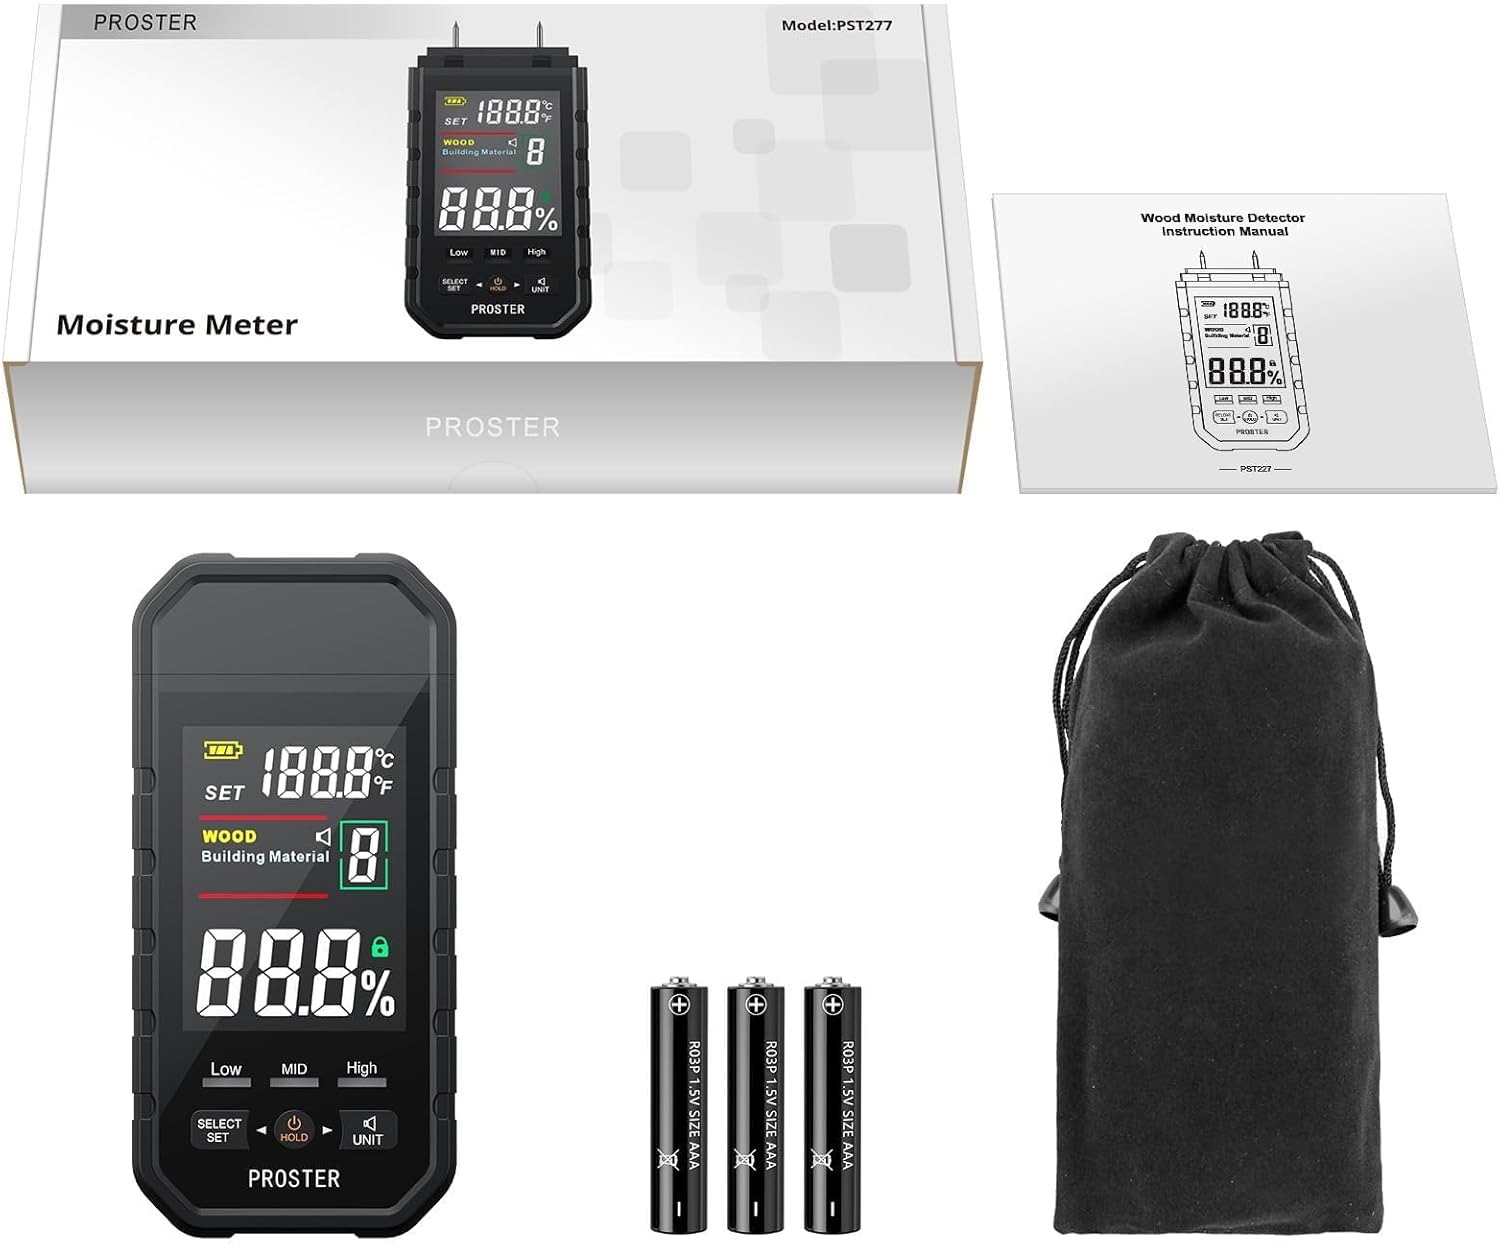
Figure 1.2: The complete package contents, including the meter, manual, batteries, and carrying pouch.
Device Components:

Figure 1.3: Diagram showing the protective cover, probes, and various controls and display elements of the moisture meter.

Figure 1.4: Detailed view of the LCD display with numbered indicators for Battery Level, Scan/Setting Status, Wood Measurement Mode, Building Material Measurement Mode, Moisture Value, Data Lock/Unlock, Sound Effect, Measurement Gear, Temperature Value, and Temperature Unit.
- Battery Level Display
- Scan Status / Setting Status
- Wood Measurement Mode Indicator
- Building Material Measurement Mode Indicator
- Moisture Value Display Area
- Data Lock/Unlock Indicator (when measuring)
- Sound Effect On/Off Indicator
- Wood / Building Materials Measurement Gear Display
- Temperature Value Display Area
- Temperature Unit (°C/°F)
2. Safety Information
- The measurement probes are sharp. Handle with care to avoid injury.
- Keep the device out of reach of children.
- Do not attempt to measure live electrical circuits.
- Ensure batteries are inserted with correct polarity. Remove batteries if the device will not be used for an extended period.
- Do not expose the device to extreme temperatures, humidity, or direct sunlight.
- Do not disassemble or modify the device. Repairs should only be performed by qualified personnel.
3. Setup
3.1 Battery Installation
- Locate the battery compartment cover on the back of the device.
- Slide the cover open.
- Insert 3 AAA batteries, ensuring correct polarity (+/-) as indicated inside the compartment.
- Close the battery compartment cover securely.
3.2 Removing the Protective Cap
Before taking measurements, carefully remove the protective cap covering the measurement probes. The cap is designed to fit snugly; gently pull it off while holding the meter firmly.
4. Operating Instructions
4.1 Power On/Off
- Press the POWER/HOLD button to turn the device on.
- The device will automatically power off after approximately 10 minutes of inactivity to conserve battery life.
- To manually turn off the device, press and hold the POWER/HOLD button for 2 seconds.
4.2 Selecting Measurement Mode (Wood / Building Material)
- After powering on, the device defaults to the last used mode.
- Press the SELECT/SET button to toggle between "WOOD" and "Building Material" modes. The active mode will be indicated on the LCD display (refer to Figure 1.4, items 3 and 4).

Figure 4.1: The meter displaying measurements in Wood mode (left) and Building Material mode (right).
4.3 Selecting Wood Gear (1-8)
- In "WOOD" mode, press the SELECT/SET button repeatedly to cycle through the 8 available wood gears (1-8). The selected gear number will be displayed (refer to Figure 1.4, item 8).
- Each gear corresponds to different wood densities or types, allowing for more accurate measurements. Refer to Section 5 for more details on material types.

Figure 4.2: The meter indicating the selection of different gears for various materials like medicinal materials, wood, bamboo, walls, and carton. The device offers 8 specific gears for wood types.
4.4 Taking a Measurement
- Ensure the correct measurement mode (Wood or Building Material) and appropriate wood gear are selected.
- Carefully push the two sharp probes into the material to be measured. Ensure both probes penetrate the surface for an accurate reading.
- The moisture content percentage will be displayed on the LCD (refer to Figure 1.4, item 5).
4.5 Visual and Audible Alerts
The device provides visual and audible alerts based on the detected moisture level:
- Blue Backlight: Indicates a Low moisture level.
- Green Backlight: Indicates a Mid (medium) moisture level.
- Red Backlight: Indicates a High moisture level.
An audible alarm will also sound, with the frequency increasing as the moisture level rises. To toggle the sound effect on or off, press the UNIT button (refer to Figure 1.4, item 7 for indicator).
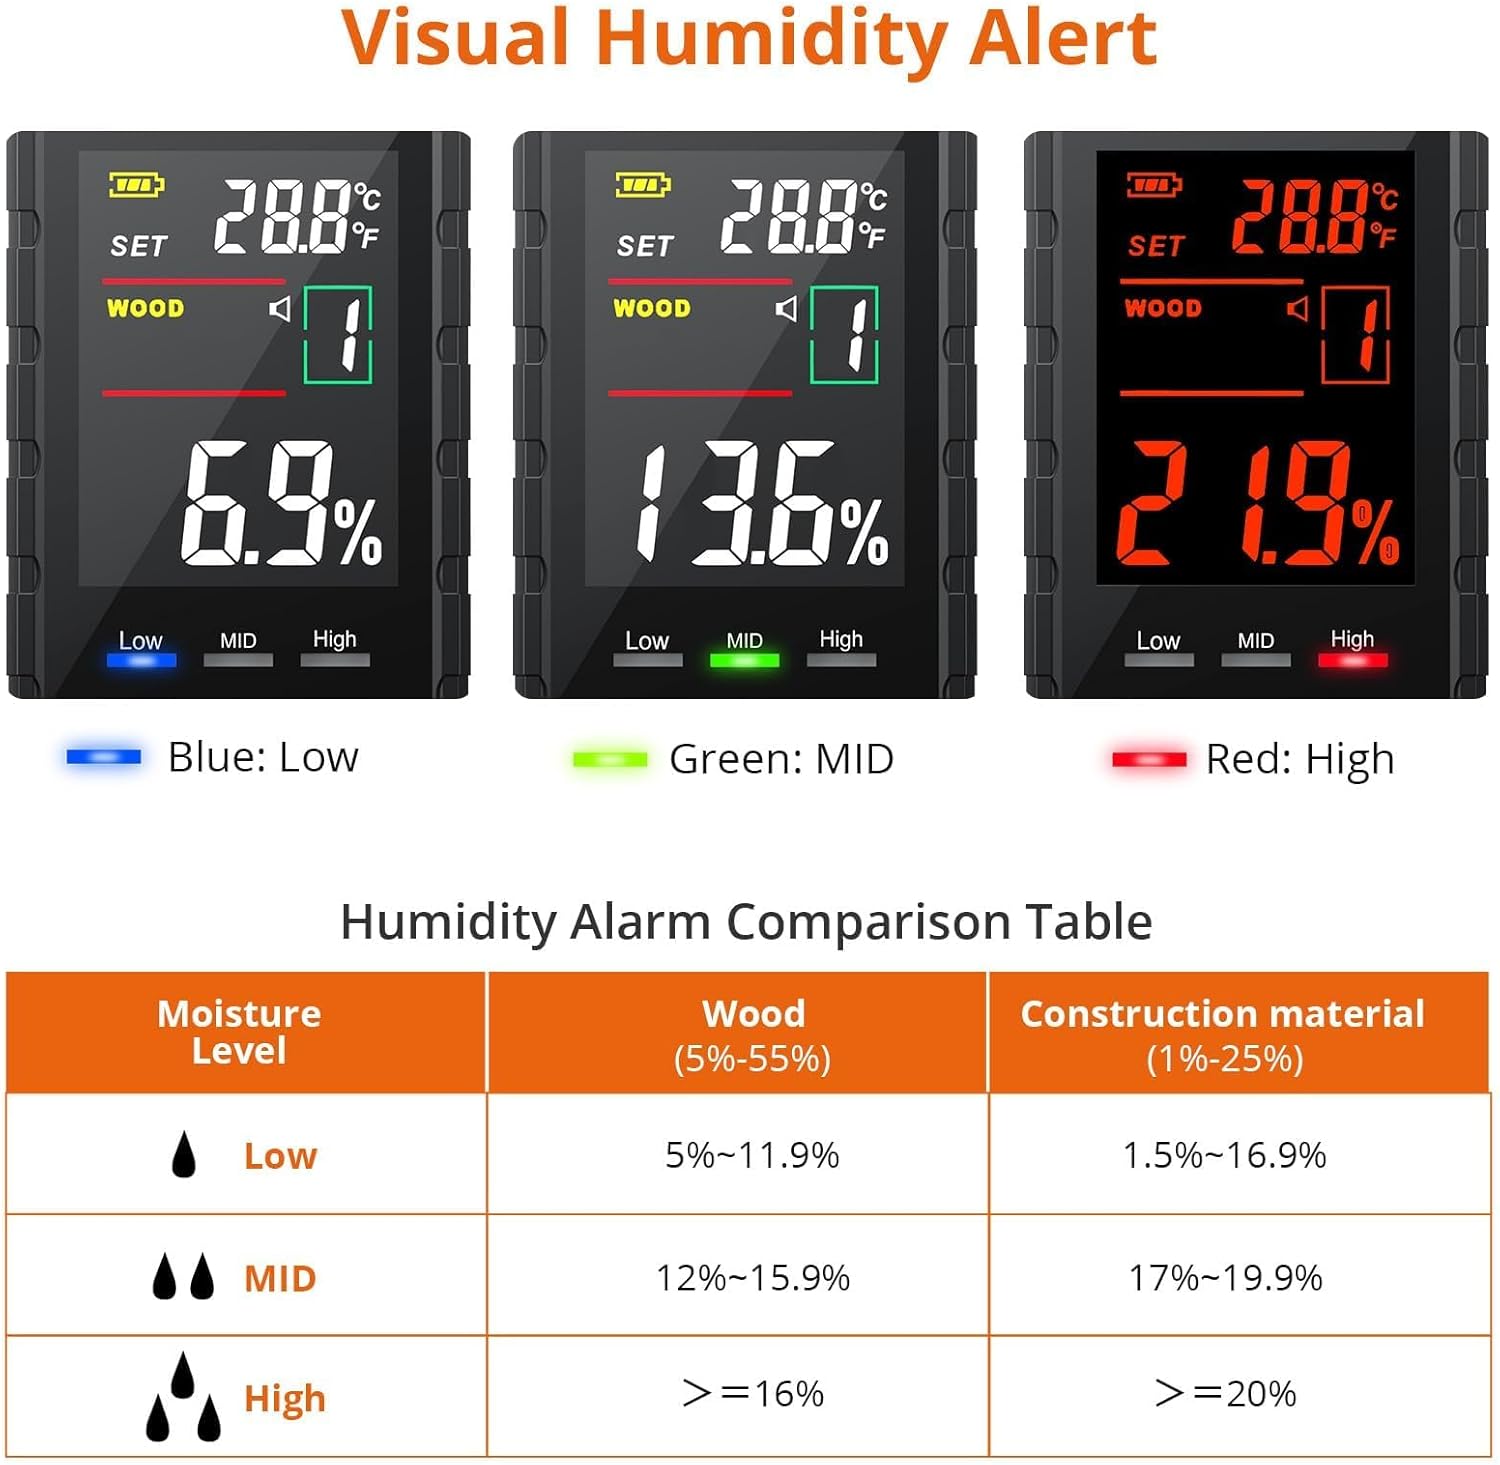
Figure 4.3: The display showing different backlight colors (Blue for Low, Green for Mid, Red for High) corresponding to moisture levels.

Figure 4.4: The meter displaying a high moisture reading with an high moisture level indicated by a red alarm icon.
4.6 Setting Red Backlight Alarm Value
The default threshold for the red backlight alarm is 12.0%. This value can be adjusted between 0.1% and 90%.
- Long press the SELECT/SET button to enter the alarm value setting mode. "ALR" will appear on the display.
- Use the POWER/HOLD button to decrease the value.
- Use the UNIT button to increase the value.
- Once the desired value is set, long press the SELECT/SET button again to confirm and exit the setting mode.
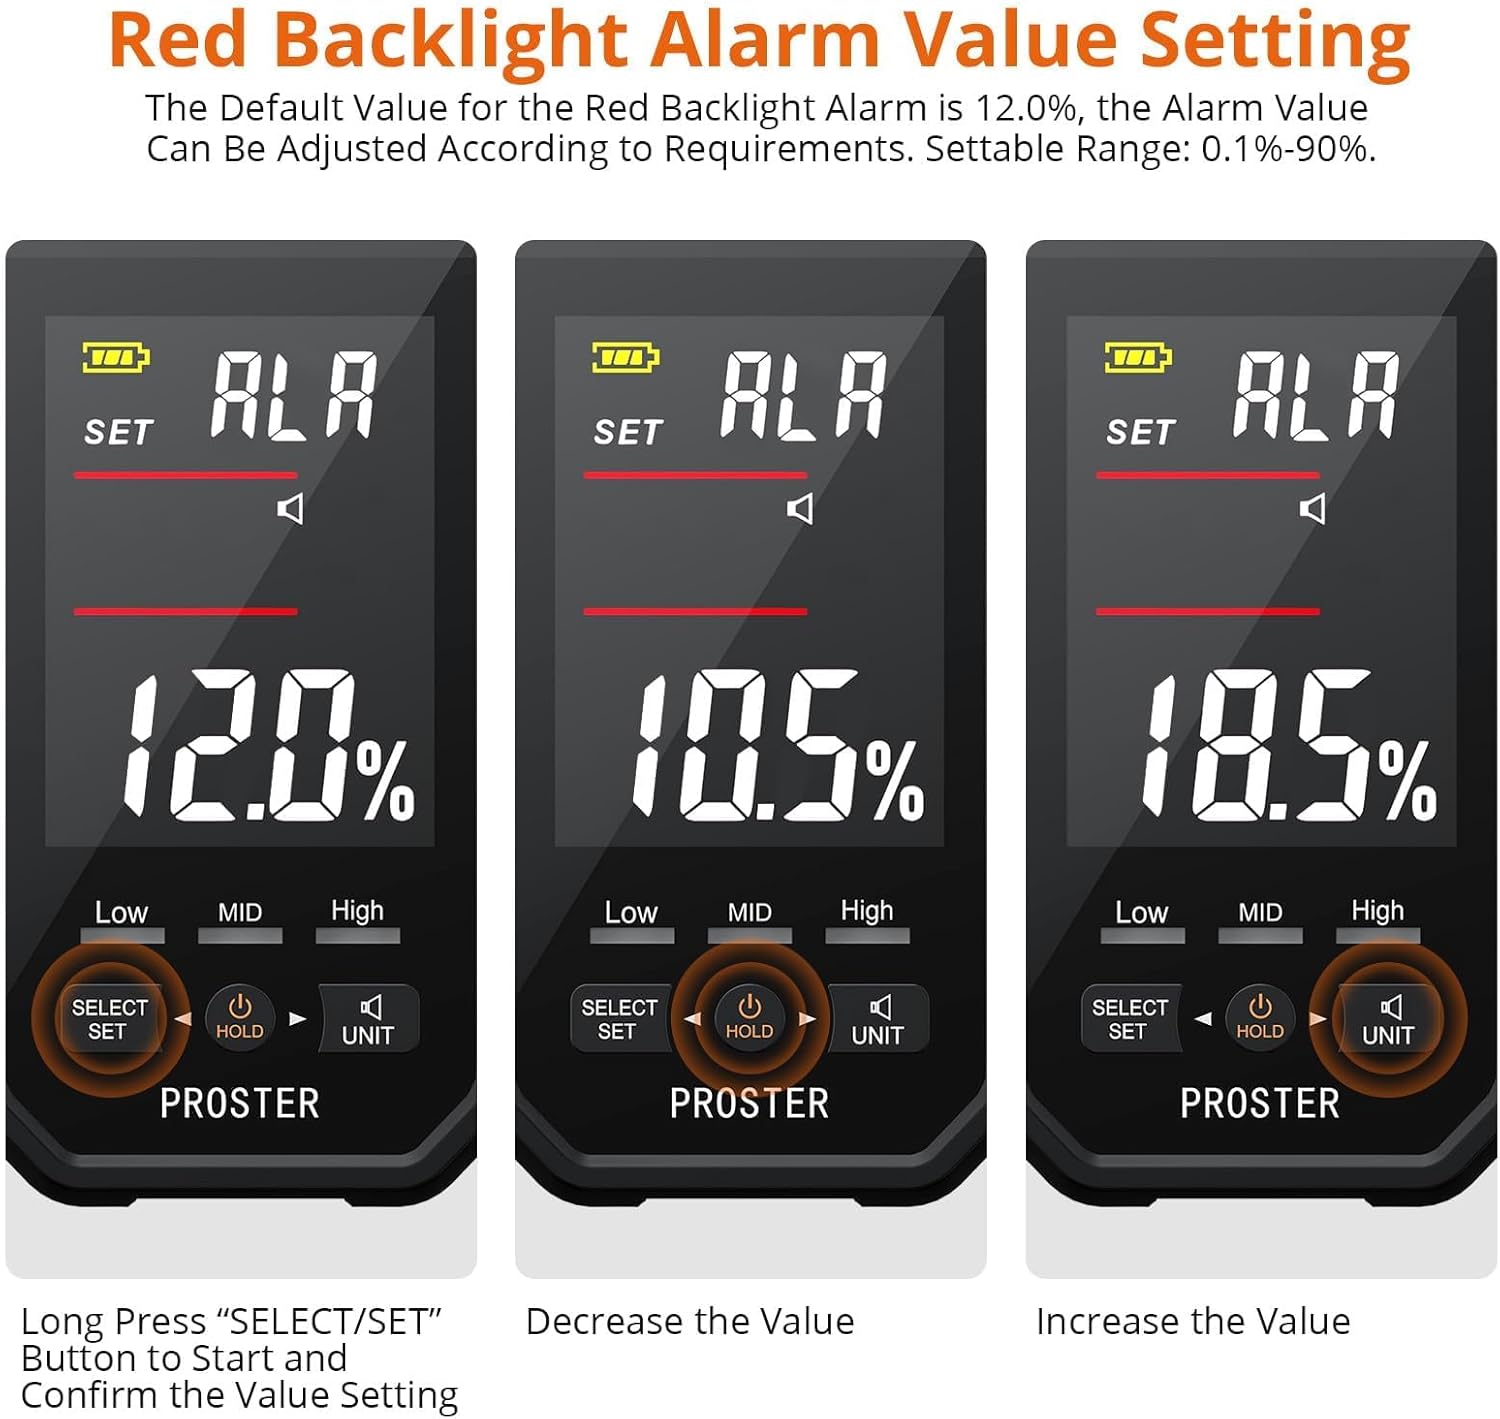
Figure 4.5: The display showing the process of setting the red backlight alarm value, including decreasing and increasing the percentage.
4.7 Data Hold Function
Press the POWER/HOLD button briefly during a measurement to lock the current reading on the display. Press it again to release the hold and resume live measurement (refer to Figure 1.4, item 6 for indicator).
4.8 Temperature Unit Selection
The device also displays ambient temperature. To switch between Celsius (°C) and Fahrenheit (°F), press and hold the UNIT button (refer to Figure 1.4, item 10 for indicator).
5. Measurement Modes and Ranges
The Proster PST227-US offers specific measurement ranges and alert thresholds for different material types.
5.1 Wood Moisture Measurement
Range: 5% - 55%
The device features 8 gears (modes) for wood, allowing for calibration based on different wood species or densities. This enhances measurement accuracy for various types of wood, including logs, lumber, and finished wood products.
Temperature Range: -9.9°C to 60°C (14.18°F to 140°F)
5.2 Building Material Moisture Measurement
Range: 1% - 25%
This mode is suitable for measuring moisture in various building materials such as walls, floors, concrete, and carton.
Temperature Range: -9.9°C to 60°C (14.18°F to 140°F)
5.3 Humidity Alarm Comparison Table
| Moisture Level | Wood (5%-55%) | Construction Material (1%-25%) |
|---|---|---|
| Low (Blue) | 5% - 11.9% | 1% - 16.9% |
| Mid (Green) | 12% - 15.9% | 17% - 19.9% |
| High (Red) | ≥ 16% | ≥ 20% |
Table 5.1: Moisture level thresholds for visual and audible alerts.
6. Maintenance
6.1 Cleaning the Device
- Wipe the device with a soft, dry cloth.
- Do not use abrasive cleaners or solvents.
- Ensure no moisture enters the device casing.
6.2 Battery Replacement
When the battery indicator on the LCD shows low power, replace all three AAA batteries promptly. Refer to Section 3.1 for battery installation instructions.
6.3 Storage
- Always replace the protective cap over the probes when not in use to prevent damage and injury.
- Store the device in its carrying pouch in a cool, dry place, away from direct sunlight and extreme temperatures.
- Remove batteries if storing for an extended period (e.g., several months) to prevent leakage.
7. Troubleshooting
- Device does not power on:
- Check if batteries are installed correctly with the right polarity.
- Replace with new batteries if the existing ones are depleted.
- Inaccurate readings:
- Ensure probes are fully inserted into the material.
- Verify that the correct measurement mode (Wood/Building Material) is selected.
- For wood, ensure the appropriate gear (1-8) is selected for the specific wood type. Different wood species have varying densities and moisture absorption characteristics.
- Clean the probes if they appear dirty or corroded.
- Allow the device to stabilize to the ambient temperature before use.
- Display is dim or flickering:
- Replace batteries.
- Difficulty removing battery cover or protective cap:
- Apply gentle, firm pressure while sliding the battery cover. For the protective cap, squeeze slightly and pull upwards. Avoid excessive force.
8. Specifications
| Feature | Detail |
|---|---|
| Model Number | PST227-US |
| Wood Moisture Range | 5% - 55% |
| Building Material Moisture Range | 1% - 25% |
| Temperature Range | -9.9°C to 60°C (14.18°F to 140°F) |
| Power Supply | 3 x AAA batteries (included) |
| Automatic Power Off | Approx. 10 minutes of inactivity |
| Display | Tricolor Backlit LCD |
| Dimensions | 17.09 x 8.2 x 4.19 cm |
| Weight | 222 g |
9. Warranty and Support
For warranty information, technical support, or any inquiries regarding your Proster PST227-US Moisture Meter, please refer to the contact information provided with your purchase or visit the official Proster website. Keep your purchase receipt as proof of purchase for warranty claims.


