1. Introduction
Thank you for choosing the Cozion Automatic Solar Chicken Coop Door. This intelligent device is designed to simplify the daily management of your poultry by automating the opening and closing of their coop door. Featuring multiple control modes, a robust design, and solar charging capabilities, it provides convenience and security for your chickens, ducks, and geese.
Key features include:
- Dual Power Supply: Equipped with a 5000mAh high-capacity battery and high-conversion solar panels for charging on sunny days. DC charging cable included for other weather conditions.
- Four Control Modes: Light sensor control, timer control, manual control, and remote control for flexible operation.
- Intelligent Anti-Pinch Design: A sensitive sensor automatically stops the door from closing and reopens if it detects a chicken in its path, preventing injury.
- Extreme Weather Operation: Constructed from durable aluminum and AES material with IPX7 waterproofing, ensuring reliable performance in snow, rain, and dust from -26°C to 60°C.
- Easy Installation & Operation: Simple setup in under 10 minutes with all necessary accessories. Features a large LCD screen for easy programming and status display.

Figure 1: Cozion Automatic Solar Chicken Coop Door in open and closed states.
2. Safety Information
- Read all instructions carefully before installation and operation.
- Ensure the installation surface is stable and secure to prevent the door from falling.
- Keep hands and loose clothing clear of the door's path during operation.
- The anti-pinch sensor is designed to protect animals. However, always supervise initial operations to ensure proper function.
- Do not attempt to modify or disassemble the device. Refer all servicing to qualified personnel.
- Keep the solar panel clean to ensure optimal charging efficiency.
- This product is designed for poultry. Do not use it for other purposes or with larger animals that may exceed its weight or size capacity.
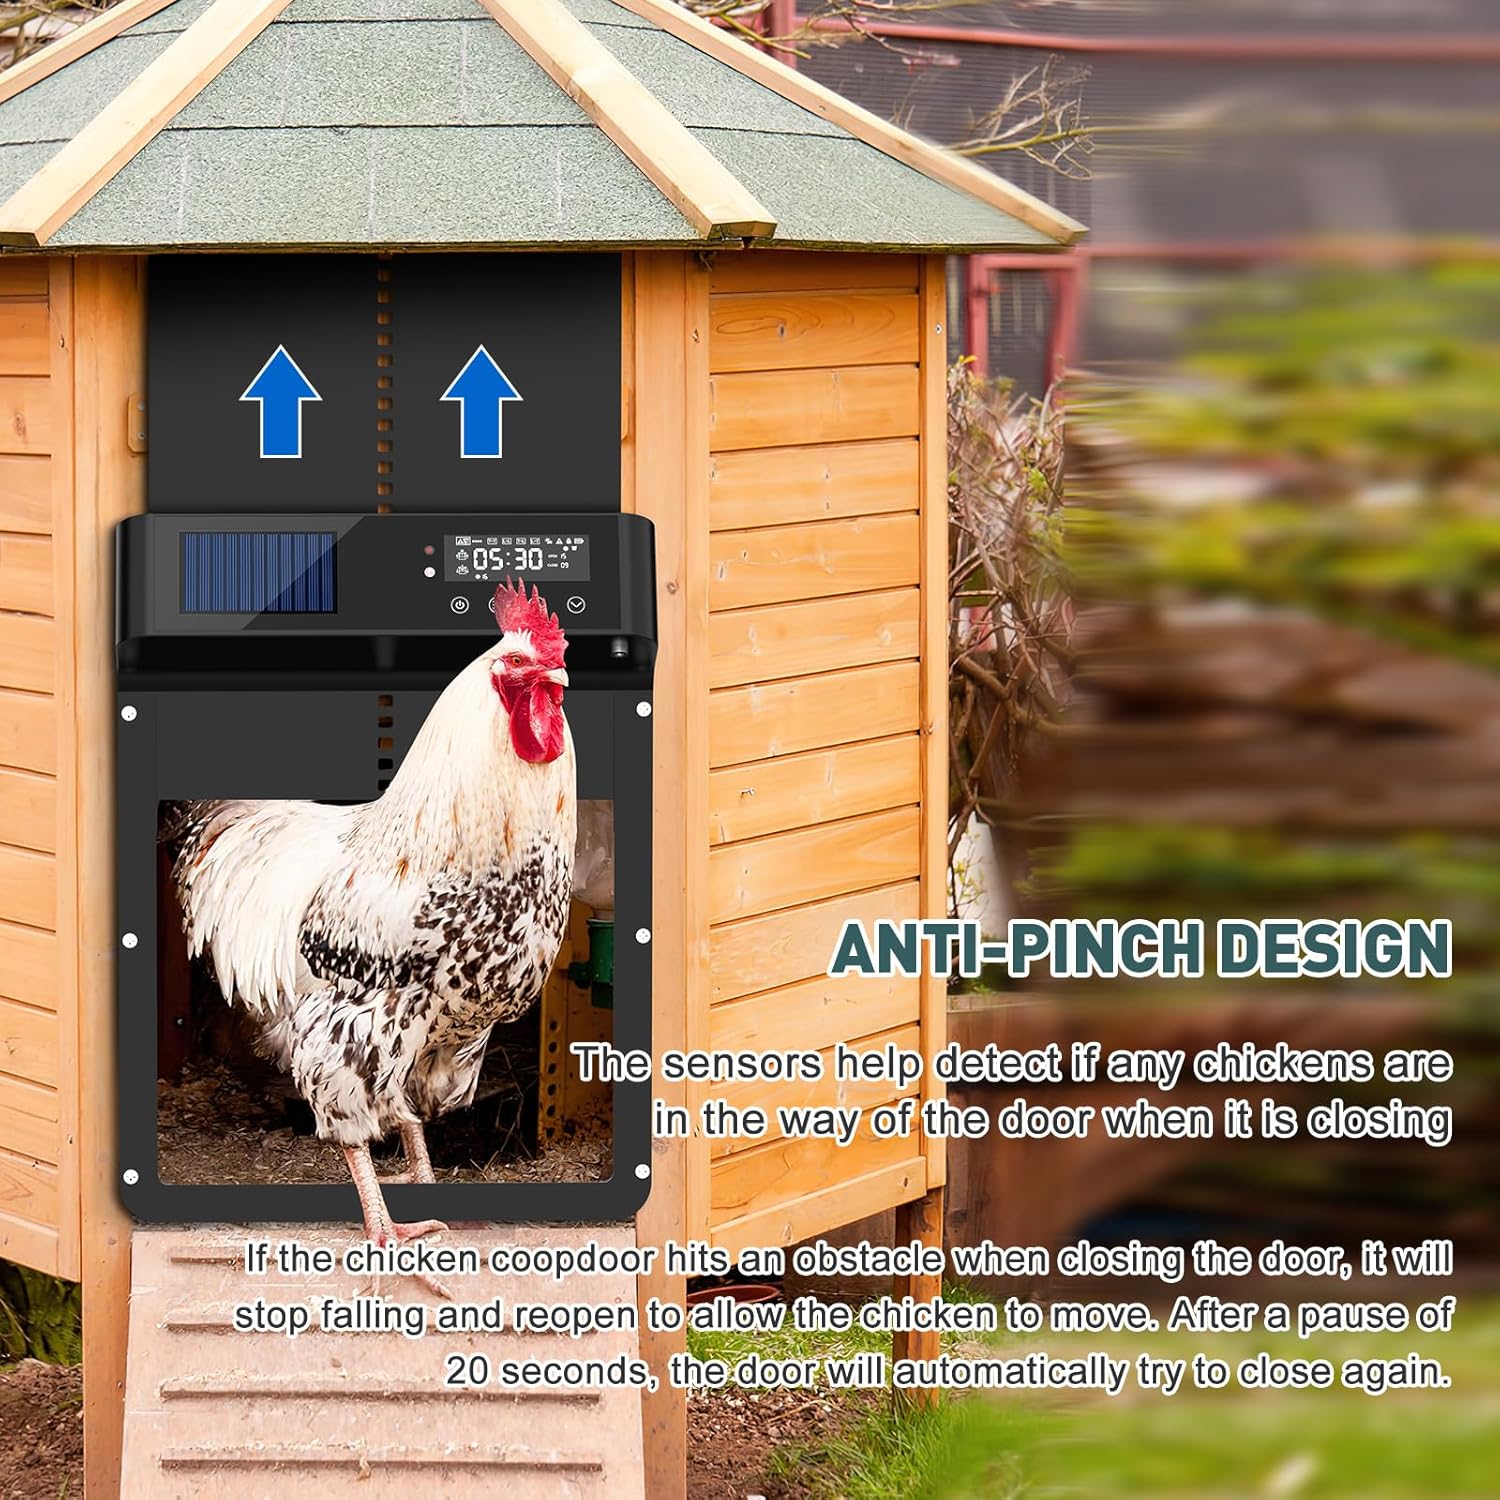
Figure 2: Intelligent Anti-Pinch Protection in action.
3. Package Contents
Please verify that all items are present and in good condition:
- 1x Cozion Automatic Solar Chicken Coop Door Unit
- 1x Remote Control
- 1x DC Charging Cable
- Mounting Screws and Wall Plugs
- 1x User Manual (this document)

Figure 3: Included components and product dimensions.
4. Setup and Installation
Installation typically takes less than 10 minutes. Follow these steps:
- Choose Location: Select a flat, vertical surface on your chicken coop where the door can operate freely without obstruction. Ensure the solar panel receives adequate sunlight.
- Mark Drilling Points: Hold the door unit against the desired installation spot. Use a pencil to mark the positions for the mounting screws through the pre-drilled holes on the unit.
- Drill Holes: Drill pilot holes at the marked positions. If installing on masonry or concrete, use appropriate drill bits and wall plugs.
- Mount the Unit: Align the door unit with the drilled holes and secure it firmly using the provided mounting screws. Do not overtighten the screws, as this may impede the door's movement.
- Initial Charge: Before first use, it is recommended to fully charge the internal battery using the DC charging cable, especially if solar charging conditions are not optimal. Connect the cable to the charging port on the unit and a suitable power source (power bank, laptop, adapter).
- Power On: Press the power button on the unit to turn it on. The LCD screen will illuminate.
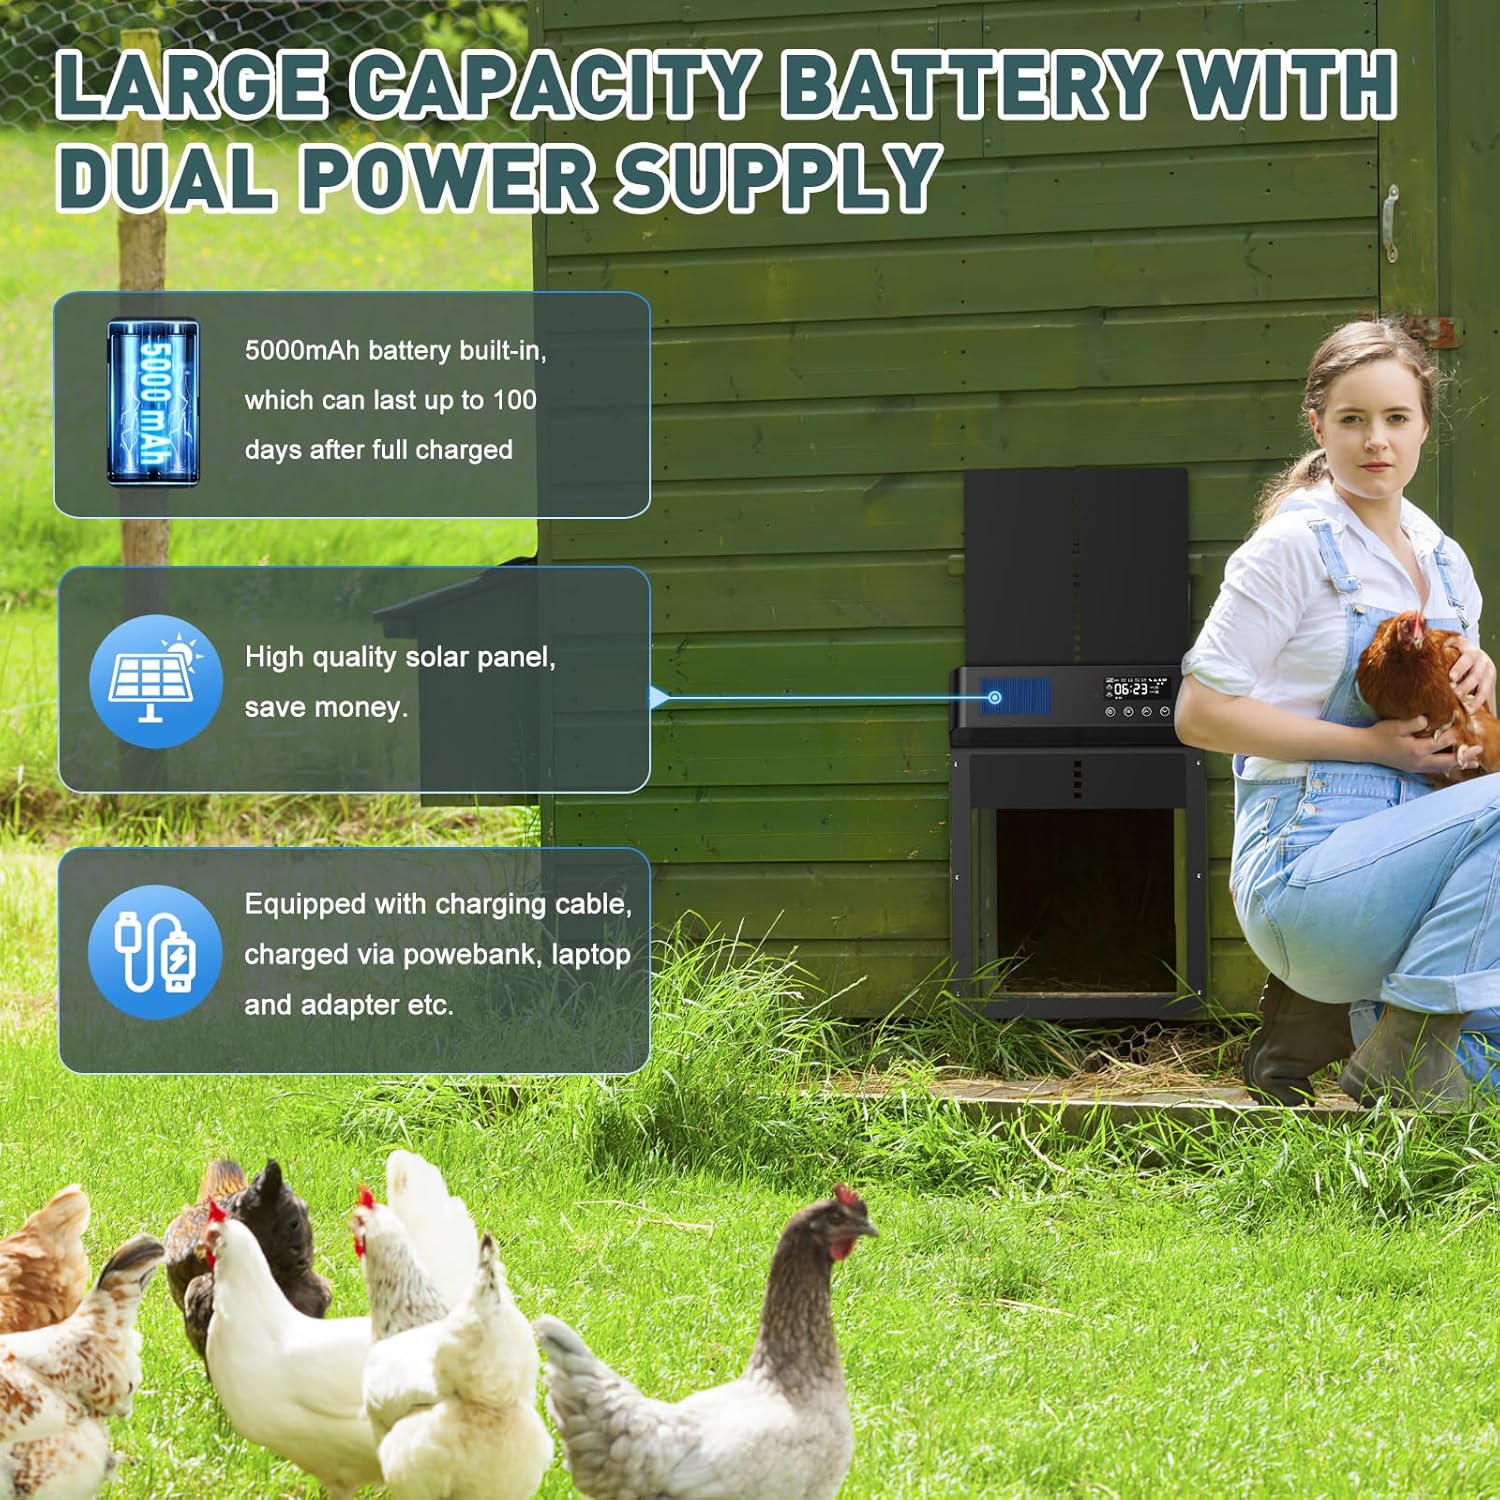
Figure 4: Dual power supply options for the door unit.
5. Operating Instructions
The Cozion Automatic Chicken Coop Door offers four intelligent control modes and four opening/closing modes for maximum flexibility.
5.1 LCD Display Overview
The clear LCD display shows the current time, battery status, selected mode, and open/close times. Use the buttons below the screen to navigate and set parameters.

Figure 5: Large LCD display for easy programming.
5.2 Control Modes
- Light Sensor Control: The door opens at dawn and closes at dusk based on ambient light levels. This mode adapts to seasonal changes automatically.

Light Sensor Mode
- Timer Control: Set specific opening and closing times. The door will operate precisely according to your programmed schedule.

Timer Mode
- Manual Control: Use the buttons on the unit to open or close the door manually at any time.

Manual Mode
- Remote Control: Operate the door wirelessly from a distance of 24-40 meters (80-130ft) using the provided remote control.

Remote Control Mode

Figure 6: Overview of the four intelligent control modes.
5.3 Opening and Closing Modes
The device supports four combined opening and closing modes:
- T-T Mode: Opening and closing at preset times.
- L-L Mode: Opening at dawn and closing at dusk (Light Sensor for both).
- T-L Mode: Opening at a preset time and closing at dusk (Light Sensor for close).
- L-T Mode: Opening at dawn (Light Sensor for open) and closing at a preset time.
Select the mode that best suits your needs and seasonal changes via the LCD display settings.

Figure 7: Four flexible opening and closing modes.
6. Maintenance
- Cleaning: Periodically wipe the door unit, especially the solar panel and the door tracks, with a soft, damp cloth to remove dust, dirt, or debris. Do not use abrasive cleaners or solvents.
- Battery Care: The integrated 5000mAh battery is designed for long life. Ensure the solar panel is exposed to direct sunlight for optimal charging. If the battery level is low during prolonged cloudy periods, use the DC charging cable to recharge the unit.
- Track Inspection: Regularly check the door tracks for any obstructions or signs of wear. Ensure the door slides smoothly.
- Sensor Check: Test the anti-pinch sensor periodically by gently placing an object in the door's path as it closes to ensure it reverses correctly.
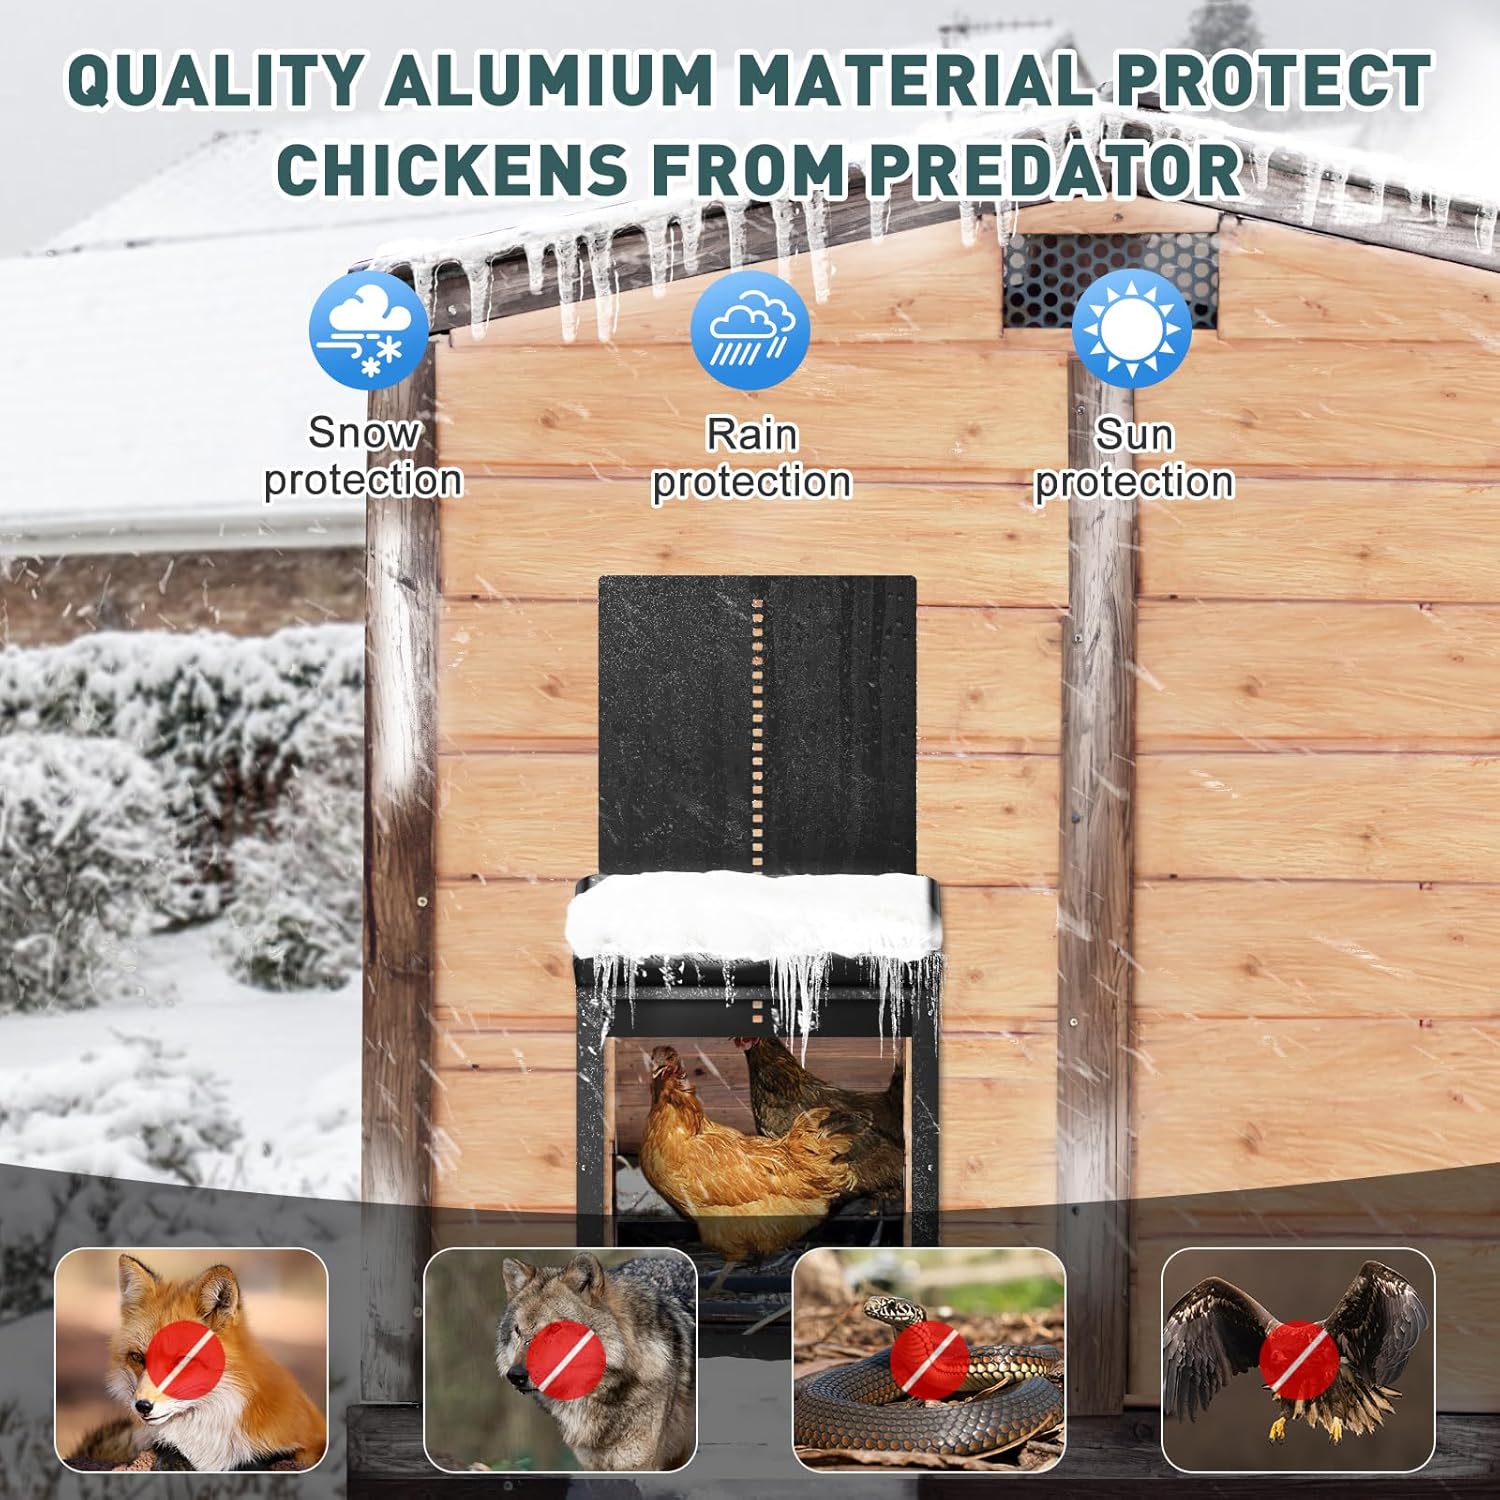
Figure 8: Durable aluminum material provides protection in extreme weather.
7. Troubleshooting
| Problem | Possible Cause | Solution |
|---|---|---|
| Door does not open/close at programmed times. | Incorrect time settings; low battery; light sensor obstructed or miscalibrated. | Verify time settings on LCD. Ensure battery is charged. Clean light sensor and ensure it's not blocked. Recalibrate light sensor if necessary. |
| Door stops or reverses during closing. | Anti-pinch sensor activated by obstruction (chicken, debris); door tracks are dirty or misaligned. | Check for obstructions in the door's path. Clean door tracks. Ensure the unit is mounted straight and securely. |
| Remote control not working. | Out of range; remote battery low; interference. | Move closer to the unit. Ensure line of sight. Check remote battery. Reduce potential interference sources. |
| Battery not charging. | Solar panel dirty or not receiving enough sunlight; DC charging cable faulty. | Clean solar panel. Relocate unit to a sunnier spot. Try a different DC charging cable or power source. |
| LCD display is blank or flickering. | Low battery; extreme temperatures. | Charge the battery. Ensure the unit is operating within its specified temperature range (-26°C to 60°C). |
8. Specifications
| Feature | Detail |
|---|---|
| Model Number | M1-FT-FR |
| Brand | Cozion |
| Recommended Species | Chicken |
| Unit Dimensions (H x W) | 35.6 cm x 27 cm (approx. 14.4 in x 10.7 in) |
| Door Opening Dimensions (H x W) | 27 cm x 23.4 cm (approx. 10 in x 9.2 in) |
| Weight | 1.53 Kilograms |
| Main Battery | 5000 mAh (Built-in, rechargeable) |
| Remote Control Battery | 1 AA (included) |
| Power Supply | Solar Powered, DC Charging |
| Material | Aluminum, AES |
| Waterproof Rating | IPX7 |
| Operating Temperature | -26°C to 60°C |
| Special Features | Durable, Waterproof, Anti-Pinch Sensor, LCD Display, Remote Control |
| Control Modes | Light Sensor, Timer, Manual, Remote |
9. Warranty and Support
Cozion offers a 90-day worry-free refund and a 1-year free warranty for this product. If you encounter any issues or have questions regarding your Automatic Solar Chicken Coop Door, please do not hesitate to contact our customer support team.
For support, please visit our official website or contact us via the details provided on your purchase receipt.


