Introduction
This user manual provides detailed instructions for the Heegomn Waterproof Digital Camera, Model BL8026. It covers essential information regarding product setup, operation, maintenance, and troubleshooting to ensure optimal performance and longevity of your device. This camera is designed for capturing high-definition photos and videos, particularly in underwater environments up to 17 feet (5 meters) deep, and is suitable for amateur enthusiasts, children, and students.
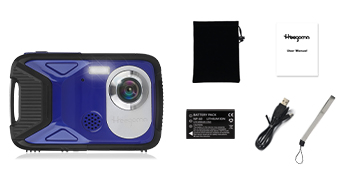
Package Contents
Please verify that all items listed below are included in your package:
- Heegomn Waterproof Digital Camera (Blue)
- NP-60 3.7V 1050mAh Lithium-Ion Battery
- 32GB Micro SD Card
- USB Charging Cable
- Wrist Strap
- User Manual
- Storage Pouch

Camera Overview
The Heegomn Waterproof Digital Camera features a robust design suitable for various environments. It includes a 2.8-inch LCD screen for easy viewing and navigation, a high-resolution lens, and intuitive control buttons for seamless operation.

Setup
1. Battery Installation and Charging
- Locate the battery compartment on the side or bottom of the camera.
- Carefully open the battery compartment. Note that the compartment may be designed for a tight seal to ensure waterproofing, requiring firm but gentle pressure to open.
- Insert the provided NP-60 3.7V 1050mAh Lithium-Ion battery, ensuring correct polarity.
- Close the battery compartment securely until you hear a click or feel it lock into place. It is crucial to ensure the battery cover is properly locked to maintain the camera's waterproof capability.
- Connect the camera to a power source using the supplied USB cable for initial charging. The battery can record continuously for 3-4 hours on a full charge.
2. SD Card Installation
- With the battery compartment open, locate the Micro SD card slot.
- Insert the 32GB Micro SD/SDHC card into the slot until it clicks into place. Ensure the card is inserted in the correct orientation.
- Close the battery compartment securely.
3. Initial Power On and Settings
- Press and hold the power button to turn on the camera.
- Upon first use, you may be prompted to set the date and time. Navigate using the directional buttons and confirm with the OK button.
4. Waterproof Seal Verification
Before using the camera underwater, always double-check that the battery compartment cover is completely sealed and locked. A loose cover will compromise the camera's waterproof integrity. It is recommended to perform a waterproof test without the camera first by submerging the empty compartment in water to ensure no leaks.
Operating the Camera
1. Power On/Off
- To power on, press and hold the Power button.
- To power off, press and hold the Power button again.
2. Mode Selection
Press the MODE button to switch between Photo, Video, and Playback modes.
3. Taking Photos
In Photo mode, frame your shot using the LCD screen and press the Shutter button to capture an image.

4. Recording Videos
In Video mode, press the Shutter button to start recording. Press it again to stop recording.
5. Using the Flash Light
The camera features a built-in flash light for low-light conditions. Access flash settings through the menu or a dedicated flash button to select modes like Auto or Off.

6. Digital Zoom
Utilize the zoom buttons (often marked with 'W' and 'T' or up/down arrows) to adjust the 8X digital zoom for closer shots.

7. Continuous Shooting
The camera supports 6 continuous shooting modes. Activate this feature through the camera's menu to capture a rapid sequence of images.
8. Self-Timer
Set a delay (e.g., 2, 5, or 10 seconds) before a photo is taken, allowing you to be part of the shot.
9. Face Detection and Smile Capture
Enable face detection to automatically focus on faces. With smile capture, the camera can automatically take a photo when a smile is detected.

10. Anti-Shaking
Activate the anti-shaking function in the settings to reduce blur caused by camera movement, especially useful in dynamic environments or when shooting handheld.
11. Playback and Deleting Files
In Playback mode, use the directional buttons to browse through your photos and videos. Press the Delete button (often marked with a trash can icon) to remove unwanted files.
12. Connecting to Computer (Downloading Pictures)
To transfer photos and videos to your computer, connect the camera using the provided USB cable. The camera will appear as a removable disk, allowing you to copy files directly.

Maintenance
1. Cleaning the Camera
- Use a soft, lint-free cloth to clean the camera body and screen.
- For the lens, use a specialized lens cleaning cloth and solution to avoid scratches.
- After underwater use, rinse the camera with fresh water and dry thoroughly with a soft cloth.
2. Battery Care
- Charge the battery fully before each use, especially for extended sessions.
- Store the battery in a cool, dry place when not in use.
- If the camera will not be used for a long period, remove the battery.
3. Waterproofing Best Practices
- Always ensure the battery compartment cover is completely sealed and locked before submerging the camera.
- Avoid opening the battery compartment in wet or sandy environments.
- Regularly inspect the rubber seals around the battery compartment for any signs of damage or debris.
Troubleshooting
This section addresses common issues you might encounter with your Heegomn Waterproof Digital Camera.
- Question: Why is my camera not waterproof?
Answer: The camera is completely sealed once the battery cover is securely closed. If the battery cover is not properly locked, water may enter. Always ensure to tightly close the battery cover after each charging session and before any water exposure. - Question: Why is the photo not clear when viewed back on the camera?
Answer: The camera uses energy-saving technology, which may slightly reduce screen display clarity to extend battery life. For best viewing clarity, import your photos or videos to your computer. - Question: I don't receive the 32GB Micro SD Card, or it said card error.
Answer: Please contact customer support to receive a new card. - Question: Battery not working or will not hold charge.
Answer: Please contact customer support to receive a new battery. - Issue: Difficulty opening the battery compartment.
Solution: The battery compartment is designed for a tight, waterproof seal. Apply firm, even pressure to slide or unlatch the cover. Avoid excessive force to prevent damage. If persistent difficulty occurs, ensure no debris is obstructing the mechanism.
Specifications
| Brand | Heegomn |
| Model Name | 8026Y |
| Model Number | BL8026 |
| Maximum Webcam Image Resolution | 13 MP |
| Effective Still Resolution | 21 MP |
| Photo Sensor Resolution | 13 MP |
| Video Resolution | 1080p (Full HD) |
| Frame Rate | 30 fps |
| Optical Zoom | 8 x |
| Digital Zoom | 8 x |
| Image Stabilization | Optical |
| Screen Size | 2.8 Inches (LCD) |
| Water Resistance Level | Waterproof |
| Water Resistance Depth | 5 Meters (17 FT) |
| Battery Type | Lithium Ion (NP-60) |
| Battery Capacity | 1.05 Amp Hours (1050mAh) |
| Battery Average Life | 3-4 Hours (recording) |
| External Memory Size | 32 GB (SD/SDHC Card) |
| Connectivity Technology | USB |
| Color | Blue |
Warranty and Support
Warranty Information
This Heegomn Waterproof Digital Camera comes with a 1-year manufacturer warranty. Additionally, a 3-month free replacement or refund service is available.
Customer Support
Should you have any questions, concerns, or require assistance with your product, please do not hesitate to contact our customer support team. We are committed to responding to all inquiries within 24 hours.
For support, please refer to the contact information provided on the product packaging or the official Heegomn website.