1. Introduction
This user manual provides essential information for the safe and effective operation of your FLARING FM175D 6-in-1 Multiprocess Welder. Please read this manual thoroughly before operating the machine to ensure proper usage, maximize performance, and prevent potential hazards. Keep this manual for future reference.

Figure 1: FLARING FM175D Multiprocess Welder and included accessories.
2. Key Features
- UPGRADED MIG WELDER & EXCLUSIVE LARGE LED DISPLAY: Designed with an intelligent LED screen, the FM175D provides you with an accurate data display and more options to help you take easier and clearer readings without removing your helmet. Exclusive design, simple operation, easy to use.
- 6-IN-1 MULTIPROCESS WELDER: The multi-process welding machine that included Gas/Solid Wire MIG(GMAW), Gasless Flux Core MIG(FCAW), Stick/MMA, Spot welding, Lift TIG, spool gun connector optional (tig gun and spool gun not included). Suitable for all kinds of welding requirements .023"/.030"/.035" solid wire, .030"/.035"/.040" flux core wire, .035"/.040" aluminum wire. Arc Welding fits rods E7018, E6013.
- SYNERGIC CONTROL, ONE BUTTON OPERATION: This FM175D welders can automatically match current and voltage after the diameter of the welding electronic is selected, which is ideal for beginners to learn welding; You can adjust the current as your need, it's also perfect for professionals. With one-touch easy adjustment of preset work modes, everyone can be a welding expert. MORE EFFICIENT.
- ADVANTAGES: The FM175D is designed with a wide voltage range of 100V-260V, ensuring it can handle voltage fluctuations without any issues. It comes with an American standard L6-50P power cord plug and includes a 240V to 120V adapter cable, making it convenient to switch between different work environments. Furthermore, the inner cover of the chassis provides detailed welding parameter guidelines, along with official authoritative recommendations, addressing all your concerns.

Figure 2: Overview of the 6-in-1 multi-process welding capabilities.
3. Package Contents
Upon opening the package, verify that all the following items are included:
- 1 x FLARING FM175D Welder
- 1 x 8.3ft Air hose with quick-fit couplings
- 1 x 10ft MIG Torch
- 1 x 6.6ft Ground Clamp
- 1 x 6.6ft Electronic Holder
- 1 x .030"/1.1 lbs Flux Cored Wire
- 2 x 0.8/.030" conductive Nozzle
- 1 x 0.9/.035" conductive Nozzle
- 2 x 1.0/.040" conductive Nozzle
- 2 x Ceramic nozzle
- 2 x Wrench
- 1 x 20cm conversion line (220V to 110V)
- 2 x Wire feed wheel (.030"/.035" & .030"/.040")
- 1 x English User Manual
Video 1: Unboxing and overview of the FLARING FM175D Welder and its included accessories. This video also demonstrates the various welding modes.
4. Safety Information
WARNING: Welding can be dangerous. Always follow safety precautions to prevent injury or death.
- Always wear appropriate personal protective equipment (PPE), including a welding helmet with proper shade, flame-resistant clothing, welding gloves, and safety shoes.
- Ensure adequate ventilation to avoid inhaling welding fumes.
- Protect bystanders from arc rays and hot metal.
- Disconnect power before servicing or changing parts.
- Do not weld near flammable materials.
- Ensure the welding machine is properly grounded.
- Be aware of electrical shock hazards.

Figure 3: The FM175D features multiple safety protections including over voltage, over current, overload, and overheating protection, along with efficient heat dissipation.
5. Setup
5.1 Power Connection
The FM175D supports dual voltage input (110V/120V and 220V/240V). It comes with an American standard L6-50P power cord plug and includes a 240V to 120V adapter cable for versatile use in different work environments. Connect the appropriate power cable to a suitable power outlet.
5.2 Wire Feed Structure
The welder features a stable and smooth wire feed mechanism. Refer to the diagram below for component identification:
- Welding Wire (2.2lbs / .023")
- Automatic Wire Feed
- Wire Pressing Wheel
- Wire Feeding Wheel

Figure 4: Detailed view of the wire feed structure for stable and smooth wire delivery.
Install the welding wire onto the spool holder and thread it through the wire feed mechanism according to the instructions provided on the inner cover of the chassis.
6. Operating Instructions
The FM175D offers multiple welding modes. Use the intelligent LED display and control knobs for precise adjustments.
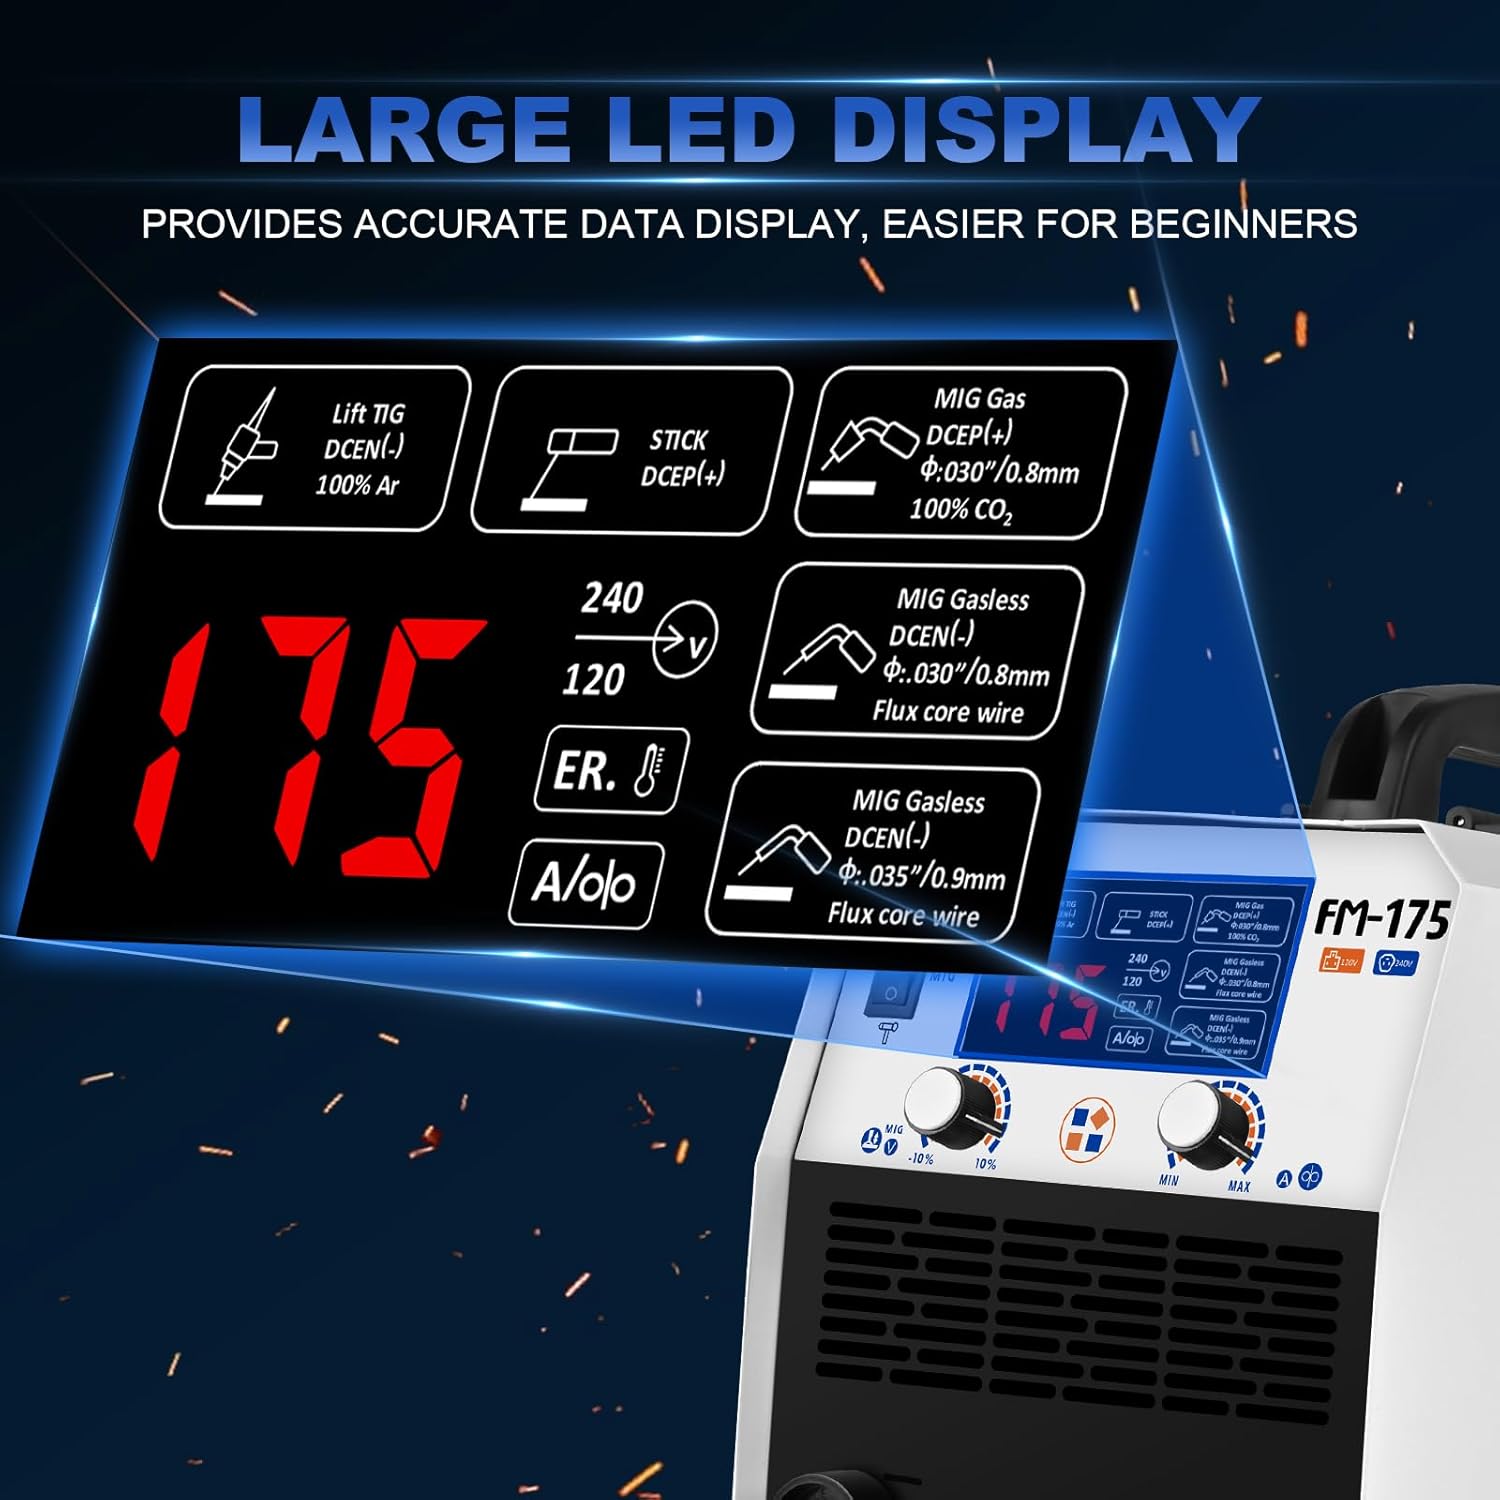
Figure 5: The large LED display provides accurate data and easy readability for various welding modes.
6.1 Mode Selection and Synergic Control
The welder features synergic control, automatically matching current and voltage once the welding electronic diameter is selected. This simplifies operation for beginners while allowing professionals to fine-tune settings as needed. Use the mode selection button to switch between the following welding processes:
- Gas/Solid Wire MIG (GMAW): For welding with shielding gas and solid wire.
- Gasless Flux Core MIG (FCAW): For welding with flux-cored wire without external shielding gas.
- Stick/MMA: For manual metal arc welding with coated electrodes.
- Lift TIG: For TIG welding (TIG gun not included).
- Spot Welding: For precise spot welds.
- Spool Gun Connector Optional: For use with a spool gun (not included), typically for aluminum welding.
The inner cover of the chassis provides detailed welding parameter guidelines and official authoritative recommendations for each mode.

Figure 6: The multi-function welder is suitable for various materials including carbon steel, stainless steel, iron, and aluminum.
7. Maintenance
Regular maintenance ensures the longevity and optimal performance of your welding machine.
- Keep the machine clean and free from dust and debris. Use compressed air to blow out internal components periodically.
- Inspect all cables and connections for wear or damage before each use. Replace any damaged parts immediately.
- Check the wire feed mechanism for proper alignment and cleanliness.
- Ensure the cooling fan is unobstructed and functioning correctly to prevent overheating.
- Store the welder in a dry, clean environment when not in use.
8. Troubleshooting
If you encounter issues with your FLARING FM175D welder, refer to the following common troubleshooting tips:
| Problem | Possible Cause | Solution |
|---|---|---|
| No power to the machine | Power cord unplugged, circuit breaker tripped, faulty power switch. | Check power connections, reset circuit breaker, contact support if switch is faulty. |
| No arc/poor arc stability | Improper grounding, incorrect settings, worn consumables, wrong wire/electrode. | Ensure proper ground clamp connection, adjust settings, replace worn nozzles/tips, use correct welding material. |
| Wire feeding issues | Tangled wire, incorrect wire tension, clogged liner, wrong drive roll size. | Untangle wire, adjust tension, clean/replace liner, ensure correct drive rolls are installed. |
| Overheating protection activated | Exceeded duty cycle, poor ventilation, blocked fan. | Allow machine to cool down, ensure proper airflow, clear any obstructions from fan. |
For more complex issues, please refer to the detailed troubleshooting section in the included English User Manual or contact FLARING customer support.
9. Specifications
| Specification | Value |
|---|---|
| Manufacturer | FLARING |
| Part Number | FM175D |
| Item Weight | 10.78 pounds |
| Product Dimensions | 13.8 x 6 x 7.4 inches |
| Item Model Number | FM175D |
| Size | Medium |
| Color | White |
| Pattern | MIG Welder-4EN-175A-120/240V |
| Power Source | AC |
| Voltage | 120-240 Volts |

Figure 7: Physical dimensions and net weight of the FM175D welder.
10. Warranty and Support
FLARING offers a full 2-year warranty on this product, along with 53 days hassle-free returns. For any questions, technical assistance, or warranty claims, please contact FLARING customer support through the official channels provided in your product packaging or on the FLARING website.
Choose FLARING, JUST STITCHING WITH FIRE.