1. Introduction
The horizont Shockstar S70 is a solar-powered electric fence energizer designed for reliable animal containment. It features an integrated 10W solar panel and a 12Ah battery, making it ideal for remote locations without access to mains power. This energizer is suitable for electric fences up to 12 km or for powering up to 5 electric nets of 50 meters each, effectively managing animals such as horses, cattle, sheep, and goats.

Image: The horizont Shockstar S70 Solar Electric Fence Energizer, showing the main unit with solar panel, the 12V 12Ah battery, a warning sign, and the fence connection kit including a ground stake.
2. What's in the Box
Please check the package contents against the list below:
- Electric fence energizer with integrated solar panel
- Super Vlies 12V 12Ah Battery
- Warning sign
- Fence and ground connection kit
- Ground stake

Image: A visual representation of the package contents, including the solar energizer, 12V 12Ah battery, warning sign, and connection cables with a ground stake.
3. Setup
3.1 Unpacking and Initial Inspection
Carefully remove all components from the packaging. Inspect for any signs of damage during transit. If any parts are missing or damaged, contact customer support immediately.
3.2 Battery Installation and Placement
The Shockstar S70 comes with an integrated 12Ah battery. Ensure the battery is securely placed within its compartment. Position the energizer in an area that receives maximum direct sunlight throughout the day for optimal solar charging. The unit is designed for autonomous operation in isolated areas.

Image: The energizer with its top cover open, revealing the battery compartment. Labels indicate energy control, easy opening, and a comfortable handle for transport.
3.3 Solar Panel Adjustment
The solar panel can be adjusted to maximize sun exposure throughout the seasons. Pre-set angles are available for different times of the year:
- Transport Position: 90 degrees
- Winter: 60 degrees
- Spring/Autumn: 50 degrees or 43 degrees
- Summer: 36 degrees
Adjust the panel to the appropriate angle for your location and season to ensure efficient charging.

Image: Illustrations demonstrating how to adjust the solar panel angle for optimal sun exposure during winter, spring/autumn, and summer, along with a close-up of the angle adjustment dial.
3.4 Grounding and Fence Connection
Connect the provided ground stake firmly into the earth. Ensure a good electrical connection. Then, connect the energizer to your electric fence using the supplied connection kit. Refer to the markings on the energizer for positive (+) and negative (-) connections.

Image: The Shockstar S70 energizer installed in a field, connected to a fence line. Icons indicate its 10W solar panel, 0.72J pulse energy, and suitability for fences up to 12 km for various animals.
4. Operating the Energizer
4.1 Power On/Off and Monitoring
The energizer features a 3-level LED indicator to monitor battery status and fence activity. A flashing LED indicates that the energizer is producing pulses. Refer to the control panel inside the unit for specific ON/OFF settings and battery level indications.
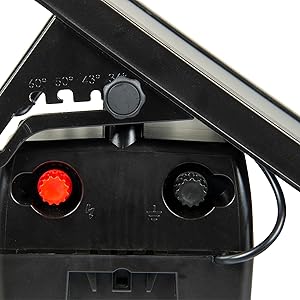
Image: A close-up view of the internal control panel of the energizer, displaying indicators for battery charge and fence pulse activity, along with ON/OFF switch positions.
4.2 Energy Saving Function
The Shockstar S70 automatically adapts its power consumption to optimize energy usage and reduce operating costs. This intelligent circuit ensures efficient operation, especially when relying solely on solar power.

Image: The energizer in a field setting, illustrating its flexible power supply options (12V battery, 9V battery, solar) and highlighting its automatic energy-saving circuit and autonomous function.
5. Maintenance
5.1 Battery Care
Regularly check the battery charge level using the LED indicators. Ensure the solar panel has unobstructed access to sunlight to keep the battery charged. For prolonged storage, ensure the battery is fully charged and store the unit in a cool, dry place.
5.2 Solar Panel Cleaning
Keep the solar panel clean from dirt, dust, leaves, and snow to maintain optimal charging efficiency. Use a soft, damp cloth to gently wipe the panel surface.
5.3 Fence Line Inspection
Periodically inspect your electric fence line for any breaks, shorts, or vegetation touching the wires, which can reduce the energizer's effectiveness.
6. Troubleshooting
- No Pulse or Weak Pulse:
- Check the battery charge level. Ensure the solar panel is clean and receiving adequate sunlight.
- Verify all fence and ground connections are secure and free from corrosion.
- Inspect the fence line for any shorts (e.g., vegetation touching the wire, broken insulators).
- Ensure the ground stake is driven deep enough into moist soil for effective grounding.
- LED Indicators Not Functioning:
- Check the battery connection and charge.
- Ensure the energizer is switched ON.
7. Specifications
| Manufacturer | horizont |
| Model Number | shockstar S70 |
| Package Dimensions | 43 x 28 x 21 cm |
| Weight | 8 Kilograms |
| Battery | 12Ah (included) |
| Solar Panel Power | 10W |
| Maximum Voltage | 11,500 V |
| Pulse Energy | 0.6 J |
| Maximum Fence Length | Up to 12 km |
| Country of Origin | Germany |
8. Warranty and Support
8.1 Warranty Information
Specific warranty details for the horizont Shockstar S70 are typically provided with the product packaging or can be found on the manufacturer's official website. Please retain your proof of purchase for any warranty claims. Information regarding spare parts availability is currently unavailable.
8.2 Customer Support
For technical assistance, troubleshooting, or inquiries about your horizont Shockstar S70, please refer to the contact information provided in your product documentation or visit the official horizont website. Always provide your model number (Shockstar S70) and purchase details when contacting support.


