
Aspiron AS-CA006
Aspiron Canister Vacuum Cleaner User Manual
Model: AS-CA006
1. Important Safety Instructions
Read all instructions before using this appliance. To reduce the risk of fire, electric shock, or injury, follow these basic precautions:
- Do not leave appliance when plugged in. Unplug from outlet when not in use and before servicing.
- Do not use outdoors or on wet surfaces.
- Do not allow to be used as a toy. Close attention is necessary when used by or near children.
- Use only as described in this manual. Use only manufacturer's recommended attachments.
- Do not use with damaged cord or plug. If appliance is not working as it should, has been dropped, damaged, left outdoors, or dropped into water, return it to a service center.
- Do not pull or carry by cord, use cord as a handle, close a door on cord, or pull cord around sharp edges or corners. Do not run appliance over cord. Keep cord away from heated surfaces.
- Do not unplug by pulling on cord. To unplug, grasp the plug, not the cord.
- Do not handle plug or appliance with wet hands.
- Do not put any object into openings. Do not use with any opening blocked; keep free of dust, lint, hair, and anything that may reduce air flow.
- Keep hair, loose clothing, fingers, and all parts of body away from openings and moving parts.
- Do not pick up anything that is burning or smoking, such as cigarettes, matches, or hot ashes.
- Do not use to pick up flammable or combustible liquids, such as gasoline, or use in areas where they may be present.
- Do not use without dust cup and/or filters in place.
- Turn off all controls before unplugging.
- Use extra care when cleaning on stairs.
2. Product Overview
The Aspiron Canister Vacuum Cleaner (Model AS-CA006) is designed for efficient and versatile cleaning across various surfaces in your home. Its powerful 1600W motor provides strong suction for deep cleaning, while its compact and lightweight design ensures easy maneuverability and storage.

Image: The Aspiron Canister Vacuum Cleaner with its main unit, telescopic wand, floor nozzle, and various attachments including the pet turbo tool, crevice tool, and small dust brush, along with a HEPA filter.
Components Included:
- Main Canister Unit
- Flexible Hose
- Telescopic Wand
- Floor Nozzle (for hard floors and carpets)
- Crevice Tool
- Pet Turbo Tool
- Small Dust Brush
- Upholstery Brush
- H13 HEPA Filter (pre-installed and spare)
- Instruction Manual

Image: A collage showing the four versatile cleaning tools: Crevice Nozzle for tight spaces, Pet Turbo Tool for pet hair, Small Dust Brush for delicate surfaces, and Upholstery Brush for fabrics.
3. Setup and Assembly
- Unpack: Carefully remove all components from the packaging.
- Attach Hose: Insert the flexible hose into the suction inlet on the main canister unit until it clicks securely into place.
- Assemble Wand and Nozzle: Connect the telescopic wand to the end of the flexible hose. Then, attach the desired floor nozzle or accessory tool to the end of the telescopic wand. Ensure all connections are firm.
- Power Cord: Unwind the power cord from the unit. The vacuum features an automatic cord rewind system.
Image: The main vacuum unit and its components laid out, demonstrating how the hose, wand, and attachments connect for assembly.
4. Operating Instructions
4.1 Powering On and Off
- Plug the power cord into a suitable electrical outlet.
- Press the power button located on the main unit to turn the vacuum on or off.
4.2 Suction Control
The Aspiron Canister Vacuum features adjustable suction power to suit different cleaning needs.
- Rotate the suction control dial on the main unit to increase or decrease suction.
- For delicate surfaces or light cleaning, use lower suction. For deep cleaning carpets or heavily soiled areas, use maximum suction.

Image: A detailed view of the suction power control dial, allowing users to adjust the vacuum's intensity from minimum to maximum.
4.3 Cleaning Different Surfaces
The versatile design and included attachments allow for effective cleaning on various surfaces.
- Hard Floors (Wood, Tile, Laminate): Use the floor nozzle with the brush setting retracted (if applicable) or the appropriate hard floor attachment for optimal results.
- Carpets and Rugs: Use the floor nozzle with the brush setting extended (if applicable) or the pet turbo tool for deeper cleaning, especially for pet hair.
- Upholstery and Fabrics: Use the upholstery brush or pet turbo tool for furniture, curtains, and car interiors.
- Tight Spaces and Corners: The crevice tool is ideal for reaching narrow gaps, edges, and corners.
- Above-Floor Cleaning: Extend the telescopic wand and attach the small dust brush for cleaning shelves, blinds, and other elevated surfaces without bending.

Image: A split image demonstrating the vacuum's effectiveness on both low pile carpet and hard floor surfaces, highlighting its multi-surface cleaning capability.

Image: The vacuum's low-profile floor nozzle reaching under a bed, illustrating its ability to clean hard-to-reach areas without requiring the user to stoop.
4.4 Automatic Cord Rewind
To retract the power cord, simply step on the cord rewind pedal located on the main unit. The cord will automatically retract into the vacuum for convenient storage.

Image: A foot pressing the cord rewind pedal on the vacuum, demonstrating the automatic cord retraction feature for easy storage.
4.5 Official Product Video
Video: An official product video from Aspiron demonstrating the key features and benefits of the Aspiron Canister Vacuum Cleaner, including its powerful suction, versatile tools, and automatic cord rewind.
5. Maintenance
Regular maintenance ensures optimal performance and extends the life of your vacuum cleaner.
5.1 Emptying the Dust Cup
The 3.7Qt large capacity dust cup should be emptied when the MAX fill line is reached or when suction power decreases.
- Ensure the vacuum is unplugged from the power outlet.
- Press the dust cup release button and lift the dust cup away from the main unit.
- Position the dust cup over a trash bin.
- Press the bottom release latch to open the dust cup and empty its contents.
- Close the bottom latch securely and reattach the dust cup to the main unit until it clicks into place.

Image: The washable dust cup and HEPA filter being rinsed under water, illustrating the ease of cleaning these components to maintain hygiene and performance.

Image: A hand holding the transparent dust cup over a trash bin, demonstrating the simple process of emptying collected debris.
5.2 Cleaning Filters
The vacuum features a 3-stage filtration system with an H13 HEPA inlet filter and an outlet sponge filter. Regular cleaning of these filters is crucial for maintaining suction and preventing secondary pollution.
- Inlet HEPA Filter:
- Locate the HEPA filter compartment, usually near the dust cup.
- Remove the HEPA filter. Tap it gently over a trash bin to remove loose dust.
- Rinse the filter under cool running water until the water runs clear. Do not use detergent.
- Allow the filter to air dry completely for at least 24 hours before reinserting. Do not use a hairdryer or other heating methods.
- Outlet Sponge Filter:
- Locate the outlet sponge filter, typically at the rear of the unit.
- Remove the sponge filter and rinse it under cool running water.
- Allow it to air dry completely before reinserting.
It is recommended to clean filters monthly or more frequently with heavy use. Replace filters every 6-12 months, or as needed.
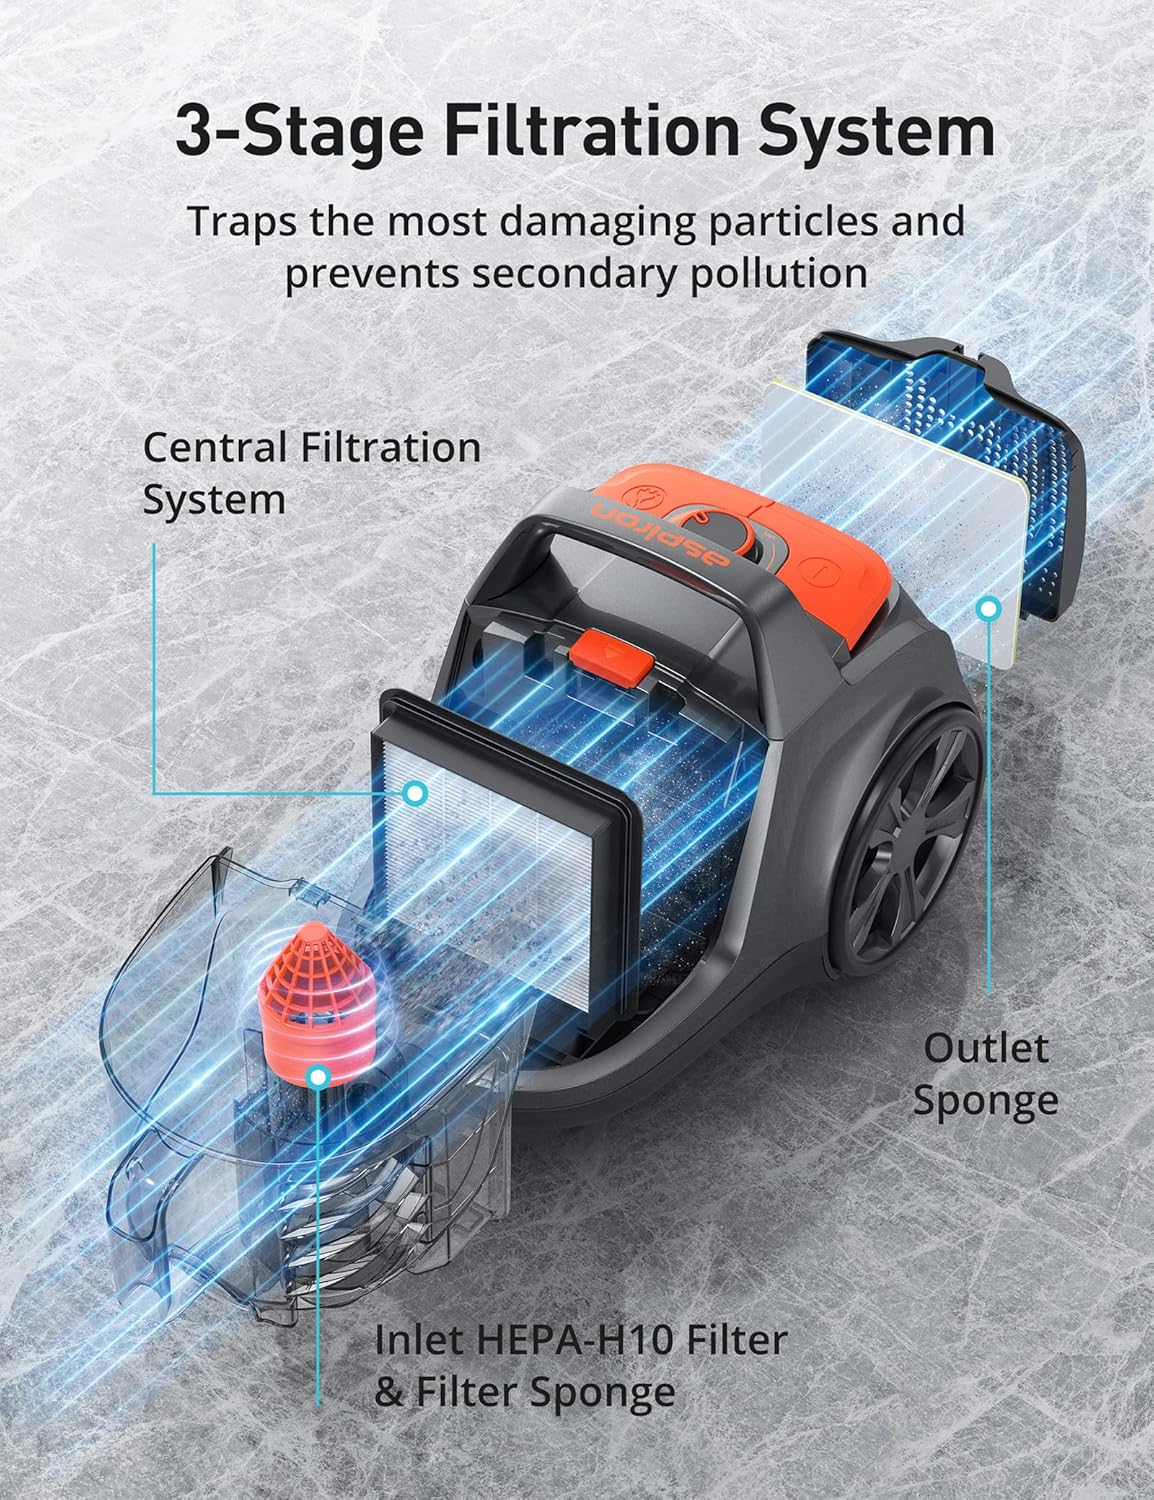
Image: An exploded view diagram illustrating the 3-stage filtration system, including the central filtration, Inlet HEPA-H10 Filter & Filter Sponge, and Outlet Sponge, designed to trap particles and expel clean air.
6. Troubleshooting
Before contacting customer support, please refer to the following troubleshooting guide for common issues.
| Problem | Possible Cause | Solution |
|---|---|---|
| Vacuum does not turn on. | Not plugged in; no power at outlet; power button not pressed. | Check power cord connection; check circuit breaker; press power button firmly. |
| Loss of suction. | Dust cup full; filters clogged; hose/attachments blocked. | Empty dust cup; clean/replace filters; check hose and attachments for blockages. |
| Unusual noise. | Blockage in hose/nozzle; motor issue. | Check for and remove blockages; if noise persists, contact customer support. |
| Cord does not rewind. | Cord is tangled; mechanism jammed. | Gently pull out a small amount of cord and try rewinding again; ensure no obstructions. |
7. Specifications
| Feature | Detail |
|---|---|
| Brand | Aspiron |
| Model Name | canister vacuum cleaner (AS-CA006) |
| Power | 1600W |
| Suction Power | Over 30Kpa |
| Dust Cup Capacity | 3.7 Qt (approx. 3.5 Liters) |
| Filter Type | H13 HEPA Filter |
| Cord Length | 20 ft |
| Cleaning Radius | 33 ft |
| Weight | 17 pounds |
| Product Dimensions | 17"L x 12"W x 9"H |
| Special Features | Automatic Cord Rewind, HEPA, High Power, Lightweight, Low Noise |
8. Warranty and Support
Aspiron is committed to providing high-quality products and excellent customer service. Your Aspiron Canister Vacuum Cleaner comes with comprehensive support.
- Service Agreement: Enjoy a 12-month standard service agreement, extendable by an additional 18 months upon product registration.
- Customer Support: Dedicated 24-hour support is available for any inquiries or assistance you may need.
- Free Return: Benefit from a 30-day free return policy.
- VIP Service: Access VIP service for free replacements if eligible.
To activate your privilege service or for any support needs, please contact us at:
Email: support@aspiron.co

Image: Information on activating privilege service, detailing warranty, support, return, and replacement policies, along with the support email address.
Related documentsAS-CA006


Ask a question about this manual
Ask about setup, troubleshooting, compatibility, parts, safety, or missing instructions. Manuals+ will review the question and use this page’s manual context to help answer it.