Golpart Expandable Heavy Duty Garment Rack Instruction Manual
Model: EA_451B
1. Introduction
This manual provides detailed instructions for the assembly, operation, and maintenance of your Golpart Expandable Heavy Duty Garment Rack. Please read this manual thoroughly before assembly and use to ensure proper function and safety.
2. Product Features
- Expandable Design: Features 2 extendable hanging rods, allowing width adjustment from 70 to 88.5 inches. Overall dimensions: 15.75"D x (70"-88.5")W x 76.37"H.
- High Load Capacity: Designed with 3 rows, 9 shelves, and 3 hanging rods (including 2 extendable ones). Supports a maximum load of 1500 lbs. Each individual hanging rod supports up to 80 lbs.
- Durable Construction: Manufactured from premium carbon steel pipe with a powder-coated surface for protection against water and rust.
- Versatile Storage: Offers diverse storage areas for various items including seasonal clothes, shoes, bedding, and accessories. Features 9 height-adjustable shelves and 3 hanging rods, plus 1 hook.
- Easy Assembly & Stability: Simple assembly process with clear instructions. Shelves are height-adjustable. Includes a wall anchor for secure fixation and enhanced stability.
3. Package Contents
Verify that all components are present before beginning assembly. If any parts are missing or damaged, please contact customer support.
| Component | Quantity |
|---|---|
| Vertical Poles | (Varies by configuration, refer to parts list in box) |
| Wire Shelves | 9 |
| Hanging Rods (Fixed) | 1 |
| Extendable Hanging Rods | 2 |
| Plastic Clips | (Sufficient for all shelves) |
| Wall Anchor Kit | 1 set |
| Assembly Tool (if required) | 1 |
| Instruction Manual | 1 |
4. Assembly Instructions
Follow these steps carefully for proper assembly. It is recommended to assemble the unit on a soft, clean surface to prevent scratches.
4.1. Prepare Components
Unpack all parts and lay them out. Identify each component using the parts list provided in your package.
4.2. Install Plastic Clips
Attach the plastic clips to the vertical poles at the desired height for your shelves. Ensure the flange of the clip fits into the groove on the pole. The arrow on the plastic clip should point upwards. Leave a small gap between the two halves of the clip when installed; this is part of the structural design, not a flaw.
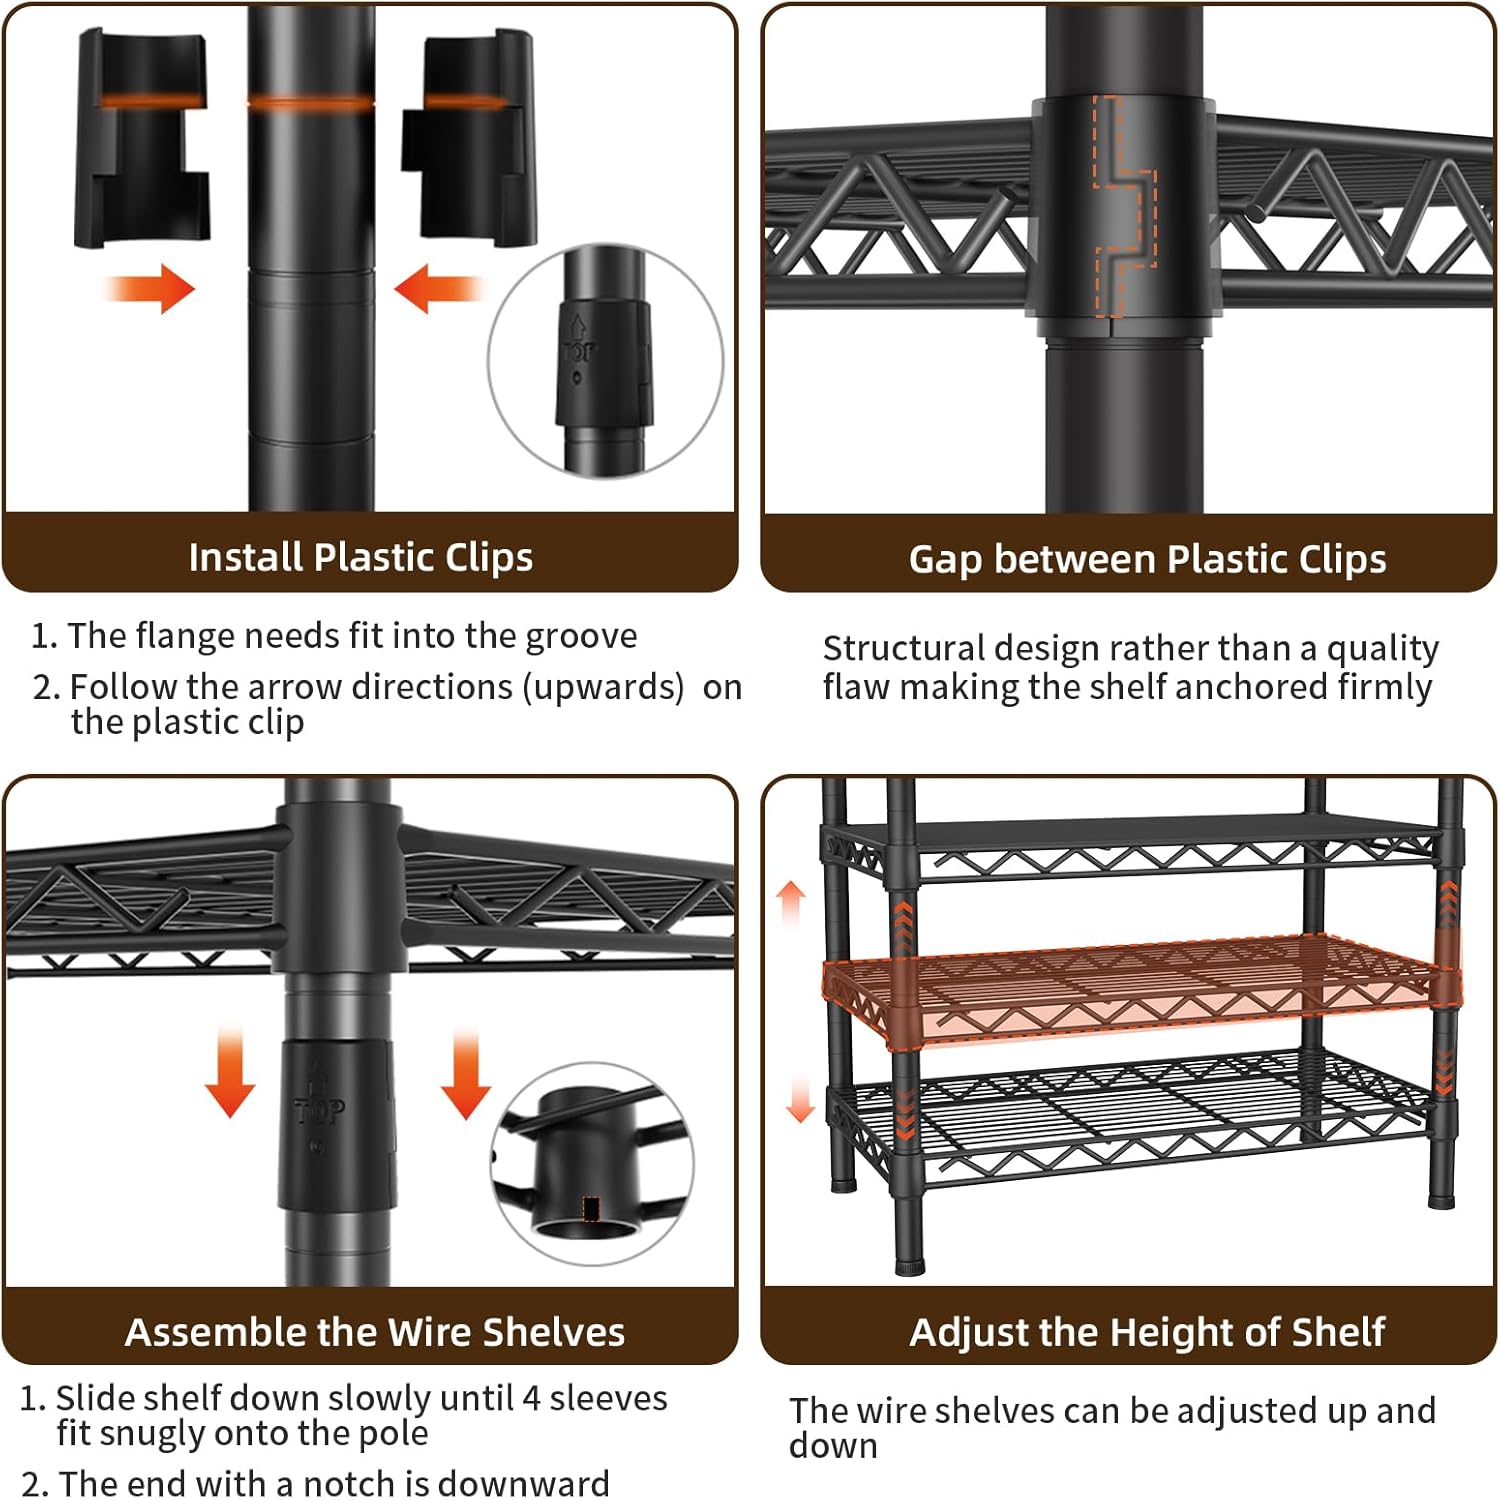
Image: Detailed view of plastic clip installation and the designed gap.
4.3. Assemble Wire Shelves
Once the plastic clips are in place, slide the wire shelves down slowly over the poles until the sleeves of the shelf fit snugly onto the plastic clips. Ensure all four corners are securely seated.

Image: Visual guide for assembling shelves and adjusting their height.
4.4. Install Hanging Rods
Attach the fixed and expandable hanging rods between the appropriate vertical poles. The expandable rods can be adjusted in length to suit your desired width (70 to 88.5 inches).

Image: Assembled garment rack demonstrating the expandable feature.
4.5. Secure to Wall (Optional but Recommended)
For enhanced stability and safety, especially in homes with children or pets, use the included wall anchor kit to secure the garment rack to a wall. Follow the instructions provided with the wall anchor kit.
4.6. Assembly Video Guide
For a visual step-by-step assembly guide, please refer to the official installation video:
Video: Official Installation Guide for Golpart 451B Extendable Clothes Rack. This video demonstrates the assembly process, including how to connect components and adjust the rack.
5. Operating Instructions
5.1. Adjusting Shelf Height
To adjust the height of a wire shelf, first remove any items from the shelf. Then, carefully lift the shelf off the plastic clips. Reposition the plastic clips on the vertical poles to the desired height, ensuring they are level, and then re-seat the shelf firmly onto the clips.
5.2. Expanding/Contracting Hanging Rods
The two extendable hanging rods can be adjusted to increase or decrease the overall width of the hanging space. Simply pull or push the rod ends to extend or contract them to fit your space requirements. Ensure the rods are securely seated in their connectors after adjustment.
Video: Demonstration of the Expandable Heavy Duty Clothes Rack. This short video highlights the rack's expandability feature.
5.3. Loading the Rack
Distribute weight evenly across shelves and hanging rods. While the rack has a high load capacity, concentrating heavy items in one small area may affect stability. Utilize the various shelves and rods for different types of clothing and accessories to maximize organization.

Image: Example of a fully utilized garment rack, showcasing its storage capacity.
6. Maintenance
- Cleaning: Wipe down the metal surfaces with a soft, damp cloth. Avoid abrasive cleaners or harsh chemicals, as they may damage the powder-coated finish.
- Inspection: Periodically check all connections, especially the plastic clips and rod attachments, to ensure they remain secure. Tighten any loose parts as needed.
- Rust Prevention: The rack is powder-coated for rust resistance. However, avoid prolonged exposure to excessive moisture to maintain its condition.
7. Troubleshooting
| Problem | Possible Cause | Solution |
|---|---|---|
| Rack feels unstable or wobbly. | Uneven floor; loose connections; not secured to wall. | Ensure the rack is on a level surface. Check all plastic clips and rod connections for tightness. Utilize the wall anchor kit for added stability. |
| Shelf slides down after assembly. | Plastic clips not properly seated in grooves or installed upside down. | Remove the shelf and re-install the plastic clips, ensuring the flange is fully seated in the pole's groove and the arrow points upwards. Push the shelf down firmly until it locks into place. |
| Hanging rod does not extend/contract smoothly. | Dust or debris inside the rod; mechanism stuck. | Clean the inside and outside of the expandable rod sections. Apply a small amount of silicone lubricant if necessary. |
| Rack appears to be leaning. | Uneven weight distribution; floor not level. | Redistribute items on the shelves and rods to balance the weight. Verify the floor is level; use shims under the feet if needed. |
8. Specifications
- Brand: Golpart
- Model Number: EA_451B
- Color: Black (Expandable)
- Material: Metal (Premium Carbon Steel Pipe)
- Product Dimensions (Expanded): 15.75"D x 88.58"W x 76.37"H
- Product Dimensions (Contracted): 15.75"D x 70"W x 76.37"H
- Installation Type: Free Standing (Wall fixation recommended)
- Special Features: Portable, With Adjustable Shelves, Rust-Proof, Expandable, Heavy Duty
- Load Capacity: 1500 Pounds (Overall)
- Hanging Rod Capacity: 80 lbs per rod
- Number of Shelves: 9
- Item Weight: 35.4 pounds
- Country of Origin: China

Image: Dimensional diagram of the Golpart Garment Rack, indicating width, depth, height, and weight capacity.
9. Warranty and Support
For warranty information or technical support, please contact Golpart customer service through the retailer where you purchased the product or visit the official Golpart website. Please have your model number (EA_451B) and purchase date available when contacting support.
Online Resources:
