1. Product Overview
The REPTITRIP SOP24 is a versatile reptile thermostat featuring two independently operating outlets. The S1 outlet is dedicated to timing control, while the S2 outlet manages day-night temperature control. This design allows for precise regulation of temperature and lighting, catering to the specific environmental needs of reptiles and amphibians.
Key Features:
- Dual Outlets: S1 for timing control, S2 for day-night temperature control.
- Customizable Timer Programs: Three S1 timer programs for flexible lighting schedules.
- Day & Night Temperature Mode: Allows setting distinct temperature ranges for day and night cycles (32 to 140°F).
- High Load Capacity: Maximum load of 1250 watts and 10A.
- Accurate Temperature Sensor: Error of ±2°F with a refresh rate of 500ms. Replaceable sensor.
- Non-Dimming Functionality: S1 is timed on/off, S2 is temperature-controlled on/off.
2. Setup Instructions
2.1 Unboxing and Component Check
Before proceeding, ensure all components are present and undamaged:
- REPTITRIP SOP24 Thermostat Unit
- Temperature Probe
- Instruction Manual (this document)
2.2 Connecting the Device
- Connect the Temperature Probe: Insert the temperature probe into the designated port on the thermostat unit.
- Position the Temperature Probe: Place the probe in the desired location within the reptile enclosure where temperature stability is crucial. Ensure it is not directly under a heat source to avoid inaccurate readings. The probe can be mounted using its suction cup.
- Connect Appliances: Plug your timing-controlled devices (e.g., UVB light) into the S1 outlet and your temperature-controlled heating devices (e.g., heat lamp, heating pad) into the S2 outlet.
- Power On: Plug the thermostat unit into a standard power outlet. The display will illuminate.

Image: REPTITRIP SOP24 Thermostat showing the main unit, S1 timing outlet, S2 temperature outlet, and the temperature probe. The display shows current time and temperature settings.

Image: REPTITRIP SOP24 Digital Temperature Timing Controller setup with two heat lamps in a terrarium. The display shows temperature detection, LCD display, support for °F, power failure memory, and 500ms refresh rate.
Video: This video demonstrates the initial setup process for a reptile thermostat, including connecting the reptile dome, mounting the temperature probe, and connecting the power supply. It also shows how to set the temperature.
3. Operating Instructions
3.1 Setting the Current Time
- Long press the "OK" button to turn on the thermostat.
- Long press the "SET" button to enter the setting mode.
- The current time will be displayed. Use the "UP" and "DOWN" arrows to adjust the hour, then press "OK" to confirm and move to minutes.
- Adjust minutes with "UP" and "DOWN" arrows, then press "OK" to confirm.

Image: Detailed view of the REPTITRIP SOP24 display and buttons, illustrating the steps to set the clock, start time, and end time for S1 programs. It shows the "SET", "OK", "UP", and "DOWN" buttons.
3.2 Setting S1 Timer Programs (Timing Control)
The S1 outlet supports three customizable timer programs. Long press "SET" to switch between program groups (1, 2, 3).
- With the desired program (e.g., S1 ON 1) selected, use "UP" and "DOWN" to set the start hour, then "OK" for minutes.
- Similarly, set the end hour and minutes for the program (e.g., S1 END 1).
- Repeat for up to three programs. To keep the S1 outlet constantly ON, set the start time to AM12:00 and the end time to PM11:59.
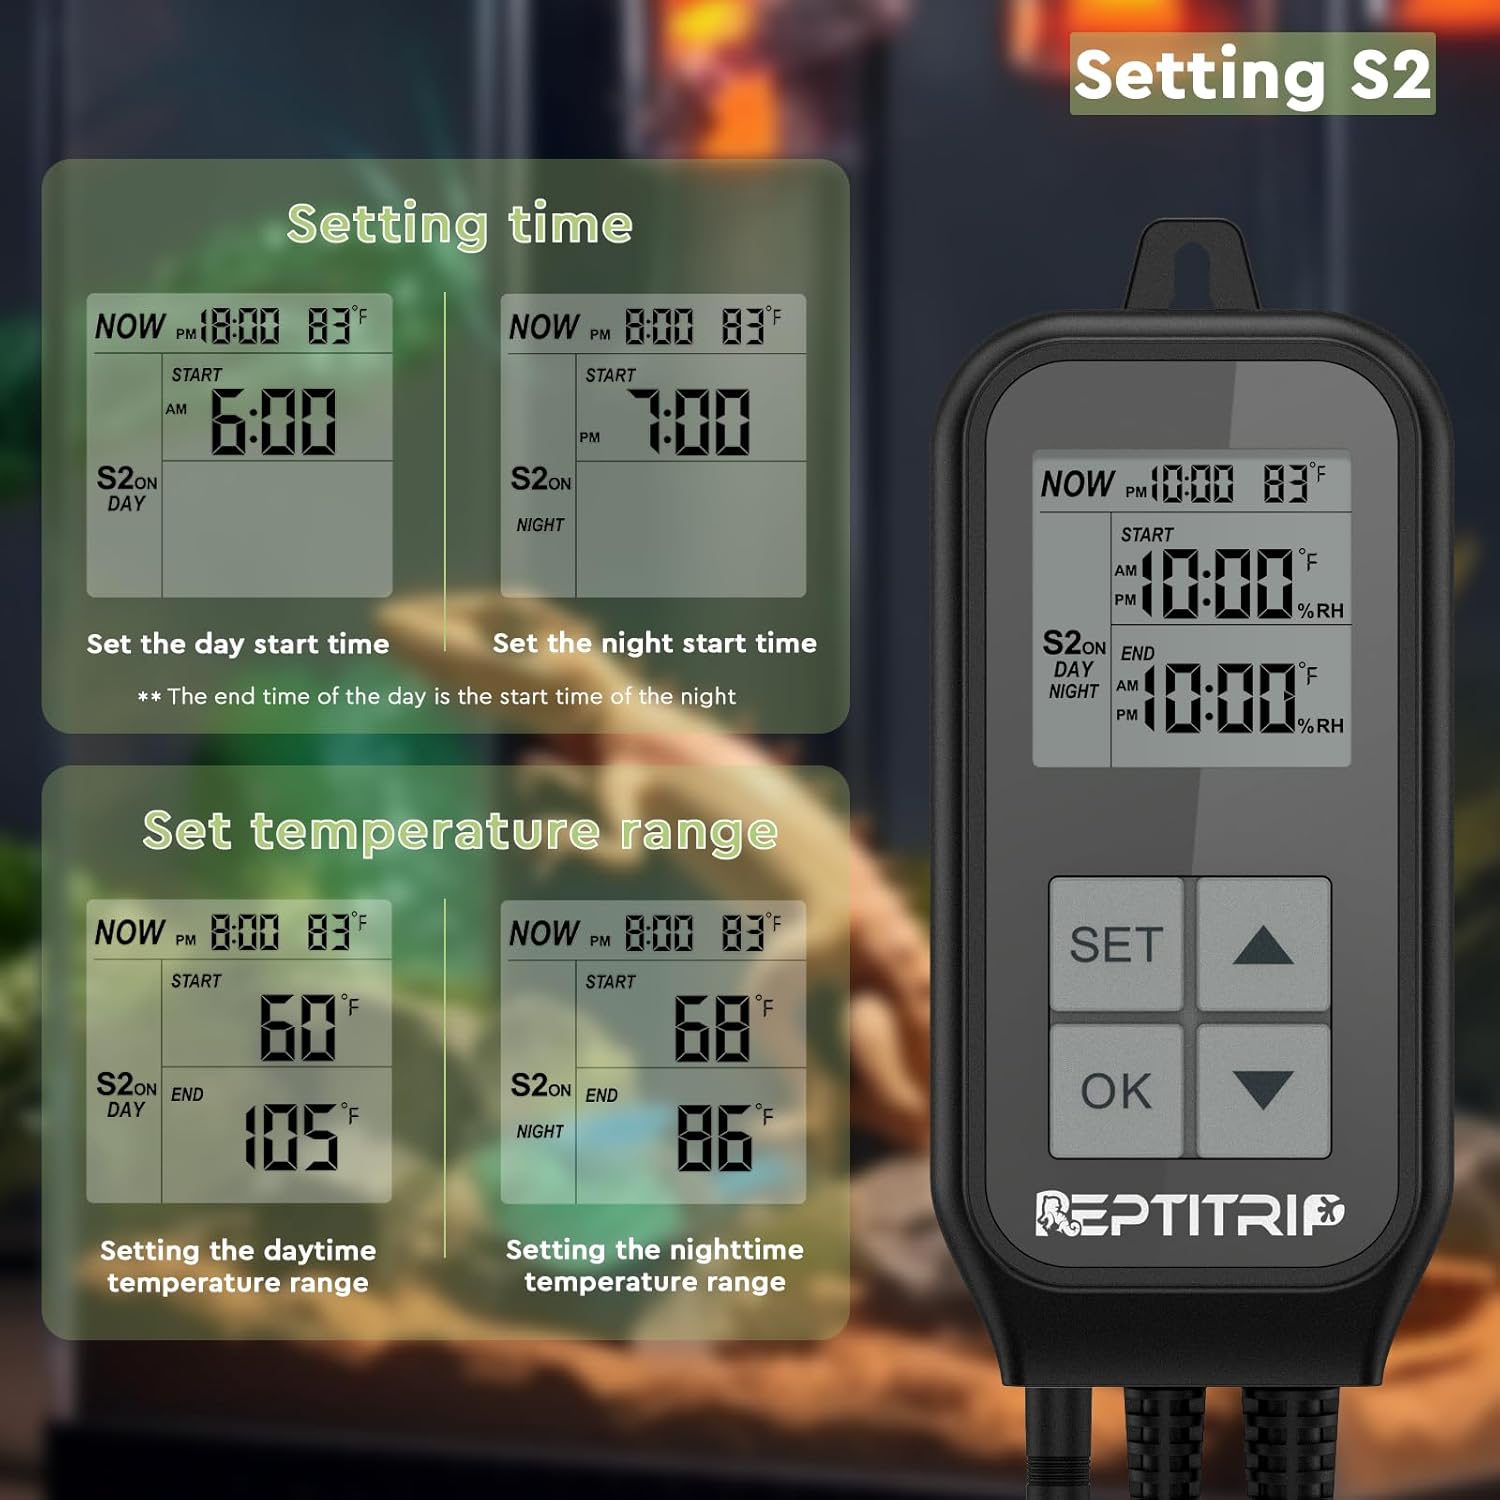
Image: The REPTITRIP SOP24 display showing the setting of S1, including current time, start time, and end time for a timer program. The buttons for "SET", "OK", "UP", and "DOWN" are visible.
3.3 Setting S2 Day-Night Temperature Control
The S2 outlet allows setting distinct temperature ranges for day and night. The end time of the day automatically becomes the start time of the night.
- From the main display, long press "SET" to enter setting mode. Navigate to the S2 settings.
- Use "UP" and "DOWN" to set the day start time (T1), then press "OK" to toggle to the daytime target temperature (SV).
- Adjust the daytime target temperature (SV) using "UP" and "DOWN" arrows.
- Long press "SET" to move to the night start time (T2).
- Set the night start time (T2) using "UP" and "DOWN" arrows, then press "OK" to toggle to the nighttime target temperature (SV).
- Adjust the nighttime target temperature (SV) using "UP" and "DOWN" arrows.
- Long press "SET" to save the settings and exit.

Image: The REPTITRIP SOP24 display showing the setting of S2, including day start time, night start time, and the corresponding temperature ranges for day and night. The buttons for "SET", "OK", "UP", and "DOWN" are visible.
Video: This video demonstrates the setup process for the REPTITRIP SOP24 thermostat, including positioning the temperature probe and setting day/night temperature and timer functions. It shows a hand interacting with the device and its display.
3.4 Switching Temperature Units (°F/°C)
To switch between Fahrenheit (°F) and Celsius (°C), press and hold the "UP" and "DOWN" buttons simultaneously for a few seconds until the unit changes on the display.
4. Maintenance
- Cleaning: Wipe the unit clean with a dry cloth. Do not use liquid cleaners or immerse the unit in water.
- Temperature Probe: Regularly check the temperature probe for any damage or debris. Ensure it is securely placed and not exposed to direct heat or moisture. The sensor is replaceable if damaged.
- Power Cords: Inspect power cords for any signs of wear or damage. Replace immediately if any issues are found.
5. Troubleshooting
If you encounter issues with your REPTITRIP SOP24 thermostat, refer to the following common problems and solutions:
- Inaccurate Temperature Readings: Ensure the temperature probe is correctly positioned and not directly under a heat source or in an area with strong airflow.
- Device Not Turning On/Off as Expected: Verify that the S1 timer programs and S2 day-night temperature ranges are set correctly. Check the power connection.
- S1 Outlet Not Functioning: Confirm the timer program for S1 is active and correctly configured.
- S2 Outlet Not Functioning: Check the set temperature ranges for S2 and ensure the current temperature is within the operational range to trigger heating.
- Sensor Damaged: If the temperature sensor is damaged, it can be replaced. Contact customer support for a replacement.
6. Specifications
| Feature | Detail |
|---|---|
| Model Number | SOP24 |
| Brand | REPTITRIP |
| Maximum Load | 1250W, 10A |
| Temperature Range | 32 to 140°F |
| Temperature Sensor Error | ±2°F |
| Refresh Rate | 500ms |
| Power Source | AC100-250V, 50/60Hz |
| Material | Acrylonitrile Butadiene Styrene (ABS) |
| Special Features | Fast Refresh, High Accuracy, Programmable, Timer |
7. Warranty and Support
For warranty information, technical support, or replacement parts, please contact REPTITRIP customer service through the retailer where the product was purchased. Keep your purchase receipt as proof of purchase.


