1. Introduction and Overview
The PLASMARGON PLC55 Plasma Cutter is a versatile and portable cutting equipment designed for efficient and precise cutting of various metals. Featuring dual voltage compatibility (110V/220V) and advanced IGBT inverter technology, it delivers stable cutting current for clean cuts up to 1/2 inch (12mm) and a maximum capacity of 22mm. Its intelligent digital display and user-friendly controls make it suitable for both professional and DIY applications.

Image 1.1: The PLASMARGON PLC55 Plasma Cutter, showcasing its compact design and included accessories.
2. Safety Information
Operating a plasma cutter involves inherent risks. Always prioritize safety to prevent injury or damage to equipment. Read and understand all safety warnings and instructions before use.
- Personal Protective Equipment (PPE): Always wear appropriate PPE, including welding helmet with proper shade, flame-resistant clothing, welding gloves, and safety shoes.
- Ventilation: Ensure adequate ventilation in the work area to disperse fumes and gases produced during cutting.
- Fire Hazards: Keep flammable materials away from the cutting area. Have a fire extinguisher readily available.
- Electrical Safety: Ensure the machine is properly grounded. Do not operate in wet conditions. Inspect power cords and connections for damage before each use.
- Arc Rays: Protect eyes and skin from arc rays, which can cause burns and eye damage.
- Compressed Air: Handle compressed air cylinders with care. Ensure connections are secure and leak-free.
- Overheat Protection: The PLC55 is equipped with overheat protection. Allow the machine to cool down if the temperature indicator activates.
3. Package Contents
Upon unpacking, verify that all components listed below are present and undamaged. If any items are missing or damaged, contact customer support immediately.
- PLASMARGON PLC55 Plasma Cutter Machine (x1)
- PT-31 Plasma Cutting Torch (x1)
- Consumables (3 sets)
- Ground Clamp (x1)
- Air Pressure Filter & Accessories (x1)
- User Guide (this manual)

Image 3.1: All components included in the PLC55 Plasma Cutter package.
4. Product Features and Components
The PLC55 Plasma Cutter is designed with user convenience and performance in mind. Familiarize yourself with the main components and their functions.
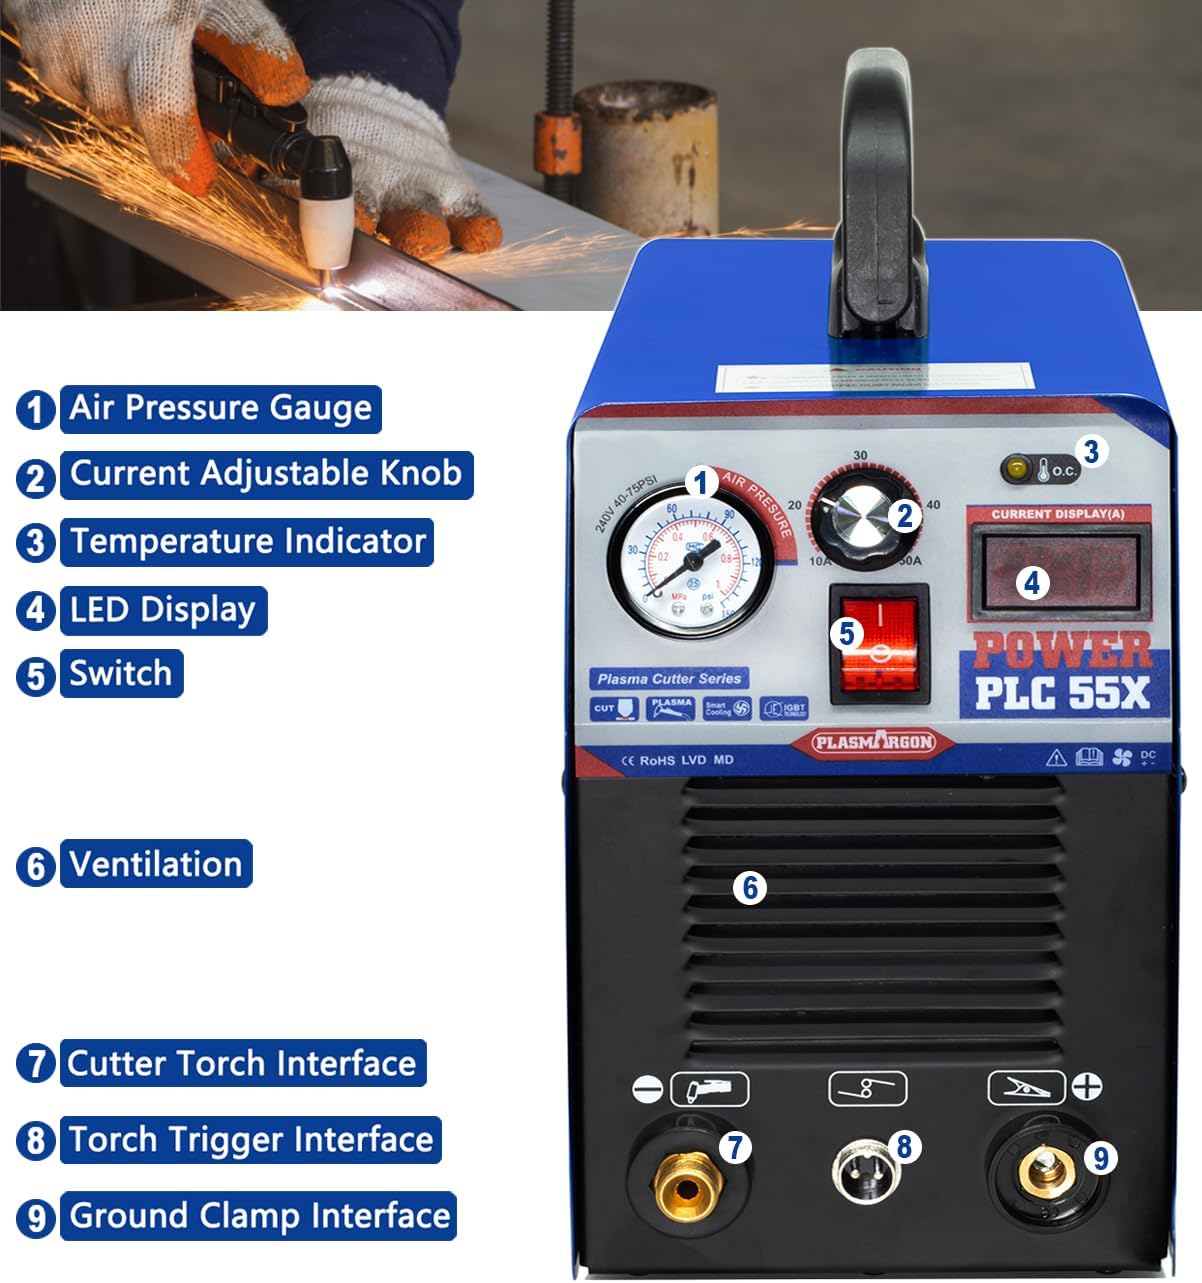
Image 4.1: Front panel of the PLC55 Plasma Cutter with numbered components.
- Air Pressure Gauge: Displays the current air pressure.
- Current Adjustable Knob: Used to set the cutting amperage (10-55A).
- Temperature Indicator: Illuminates if the machine overheats, indicating the need for cooling.
- LED Display: Shows the current amperage setting.
- Power Switch: Turns the unit ON/OFF.
- Ventilation: Ensures proper airflow for cooling the internal components.
- Cutter Torch Interface: Connection point for the plasma cutting torch.
- Torch Trigger Interface: Connection for the torch trigger cable.
- Ground Clamp Interface: Connection point for the ground clamp.
Advanced IGBT Technology: The PLC55 utilizes advanced IGBT (Insulated Gate Bipolar Transistor) technology, which offers superior stability and energy efficiency compared to older MOSFET designs. This results in a more consistent arc and improved cutting performance.


Image 4.2: Illustrations of key internal components, including IGBT technology, copper coil, and capacitors, which contribute to the machine's performance and stability.
5. Specifications
Refer to the table below for detailed technical specifications of the PLASMARGON PLC55 Plasma Cutter.

Image 5.1: A visual summary of the PLC55's key specifications.
| Specification | Value |
|---|---|
| Model | PLC55 |
| Current Range | 10-55A |
| Voltage | 110V-220V (Dual Voltage) |
| Frequency | 50Hz/60Hz |
| Torch Type | PT-31 |
| Duty Cycle | 80% (8 mins operation / 2 mins cooling in a 10-min cycle) |
| Optimal Cutting Thickness | 6-12mm (high quality) |
| Maximum Cutting Thickness | 22mm (1/2 inch clean cut) |
| Compatible Materials | Carbon steel, stainless steel, aluminum, copper, etc. |
| Item Weight | 16.27 pounds (approx. 7.38 kg) |
| Package Dimensions | 17.6 x 14.6 x 11 inches |

Image 5.2: Dimensions of the PLC55 Plasma Cutter for space planning.
6. Setup
Follow these steps to set up your PLC55 Plasma Cutter before operation.
- Placement: Place the plasma cutter on a stable, level surface in a well-ventilated area.
- Power Connection: Connect the power cord to a suitable 110V or 220V power outlet. The machine automatically detects the voltage.
- Air Compressor Connection: Connect your air compressor to the air inlet on the back of the machine. Ensure the air pressure filter is properly installed and set the air pressure to the recommended range (typically 40-75 PSI, as indicated on the gauge). The industrial-grade quick gas connection ensures a leak-free setup.
- Torch Connection: Connect the plasma cutting torch to the Cutter Torch Interface and the Torch Trigger Interface on the front panel.
- Ground Clamp Connection: Attach the ground clamp cable to the Ground Clamp Interface. Securely attach the ground clamp to the workpiece or work table, ensuring good electrical contact.
Video 6.1: A demonstration of connecting the plasma torch and ground clamp to the PLC55 Plasma Cutter, followed by adjusting the current.
7. Operation
Once the setup is complete, you can begin cutting. Always wear appropriate safety gear.
- Power On: Turn on the power switch. The LED display will illuminate.
- Adjust Current: Use the Current Adjustable Knob to set the desired amperage for your cutting task. The LED display will show the selected current. Refer to the specifications for optimal cutting thickness guidelines.
- Initiate Arc: Position the torch nozzle close to the workpiece. Press the torch trigger to initiate the plasma arc.
- Cutting: Move the torch steadily along the desired cut line. Maintain a consistent speed and distance from the workpiece for a clean cut. The PLC55 provides a stable cutting current for smooth results with minimal need for post-cut polishing.
- Monitor Indicators: Pay attention to the Temperature Indicator and air pressure light indicators. If the temperature indicator lights up, stop cutting and allow the machine to cool down to prevent damage.

Image 7.1: Examples of clean cuts on various materials, including carbon steel, galvanized sheet, and stainless steel, demonstrating the machine's cutting capability.
8. Maintenance
Regular maintenance ensures the longevity and optimal performance of your plasma cutter.
- Cleanliness: Keep the machine clean and free from dust and debris. Use compressed air to blow out internal components periodically, ensuring proper ventilation.
- Consumables: Regularly inspect and replace worn-out torch consumables (nozzles, electrodes, swirl rings, shield cups) to maintain cut quality.
- Air Filter: Check and drain the water from the air pressure filter regularly. Replace the filter element if it becomes clogged.
- Connections: Ensure all electrical and air connections are tight and secure.

Image 8.1: Diagram illustrating the machine's ventilation system, crucial for cooling and preventing overheating.
9. Troubleshooting
This section provides solutions to common issues you might encounter.
| Problem | Possible Cause | Solution |
|---|---|---|
| No power | Power cord unplugged, circuit breaker tripped, faulty power switch. | Check power connections, reset circuit breaker, contact support if switch is faulty. |
| No arc / Weak arc | Insufficient air pressure, worn consumables, poor ground connection, incorrect amperage setting. | Check air pressure, replace consumables, ensure good ground contact, adjust amperage. |
| Overheat indicator on | Exceeded duty cycle, poor ventilation. | Allow machine to cool down, ensure adequate ventilation. |
| Air pressure light on | Low air pressure, air leak. | Check air compressor, inspect air lines for leaks. |
| Poor cut quality | Worn consumables, incorrect cutting speed, improper amperage/air pressure. | Replace consumables, adjust cutting speed, optimize amperage and air pressure. |
10. Warranty and Support
PLASMARGON provides a 1-year warranty for all brand products, including the PLC55 Plasma Cutter. This warranty covers defects in materials and workmanship under normal use.
For any inquiries, technical assistance, or warranty claims, please feel free to contact PLASMARGON customer support. Please have your product model and purchase information ready when contacting support.
Contact Information: Please refer to the contact details provided on the PLASMARGON official website or your purchase documentation.