1. Introduction
Thank you for choosing the Crivit Livarno Home Balcony or Terrace Privacy Screen. This manual provides important information regarding the setup, operation, maintenance, and troubleshooting of your new privacy screen. Please read these instructions carefully before installation and retain them for future reference.
This privacy screen is designed to offer enhanced privacy and protection against wind and sun on your balcony or terrace. Its durable construction ensures resistance to various weather conditions and UV radiation.
2. Safety Instructions
- Ensure the screen is securely fastened to prevent it from becoming loose or detached in strong winds.
- Regularly inspect the screen and fastening rope for any signs of wear, damage, or deterioration. Replace damaged components immediately.
- Do not attempt to modify the product. Unauthorized modifications may compromise its integrity and safety.
- Keep children and pets away from the installation area during setup.
- The screen is designed for outdoor use within a temperature range of -30 °C to +60 °C. Do not expose it to temperatures outside this range.
3. Package Contents
Please check the package contents to ensure all parts are present and undamaged:
- 1 x Crivit Livarno Home Balcony or Terrace Privacy Screen
- 1 x Fastening Rope

Image: The folded privacy screen and the included fastening rope.
4. Setup and Installation
Follow these steps to install your privacy screen:
- Unpack the Screen: Carefully remove the privacy screen and fastening rope from the packaging.
- Position the Screen: Hold the screen against the balcony or terrace railing where you intend to install it. Ensure it covers the desired area.
- Thread the Rope: Begin threading the fastening rope through the aluminum eyelets located along the edges of the screen.
- Secure to Railing: Use the rope to securely tie the screen to the balcony or terrace railing. Pass the rope around the railing and through the eyelets, ensuring a taut and stable fit.
- Distribute Tension: Distribute the tension evenly across all eyelets to prevent sagging and ensure the screen remains flat and secure. Tie off any excess rope.
- Final Check: Once installed, gently pull on the screen to ensure it is firmly attached and will not easily come loose in windy conditions.
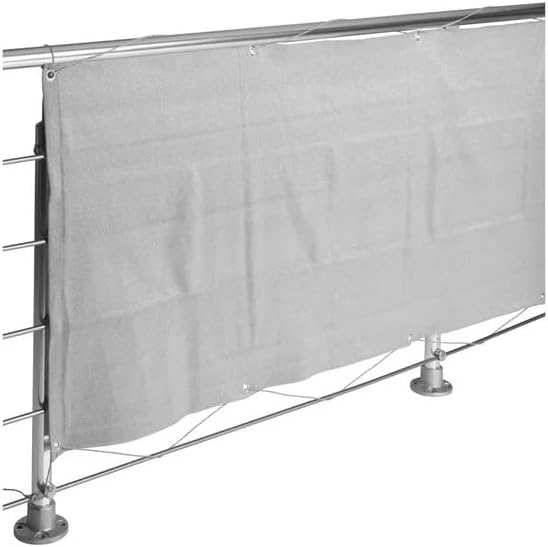
Image: The privacy screen securely installed on a balcony railing, demonstrating proper attachment.
5. Operation
The Crivit Livarno Home Balcony or Terrace Privacy Screen operates passively by providing a physical barrier. Once installed, it offers continuous privacy and protection from external elements. No active operation is required.

Image: The privacy screen installed on a balcony, effectively obscuring the view from outside and enhancing privacy.
6. Maintenance and Care
To ensure the longevity and appearance of your privacy screen, follow these maintenance guidelines:
- Cleaning: Wipe the screen with a damp cloth and mild soap solution. Rinse thoroughly with clean water. Do not use harsh chemicals, abrasive cleaners, or stiff brushes, as these may damage the material.
- Drying: Allow the screen to air dry completely before folding or storing it.
- Inspection: Periodically check the screen for any tears, fraying of the rope, or damage to the eyelets. Address any issues promptly to prevent further damage.
- Storage: If you need to remove the screen for extended periods, clean it thoroughly, ensure it is dry, and store it in a cool, dry place away from direct sunlight.
7. Troubleshooting
Here are some common issues and their solutions:
| Problem | Possible Cause | Solution |
|---|---|---|
| Screen sags or is loose. | Rope not tight enough; rope has stretched; improper fastening. | Re-tighten the fastening rope, ensuring even tension. Re-tie knots if necessary. |
| Eyelets are damaged or detached. | Excessive force during installation; material fatigue. | If minor, try to secure the screen using adjacent eyelets. For significant damage, the screen may need replacement. |
| Screen appears dirty or stained. | Accumulation of dust, dirt, or environmental debris. | Clean the screen as per the 'Maintenance and Care' section. |
8. Specifications
| Feature | Detail |
|---|---|
| Model Number | FRT025 |
| Dimensions (L x W x H) | Approximately 35 x 25 x 10 cm (packaged) |
| Material Features | Weather-resistant, UV-resistant |
| Eyelets | 24 aluminum eyelets |
| Temperature Resistance | -30 °C to +60 °C |
| Included Accessories | Fastening rope |
| ASIN | B0CBC4T182 |
9. Warranty and Support
For information regarding warranty coverage and customer support, please refer to the documentation provided at the time of purchase or contact your retailer. Keep your proof of purchase for any warranty claims.
For further assistance or inquiries, please contact the manufacturer or the point of sale.


