
1. Introduction
This manual provides essential information for the safe and effective installation, operation, and maintenance of your WOWTOU 29 Flash Patterns LED Red White Emergency Strobe Dash Light. Please read these instructions thoroughly before use and retain them for future reference.

Image 1.1: The WOWTOU Red White Emergency Strobe Dash Light. This image displays the compact design of the LED light bar, suitable for vehicle dashboards or windshields.
2. Safety Information
- Ensure the vehicle's power is off before installation to prevent electrical shock.
- This product is designed for DC 12V power input only. Do not connect to other voltage sources.
- Mount the light securely to prevent it from becoming a projectile during sudden stops or accidents.
- Do not obstruct the driver's view or interfere with airbag deployment.
- Check local and state laws regarding the use of emergency warning lights on private or public vehicles.
- Avoid direct eye exposure to the LED lights, as they are high intensity.
3. Package Contents
Verify that all items are present in the package:
- 1 x WOWTOU LED Emergency Strobe Dash Light
- 2 x Adjustable Suction Cup Brackets
- 4 x Suction Cups (additional for secure mounting)
- 1 x Cigar Plug with On/Off and Flash Pattern Switch (16-ft cord)
- 1 x Self-adhesive Gasket (to reduce flashback)
- Metal Knobs and Washers for assembly
- 1 x Fuse (included component)
4. Features
- Low Profile Design: Compact and discreet for various vehicle applications.
- High Intensity LEDs: Built-in 16 high-intensity LEDs with premium optics for optimal power and brightness.
- Durable Construction: Die-casting aluminum housing and durable optical polycarbonate light cover.
- Multiple Flash Patterns: 29 selectable flash patterns, including directional options (left to right, right to left, center out).
- Memory Recall: Last pattern memory recall function.
- Easy Control: 16-ft cord cigar plug with integrated on/off and flash pattern switch.
- Adjustable Mounting: Comes with 30-degree angle adjustable brackets and suction cups for temporary or solid mounting.
- Reduced Flashback: Self-adhesive gasket helps minimize internal light reflection.

Image 4.1: Close-up view of the LED light bar, highlighting the 16 high-power LEDs. This image demonstrates the light's robust construction and bright output.
5. Specifications
| Attribute | Specification |
|---|---|
| Model Number | WT315TWR |
| Color | Red / White |
| Material | Aluminum |
| Light Source Type | LED |
| Voltage | 12 Volts (DC) |
| Item Weight | 1.08 Kilograms |
| Cord Length | 16 ft / 488 cm |
| Included Components | Fuse |

Image 5.1: Product dimensions. This diagram illustrates the length, width, and height of the light bar and its mounting brackets in both inches and centimeters.
6. Setup and Installation
6.1 Assembly Instruction
Follow these steps to assemble the light bar with the suction cup brackets:
- Attach the self-adhesive gasket to the edge of the light bar to reduce flashback.
- Secure the adjustable suction cup brackets to the light bar using the provided metal knobs and washers. Tighten the knobs by hand until secure.

Image 6.1: Assembly diagram. This image shows the components including metal knobs, washers, self-adhesive gasket, and how they connect to the light bar and suction cup brackets.
6.2 Mounting and Application
To mount the light securely on your vehicle's windshield or rear window:
- Ensure the mounting surface is clean and dry.
- Press the suction cups down firmly in the middle to flatten against the surface. Remove any air that may have seeped in.
- Push down the lever on each suction cup bracket to hold them securely in position.
- Press up firmly on the light bar when locking the suction cup brackets in place to ensure a solid mount.
- Adjust the angle of the light bar as needed for optimal visibility.
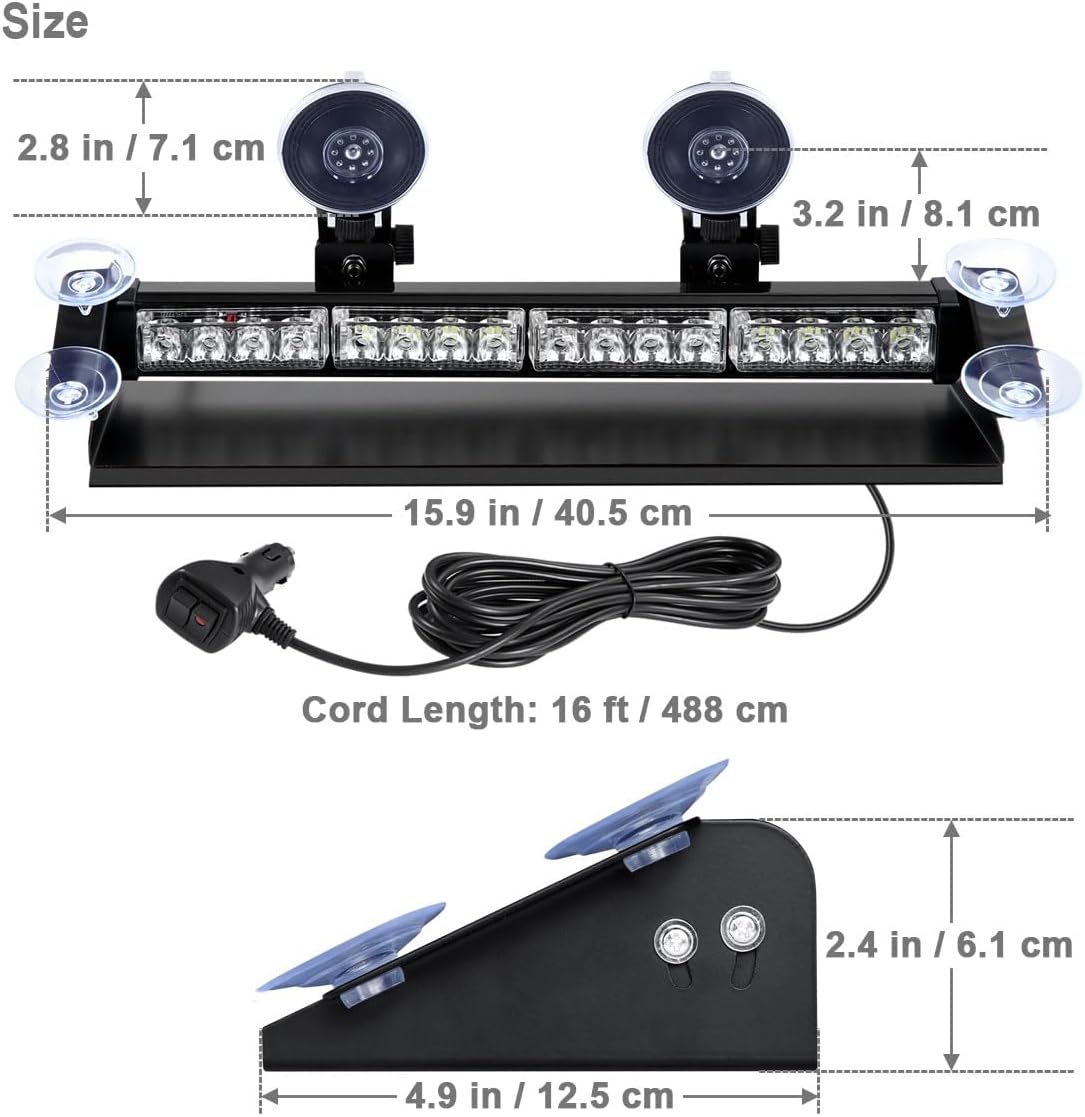
Image 6.2: Mounting and application guide. This image demonstrates the process of attaching the light bar to a vehicle's windshield using suction cups, showing both the release and lock positions of the suction cup levers.
7. Operating Instructions
The light bar is controlled via the cigar plug, which features an integrated On/Off button and a flash pattern switch.
- Insert the cigar plug into your vehicle's 12V DC power outlet.
- Press the Power On & Off Button (with indicator light) to turn the unit on or off.
- Press the Pattern Switch Button to cycle through the 29 available flash patterns. The unit will remember the last selected pattern when powered off and on again.
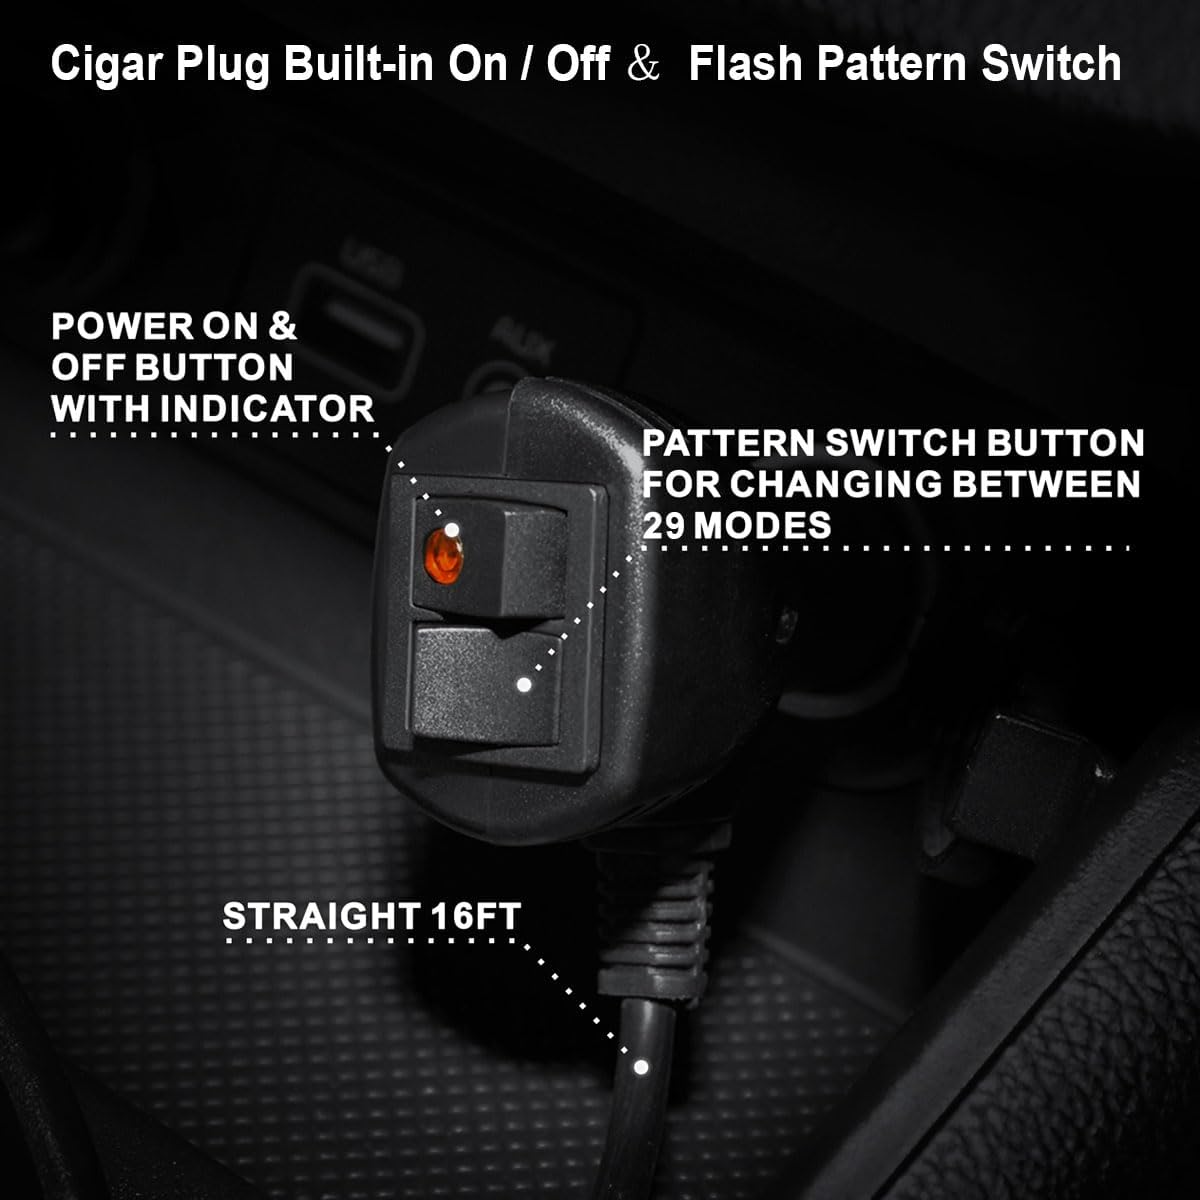
Image 7.1: Cigar plug control. This image details the cigar plug, showing the power on/off button with its indicator and the separate button for changing between the 29 flash patterns.
8. Maintenance
- Cleaning: Regularly wipe the light bar and suction cups with a soft, damp cloth to remove dust and grime. Do not use abrasive cleaners or solvents.
- Inspection: Periodically check the mounting for security and the power cord for any signs of wear or damage.
- Storage: If storing the light for an extended period, ensure it is clean, dry, and stored in a cool, dry place away from direct sunlight.
9. Troubleshooting
- Light does not turn on:
- Ensure the cigar plug is fully inserted into the 12V DC outlet.
- Check the vehicle's 12V DC outlet for power (e.g., by testing with another device).
- Inspect the fuse within the cigar plug. Replace if blown (refer to included components for fuse type).
- Verify the On/Off button on the cigar plug is pressed to the 'On' position.
- Light patterns are not changing:
- Ensure the light is powered on.
- Press the Pattern Switch Button firmly.
- Suction cups are not holding:
- Clean the mounting surface and suction cups thoroughly.
- Ensure no air is trapped under the suction cups before locking the levers.
- Apply slight pressure to the light bar while locking the suction cup levers.
10. Warranty and Support
This WOWTOU product comes with an 18-month manufacturer and seller warranty. Additionally, a 60-day money-back or replacement service is provided. For warranty claims or technical support, please contact your retailer or the manufacturer directly with your purchase details and model number (WT315TWR).