1. Introduction
Thank you for choosing the AVATTO ZTS02-EU-W3 Zigbee 3-Way Smart Light Switch. This smart switch is designed to provide convenient control over your lighting, offering both traditional manual operation and smart control via Zigbee hubs and compatible applications like Tuya. Its 3-way functionality allows for control from multiple locations, enhancing your home automation experience. Please read this manual carefully before installation and use to ensure proper operation and safety.
2. Safety Information
- WARNING: Risk of electric shock. Installation should only be performed by a qualified electrician or a person with a thorough understanding of electrical wiring.
- Always disconnect power at the circuit breaker before installing or servicing the switch.
- Ensure the switch is installed in a dry indoor location.
- Do not exceed the maximum load rating of the switch.
- Use only with compatible lighting types as specified.
- Keep out of reach of children.
3. Product Features
- Zigbee Connectivity: Seamless integration with Zigbee-compatible smart home systems and Tuya app.
- 3-Way Control: Operate lights from two different locations.
- Voice Control: Compatible with voice assistants like Amazon Alexa and Google Home for hands-free operation.
- Luxury Glass Panel: Durable and aesthetically pleasing design.
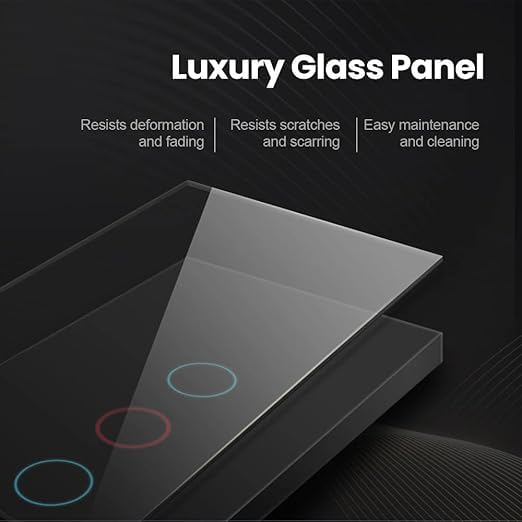
Image: The AVATTO ZTS02-EU-W3 Smart Switch features a luxury glass panel that resists deformation, scratches, and is easy to clean and maintain.
4. Specifications
| Feature | Specification |
|---|---|
| Brand | AVATTO |
| Model | ZTS02-EU-W3 |
| Circuit Type | 3-Way |
| Switch Type | TRIAC |
| Operation Mode | Automatic |
| Connection Type | Normally Open |
| Connector Type | Clip |
| Terminal | Screw |
| Mounting Type | Wall Mount |
| Materials | Mixed Materials |
| Contact Material | Copper |
| Language | English |
5. Package Contents
The package typically includes:
- AVATTO ZTS02-EU-W3 Smart Light Switch
- Mounting Screws
- User Manual (this document)

Image: A general view of the AVATTO ZTS02-EU-W3 Smart Light Switch, showing its design and form factor.
6. Installation Guide
6.1 Pre-installation
- Turn off power at the circuit breaker for the switch location. Verify power is off using a voltage tester.
- Remove the existing wall plate and old switch.
- Identify the wires: Live (Line), Neutral, Load (to light), and Traveler wires (for 3-way setup). A Neutral wire is required for this smart switch.
6.2 Wiring Instructions
Follow the wiring diagram carefully. Incorrect wiring can damage the switch or cause electrical hazards.
- Connect the Live (Line) wire to the 'L' terminal on the switch.
- Connect the Neutral wire to the 'N' terminal on the switch.
- Connect the Load wire (to the light fixture) to the 'L1', 'L2', or 'L3' terminals as appropriate for your lighting circuit. This is a 3-gang switch, allowing control of up to three separate light circuits.
- For 3-way control, connect the Traveler wires between the two 3-way switches according to standard 3-way wiring practices. Ensure the other 3-way switch is a traditional mechanical switch or a compatible smart 3-way switch.
- Secure all wire connections using the screw terminals.
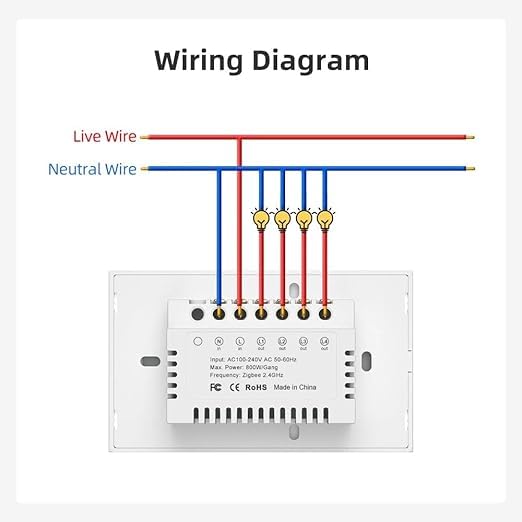
Image: Detailed wiring diagram for the AVATTO ZTS02-EU-W3 Smart Light Switch, showing connections for Live, Neutral, and Load wires to multiple light fixtures.
6.3 Post-installation
- Carefully push the switch into the wall box.
- Secure the switch to the wall box with the provided screws.
- Attach the wall plate.
- Restore power at the circuit breaker.
7. Operation
7.1 Manual Control
Press the touch panel buttons on the switch to manually turn the connected lights on or off.
7.2 Pairing with Zigbee Hub / Tuya App
- Ensure your Zigbee hub is powered on and in pairing mode.
- On the AVATTO switch, press and hold one of the touch buttons for approximately 5-10 seconds until the indicator light starts blinking rapidly. This indicates the switch is in pairing mode.
- Open your Tuya Smart or Smart Life app (or your Zigbee hub's app) and follow the on-screen instructions to add a new device.
- Once successfully paired, the indicator light on the switch will stop blinking and remain solid or turn off, and the device will appear in your app.
- You can now control the switch remotely, set schedules, and create automation routines through the app.
7.3 Voice Control Setup
To enable voice control, ensure your AVATTO switch is successfully paired with the Tuya app and linked to your Amazon Alexa or Google Home account.
- Open the Amazon Alexa app or Google Home app.
- Navigate to the 'Skills & Games' (Alexa) or 'Works with Google' (Google Home) section.
- Search for and enable the 'Tuya Smart' or 'Smart Life' skill/service.
- Link your Tuya account when prompted.
- Discover devices. Your AVATTO smart switch should now be discoverable and controllable via voice commands (e.g., "Alexa, turn on living room light").
8. Maintenance
- To clean the glass panel, gently wipe it with a soft, damp cloth.
- Do not use abrasive cleaners or solvents, as these may damage the finish.
- Ensure the switch is dry before restoring power if it has been exposed to moisture.
9. Troubleshooting
- Switch not responding: Check the circuit breaker to ensure power is on. Verify wiring connections are secure.
- Lights not turning on/off: Ensure the light bulbs are functional. Check the load wire connection.
- Cannot pair with Zigbee hub: Ensure the switch is in pairing mode (blinking indicator). Move the switch closer to the Zigbee hub. Check if the hub is in pairing mode.
- Voice control not working: Confirm the Tuya skill is enabled and linked in your Alexa/Google Home app. Ensure the device is discovered in the voice assistant app.
- Intermittent connection: Ensure the Zigbee hub is within range and there are no significant obstructions. Consider adding Zigbee repeaters if necessary.
10. Warranty and Support
For warranty information and technical support, please refer to the documentation provided at the point of purchase or contact AVATTO customer service through their official website or the retailer where the product was purchased.


