
TEKXDD silvery
Contents
TEKXDD Smart Lock User Manual
Model: silvery
1. Introduction
Thank you for choosing the TEKXDD Smart Lock. This manual provides detailed instructions for the installation, operation, and maintenance of your new smart lock. Please read this manual thoroughly before installation and keep it for future reference.

The TEKXDD Smart Lock offers multiple unlocking methods for enhanced security and convenience.
2. Product Features
- Multiple Unlocking Methods: Supports Smartphone App, 2nd Gen Fingerprint ID, Anti-peep Keypad, and Mechanical Key.
- Bluetooth Access Sharing: Easily share permanent, temporary, or scheduled access codes via Bluetooth.
- Advanced Fingerprint Recognition: Utilizes semiconductor fingerprint recognition for secure and accurate living fingerprint collection.
- Easy Installation: Designed for standard doors (thickness 35-55mm), no drilling required for most installations. Adjustable handle direction (left/right).
- Durable Design: Resistant to high temperature and high humidity, suitable for various environments.

The smart lock provides four convenient ways to unlock your door.
3. Package Contents
Before beginning installation, please verify that all components are present and in good condition:
- Smart Lock Assembly (Front and Rear Handles)
- Latch Bolt
- Gate Guide Plate
- Mechanical Keys (2)
- Installation Hardware (Screws, Spindles)
- Screwdriver
- User Manual (this document)
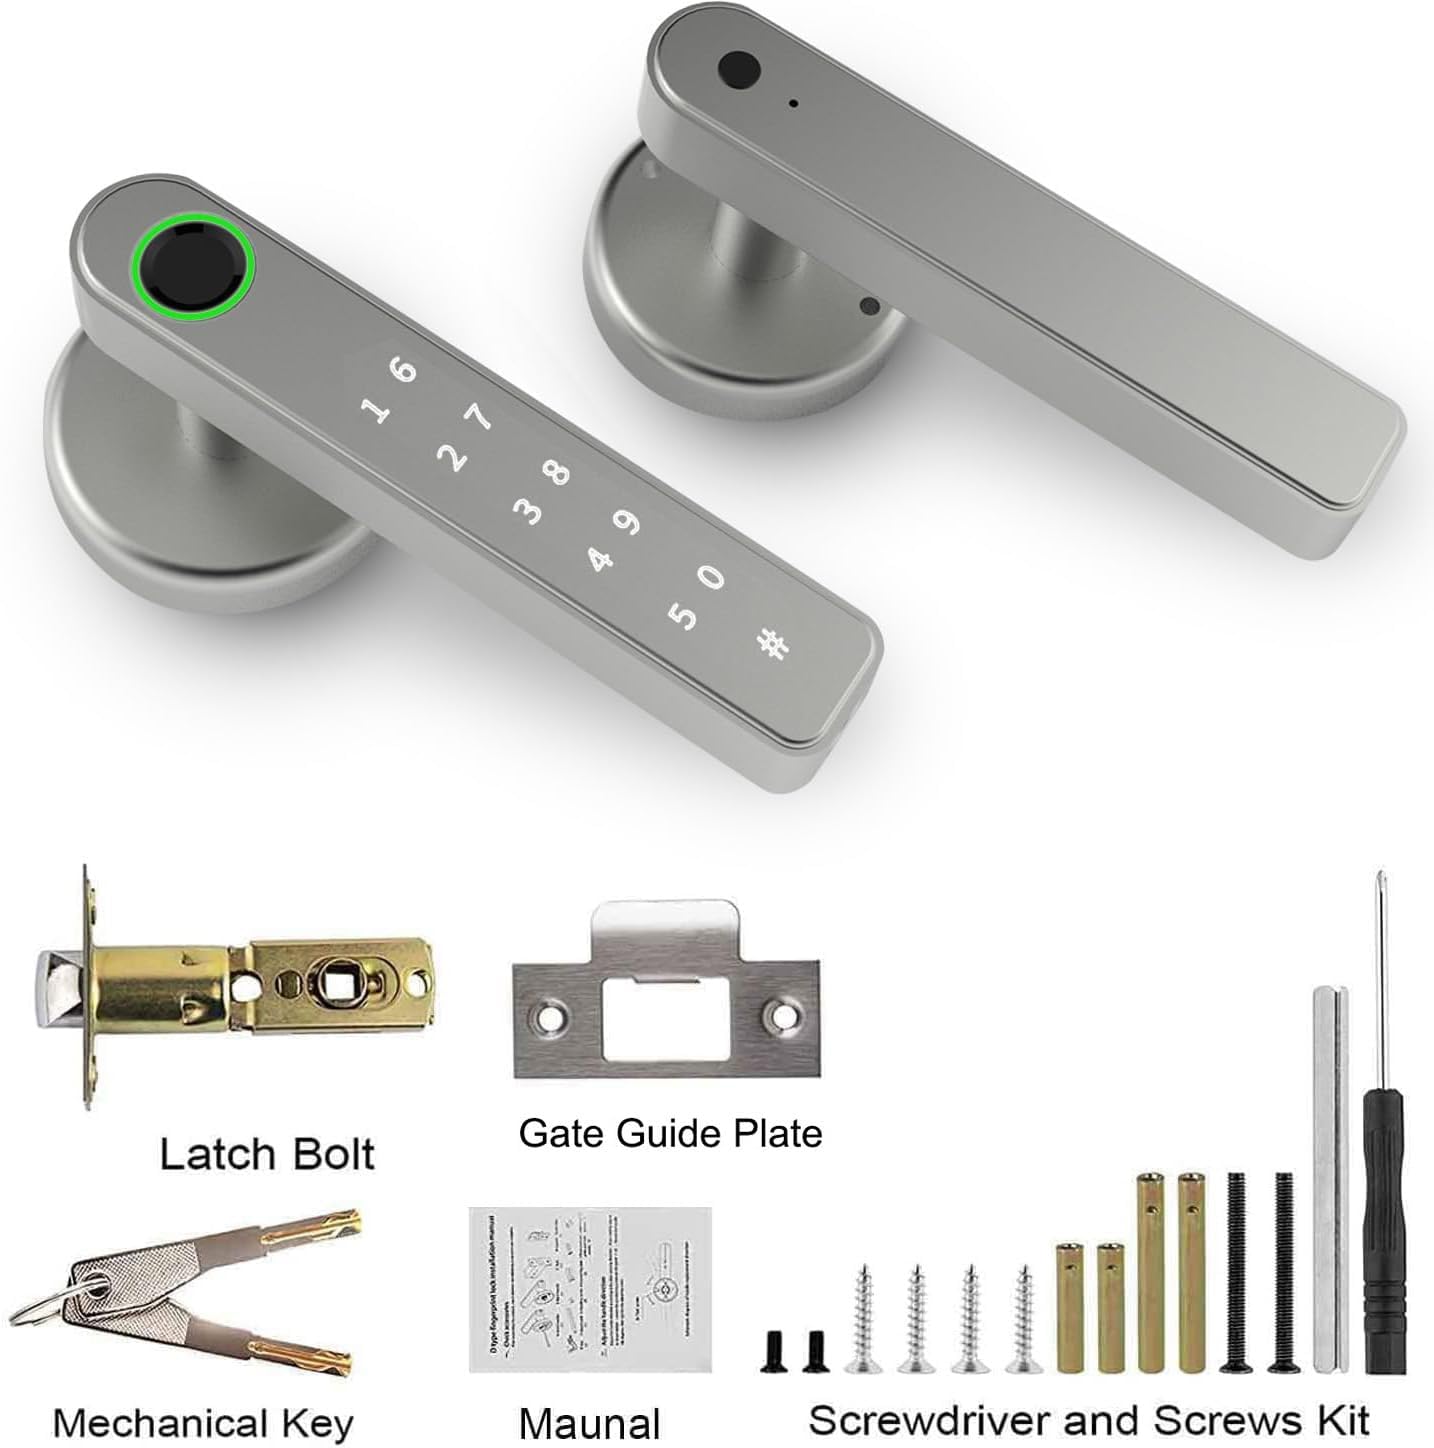
Ensure all parts are accounted for before proceeding with installation.
4. Installation Guide
4.1 Door Preparation and Dimensions
Ensure your door meets the following specifications for proper installation:
- Door Thickness: 35-55mm
- Backset: 60mm or 70mm (adjustable)
- Cross Bore Diameter: 40-57mm

Verify your door's dimensions match the requirements for the smart lock.
4.2 Handle Direction Adjustment
The smart lock handle can be adjusted for left or right-hand opening doors. Follow the instructions provided in the physical manual to adjust the handle direction if needed.

The handle direction can be freely adjusted to suit your door's opening orientation.
4.3 Step-by-Step Installation
- Install Latch Bolt: Insert the latch bolt into the door edge, ensuring the bevel faces the door frame. Secure with screws.
- Install Exterior Handle: Feed the spindle and wires through the latch bolt. Position the exterior handle on the door.
- Install Interior Handle: Connect the wires from the exterior handle to the interior handle. Align the interior handle with the spindle and secure it to the exterior handle using the provided screws.
- Install Batteries: Open the battery cover on the interior handle and insert 4 x AAA batteries (not included).
- Test Operation: After installation, test the mechanical key, fingerprint, and keypad functions to ensure smooth operation.
For detailed visual instructions, please refer to the included physical user manual.
5. Operating Instructions
5.1 Initial Setup and Administrator Registration
Upon first power-up, the lock will be in factory default mode. You must register an administrator fingerprint or passcode to begin using the smart features.
- Wake Up Lock: Touch the keypad or fingerprint sensor to wake the lock.
- Enter Programming Mode: Press the '*' key, then '#' (or follow specific instructions in the physical manual for administrator setup).
- Register Administrator: Follow the voice prompts to register your first fingerprint or set an administrator passcode. This will be used to add other users and manage settings.
5.2 Unlocking Methods
- Fingerprint Unlock: Place your registered finger on the fingerprint sensor. The lock will unlock if the fingerprint is recognized.
- Keypad Unlock: Enter your registered passcode on the keypad, then press '#'. The lock will unlock if the passcode is correct.
- Smartphone App Unlock:
- Download the designated smart lock application (e.g., Tuya Smart).
- Pair your smart lock with the app via Bluetooth.
- Use the app interface to unlock the door, manage users, and view access logs.
- Mechanical Key Unlock: In case of emergency or battery depletion, insert the mechanical key into the keyhole and turn to unlock.

The lock provides multiple access options, including an emergency mechanical key and a USB charging interface for temporary power.
5.3 Adding/Deleting Users
Only the administrator can add or delete user fingerprints and passcodes. Refer to the app's instructions or the physical manual for detailed steps on user management.
6. Maintenance
- Battery Replacement: The lock requires 4 x AAA batteries. Replace batteries when the low battery warning is indicated. Use high-quality alkaline batteries for optimal performance.
- Cleaning: Wipe the lock surface with a soft, dry cloth. Avoid using abrasive cleaners or solvents that may damage the finish or electronic components.
- Fingerprint Sensor Care: Keep the fingerprint sensor clean and dry. Avoid scratching the sensor surface.
- Lubrication: Do not lubricate the lock cylinder or internal mechanisms with oil-based lubricants. If the latch mechanism feels stiff, consult professional assistance.
7. Troubleshooting
| Problem | Possible Cause | Solution |
|---|---|---|
| Lock does not respond. | Dead batteries. | Replace batteries. Use a USB power bank for temporary power via the micro USB port if needed. |
| Fingerprint not recognized. | Finger is wet/dirty; sensor is dirty; fingerprint not registered correctly. | Ensure finger and sensor are clean and dry. Re-register fingerprint if issue persists. Try another registered fingerprint or passcode. |
| Keypad does not respond. | Incorrect passcode; keypad malfunction. | Ensure correct passcode is entered. Try waking the keypad by touching it. If unresponsive, check batteries. |
| Lock is difficult to turn or latch. | Misalignment during installation; door frame issue. | Check installation alignment. Ensure door frame strike plate is correctly positioned. Do not force the handle. |
| Bluetooth connection issues. | Bluetooth off on phone; app not updated; interference. | Ensure Bluetooth is enabled on your device. Update the app. Try restarting your phone and the lock (by removing/reinserting batteries). |
8. Product Specifications
| Feature | Specification |
|---|---|
| Model | silvery |
| Manufacturer | TEKXDD |
| Dimensions (L x W x H) | 10 x 10 x 5 cm |
| Item Weight | 1 kg |
| Material | Cast Iron |
| Power Source | 4 x AAA Batteries (not included) |
| Lock Type | Biometric, Keypad, App, Mechanical Key |
| Door Thickness Compatibility | 35-55mm |
| Special Features | Keyless Entry, Bluetooth Connectivity |
9. Warranty and Support
TEKXDD provides a limited warranty for this smart lock. Please refer to the warranty card included in your package for specific terms and conditions. For technical support, troubleshooting assistance, or warranty claims, please contact TEKXDD customer service through the contact information provided on the product packaging or the official TEKXDD website.
When contacting support, please have your product model number (silvery) and ASIN (B0C9Q5GJ63) ready.
Ask a question about this manual
Ask about setup, troubleshooting, compatibility, parts, safety, or missing instructions. Manuals+ will review the question and use this page’s manual context to help answer it.