1. Introduction
This manual provides essential information for the safe and effective installation, operation, and maintenance of your Anchilly FZ31-9 Oven Heater Rotary Switch. This 6-pin, 5-position rotary switch is designed for use in oven and heater applications, rated for 16A at 250VAC and 13A at 125VAC, with a T125/55 temperature rating. Please read this manual thoroughly before installation or use.
2. Important Safety Information
- Electrical Hazard: Always disconnect power to the appliance before installing, servicing, or removing the switch. Failure to do so can result in serious injury or death.
- Professional Installation Recommended: Installation should only be performed by a qualified electrician or service technician familiar with appliance wiring and electrical safety standards.
- Compatibility: Ensure the switch's specifications (pin quantity, gears, voltage, current, and appearance) match your original switch and appliance requirements. Incompatible parts can lead to malfunction or damage.
- Temperature Rating: The switch is rated T125/55, indicating its maximum operating temperature. Do not exceed this rating.
- Secure Connections: Ensure all wiring connections are tight and secure to prevent arcing or overheating.
3. Product Overview
The Anchilly FZ31-9 is a robust rotary switch featuring 6 pins and 5 distinct positions for controlling various functions in ovens and heaters. Its design allows for precise selection of operational modes.
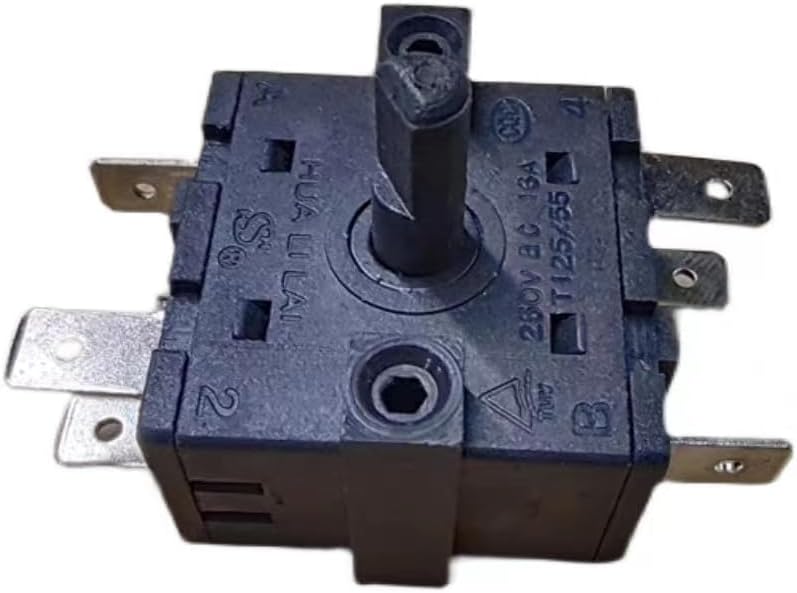
Figure 3.1: Top-down view of the Anchilly FZ31-9 rotary switch, showing the central shaft and some terminals.

Figure 3.2: Side view of the rotary switch, highlighting the multiple spade terminals for electrical connections.

Figure 3.3: Angled view of the rotary switch, providing a clearer perspective of its compact design and terminal layout.

Figure 3.4: Close-up view of the switch body, showing electrical ratings (13A 125VAC) and terminal labels (A, B, 1, 2, 3, 4).
The switch features a non-360 degree rotation, allowing for 4 distinct turns from the starting point, resulting in a total of 5 positions. The terminals are typically labeled for clear wiring identification.
4. Specifications
| Feature | Specification |
|---|---|
| Operation Mode | Manual |
| Current Rating | 16 Amps (250VAC), 13 Amps (125VAC) |
| Operating Voltage | 250 Volts (AC) |
| Contact Type | Normally Open |
| Connector Type | Screw |
| Brand | Anchilly |
| Terminal | Screw |
| Circuit Type | 5-way |
| Mounting Type | Panel Mount |
| Contact Material | Copper |
| Number of Positions | 5 |
| Control Method | Rotary (Manual) |
| Unit Count | 1.0 Count |
| Manufacturer | Anchilly |
| Part Number | FZ31-9778 |
| Item Weight | 1.6 ounces |
| Package Dimensions | 2 x 2 x 1.6 inches |
| Batteries Required? | No |
5. Setup and Installation
WARNING: Ensure power is disconnected before proceeding with installation. Only qualified personnel should perform electrical installations.
5.1 Pre-Installation Checks
- Verify that the new switch matches the specifications (pin configuration, voltage, current, and physical dimensions) of the original switch being replaced.
- Confirm that the appliance's power supply is completely off at the circuit breaker.
5.2 Mounting the Switch
- Prepare the panel opening for the switch. The FZ31-9 is designed for panel mounting.
- Insert the switch into the opening, ensuring it is properly aligned.
- Secure the switch using the appropriate fasteners (not included) to ensure it is firmly in place and does not rotate freely.
5.3 Wiring Instructions
The FZ31-9 switch features 6 pins, typically labeled A, B, 1, 2, 3, 4. Refer to the wiring diagram of your specific appliance for exact connections. The following describes the internal connections at each position:
- Position 1 (Leftmost): Terminal B is connected to Terminal 3.
- Position 2: Terminal B is connected to Terminal 4.
- Position 3: Terminal A is connected to Terminal 1, and Terminal B is connected to Terminal 4.
- Position 4: Terminal A is connected to Terminal 2, and Terminal B is connected to Terminal 4.
- Position 5 (Rightmost): Terminals A, 1, and 2 are fully connected (A-1-2), and Terminal B is connected to Terminal 4.
Connect the appliance's wires to the corresponding terminals on the switch. Ensure all screw connections are tightened securely to prevent loose contacts and potential hazards.
6. Operating the Switch
The Anchilly FZ31-9 rotary switch provides 5 distinct operating positions. To select a position, rotate the switch knob (not included) to the desired setting. The switch is designed for non-360 degree rotation, meaning it has definite stops at each of its 5 positions.
- Rotation: The switch can be turned 4 times from its starting point to reach all 5 positions.
- Functionality: Each position corresponds to a specific internal electrical configuration, as detailed in the 'Wiring Instructions' section (5.3). These configurations control different heating elements or functions within your appliance.
- Selection: Turn the knob clockwise or counter-clockwise to move between the positions. Ensure the knob clicks firmly into each desired position for proper operation.
7. Maintenance
The FZ31-9 rotary switch is designed for durability and requires minimal maintenance. However, periodic checks can help ensure its longevity and safe operation.
- Cleaning: If necessary, gently wipe the exterior of the switch with a dry, soft cloth. Do not use abrasive cleaners or solvents. Ensure power is disconnected before cleaning.
- Inspection: Periodically inspect the switch for any signs of physical damage, loose connections, or discoloration around the terminals, which could indicate overheating.
- Professional Check: If you notice any unusual behavior, such as intermittent operation, excessive heat, or burning smells, discontinue use immediately and consult a qualified technician.
8. Troubleshooting
If you encounter issues with your FZ31-9 rotary switch, refer to the following common problems and solutions:
- Switch Does Not Operate:
- Check if the appliance has power.
- Verify all wiring connections are secure and correct according to the appliance's diagram.
- Ensure the switch is fully engaged in a position.
- Incorrect Function/Appliance Not Heating Properly:
- Confirm that the switch model (FZ31-9) is indeed the correct replacement for your appliance.
- Double-check the wiring against the appliance's schematic to ensure wires are connected to the correct terminals (A, B, 1, 2, 3, 4).
- Ensure the switch is rotated to the correct position for the desired function.
- Switch Feels Loose or Damaged:
- If the switch feels loose, ensure it is securely mounted to the panel.
- If physical damage is observed, the switch should be replaced immediately by a qualified technician.
If troubleshooting steps do not resolve the issue, contact a qualified service technician for further assistance.
9. Warranty and Support
For warranty information regarding your Anchilly FZ31-9 Oven Heater Rotary Switch, please refer to the documentation provided at the time of purchase or contact your retailer. Specific warranty terms may vary depending on the seller and region.
For technical support or inquiries, please reach out to the seller or manufacturer directly. Ensure you have your product model number (FZ31-9778) and purchase details available when contacting support.


