
Philips LED 582882
Contents
User Manual: 11" Super Slim Flush Mount Ceiling Light
Brand: Philips LED
Model: 582882
1. Product Overview
The Philips 11" Super Slim LED Flush Mount is designed to provide efficient and comfortable lighting for your indoor spaces. This integrated LED fixture offers a sleek, contemporary design and is engineered for long-lasting performance with minimal maintenance. It features smooth dimming capabilities without flicker or hum, allowing you to create the ideal ambiance in any room. The product is part of the Philips EyeComfort tested criteria, ensuring light that is gentle on your eyes.

Figure 1.1: Philips 11" Super Slim Flush Mount Ceiling Light (2-Pack)
This image displays the product as a two-pack, highlighting its sleek design and compact packaging. The lights are round, black-rimmed, and feature a white diffuser for even light distribution.

Figure 1.2: Product Dimensions
This diagram illustrates the compact dimensions of the light fixture, with a diameter of 11.8 inches and a super-slim profile of just 1 inch in height.
2. Safety Information
Please read all instructions carefully before installation and use. Retain this manual for future reference.
- Electrical Safety: Always turn off power at the circuit breaker before installing, servicing, or cleaning the fixture. Ensure all electrical connections comply with local codes and ordinances. If you are unsure about wiring, consult a qualified electrician.
- Product Use: This fixture is designed for indoor use only. Do not install in wet or damp locations unless explicitly stated.
- Handling: Handle the fixture with care to avoid damage. Do not apply excessive force.
- Dimmer Compatibility: Use only with compatible LED dimmers to ensure proper dimming performance and prevent flickering or hum. Refer to the dimmer manufacturer's instructions for compatibility.
- Heat: Although LED fixtures run cooler than traditional bulbs, ensure adequate ventilation around the fixture.
3. Package Contents
Verify that all components are present before beginning installation:
- Philips 11" Super Slim Flush Mount LED Light Fixture(s)
- Mounting Bracket
- Screws
- Wire Nuts
- Instruction Manual (this document)
4. Installation Guide
The Philips Super Slim Flush Mount LED Light is designed for easy installation. Follow these steps carefully:
- Turn Off Power: Before starting, ensure the power to the light fixture's circuit is turned off at the circuit breaker.
- Prepare Mounting Surface: If replacing an existing fixture, remove it. Ensure the junction box is securely mounted and ready for the new fixture.
- Attach Mounting Bracket: Secure the provided mounting bracket to the junction box using the supplied screws. Ensure it is firmly attached.
- Make Electrical Connections: Connect the fixture's wires to the corresponding house wires using the wire nuts. Typically, black to black (live), white to white (neutral), and green/bare copper to green/bare copper (ground). Ensure connections are secure.
- Mount the Fixture: Align the fixture with the mounting bracket and secure it in place. The super slim design allows for a flush fit against the ceiling.
- Restore Power: Once the fixture is securely installed and all connections are made, turn the power back on at the circuit breaker.
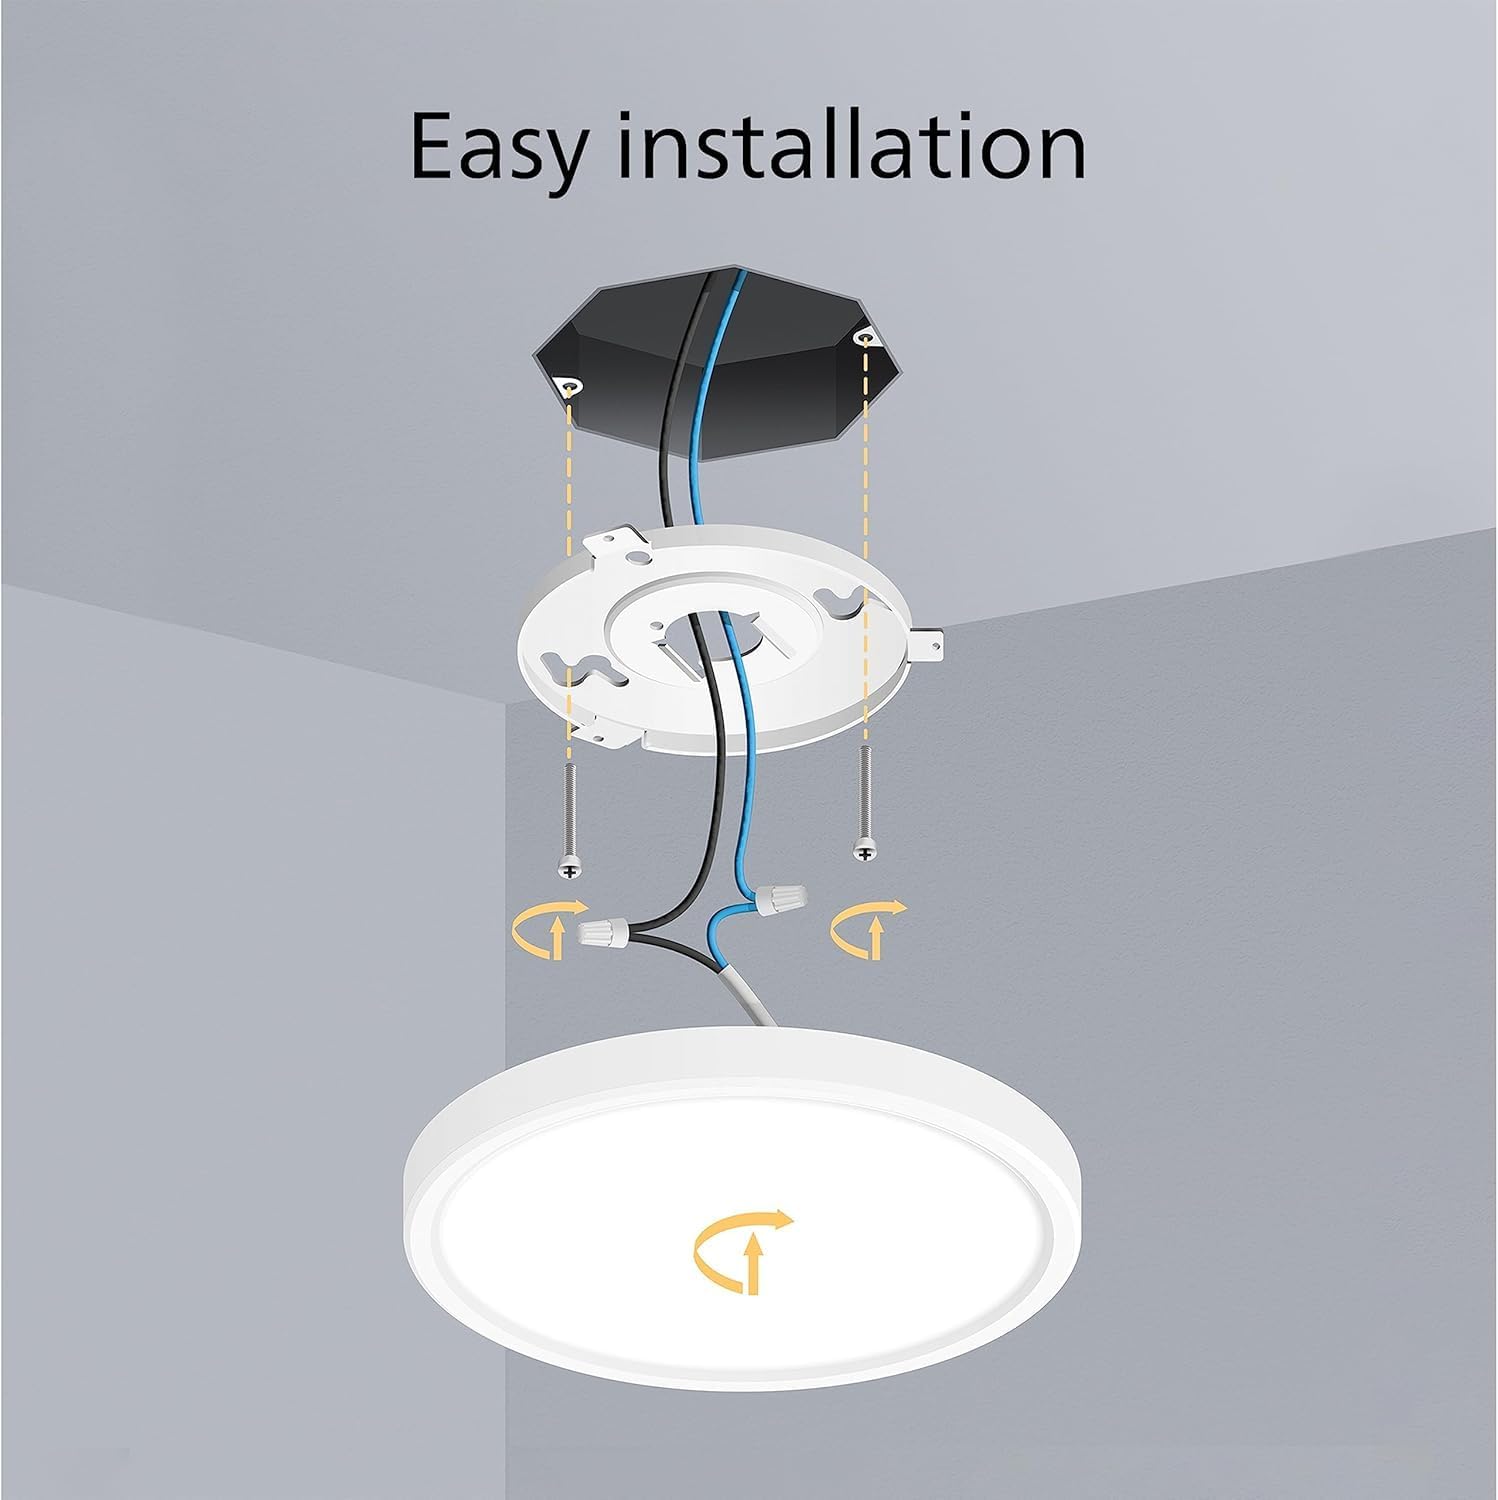
Figure 4.1: Easy Installation Diagram
This diagram illustrates the straightforward steps for installing the light fixture, emphasizing the connection of wires and securing the light to the ceiling's junction box.

Figure 4.2: Ultra-Thin Profile After Installation
This image showcases the light's ultra-thin profile once installed, blending seamlessly with the ceiling for a modern aesthetic.
5. Operating Instructions
This Philips LED Flush Mount light is designed for simple operation and enhanced user experience.
- Power On/Off: Use your standard wall switch to turn the light fixture on or off.
- Dimming Functionality: The fixture is fully dimmable from 100% down to 10%. For optimal performance, use with a compatible LED dimmer switch. The smooth dimming ensures no flicker or hum, allowing you to adjust the brightness to your desired level for any activity or mood.
- Color Temperature: This model provides a Bright White (3000K) light, ideal for creating a crisp and inviting atmosphere suitable for various indoor settings.

Figure 5.1: Dimming Capability
This image visually represents the light's dimmable feature, allowing users to adjust brightness from full illumination to a subtle glow.

Figure 5.2: Creating Ambiance
This photo shows the light fixture installed in a bedroom, demonstrating its ability to create a comfortable and inviting atmosphere.
6. Maintenance
The Philips Super Slim LED Flush Mount is designed to be maintenance-free. The integrated LED means there are no bulbs to replace throughout its lifespan.
- Cleaning: To clean the fixture, ensure the power is off at the circuit breaker. Use a soft, dry, or slightly damp cloth. Do not use abrasive cleaners or solvents, as they may damage the finish or electrical components.
- Lifespan: This LED fixture has an impressive lifespan of up to 50,000 hours, significantly reducing the need for replacement.
7. Troubleshooting
If you encounter any issues with your Philips LED Flush Mount light, please refer to the following common problems and solutions:
| Problem | Possible Cause | Solution |
|---|---|---|
| Light does not turn on. | No power to the fixture; loose wiring connection; faulty switch. | Check circuit breaker. Ensure all wire connections are secure. Test the wall switch. |
| Light flickers or hums when dimmed. | Incompatible dimmer switch; loose wiring. | Ensure you are using an LED-compatible dimmer. Consult the dimmer manufacturer's compatibility list. Check wiring connections. |
| Light is not as bright as expected. | Dimmer setting is too low; incorrect installation. | Adjust the dimmer to maximum brightness. Review installation steps to ensure proper connection. |
| Light turns on/off unexpectedly. | Loose wiring; electrical interference. | Check all wire connections. Ensure the fixture is not on a circuit with other high-power appliances causing interference. |
If the problem persists after attempting these solutions, please contact Philips LED customer support.
8. Specifications
| Feature | Detail |
|---|---|
| Brand | Philips LED |
| Model Number | 582882 |
| Style | 11 Inch Black, Super Slim Flush Mount |
| Light Source Type | Integrated LED |
| Color Temperature | 3000K (Bright White) |
| Brightness | 1500 Lumens |
| Equivalent Wattage | 100 Watts (incandescent equivalent) |
| Voltage | 120 Volts |
| Dimmable | Yes (100% to 10%, no flicker/hum) |
| Lifespan | Up to 50,000 hours |
| Material | Plastic, Metal |
| Product Dimensions (Approx.) | 11.8 inches (Diameter) x 1 inch (Height) |
| Installation Type | Flush Mount |
| Indoor/Outdoor Usage | Indoor |
9. Warranty and Support
Warranty: This Philips LED light fixture comes with a 3-year limited warranty from the date of purchase. This warranty covers defects in materials and workmanship under normal use. Please retain your proof of purchase for warranty claims.
Additional Resources:
- For a downloadable PDF version of the user guide, please visit: User Guide (PDF)
- For further support or to explore other Philips LED products, visit the official Philips LED Store: Philips LED Store
For technical assistance or warranty service, please contact Philips LED customer support through their official channels.
Ask a question about this manual
Ask about setup, troubleshooting, compatibility, parts, safety, or missing instructions. Manuals+ will review the question and use this page’s manual context to help answer it.