
1. Introduction
Thank you for choosing the RAF Air Fryer R.5309. This appliance is designed to cook your favorite foods with little to no oil, offering a healthier alternative to traditional frying. Please read this manual thoroughly before using the appliance to ensure safe and efficient operation. Keep this manual for future reference.
2. Important Safety Instructions
When using electrical appliances, basic safety precautions should always be followed to reduce the risk of fire, electric shock, and injury to persons.
- Read all instructions before using the appliance.
- Do not touch hot surfaces. Use handles or knobs.
- To protect against electric shock, do not immerse cord, plugs, or the appliance in water or other liquid.
- Close supervision is necessary when any appliance is used by or near children.
- Unplug from outlet when not in use and before cleaning. Allow to cool before putting on or taking off parts.
- Do not operate any appliance with a damaged cord or plug, or after the appliance malfunctions or has been damaged in any manner.
- The use of accessory attachments not recommended by the appliance manufacturer may cause injuries.
- Do not use outdoors.
- Do not let cord hang over edge of table or counter, or touch hot surfaces.
- Do not place on or near a hot gas or electric burner, or in a heated oven.
- Extreme caution must be used when moving an appliance containing hot oil or other hot liquids.
- Always attach plug to appliance first, then plug cord into the wall outlet. To disconnect, turn any control to "off", then remove plug from wall outlet.
- Do not use appliance for other than intended use.
- Ensure the air fryer is placed on a stable, heat-resistant surface.
- Do not block any ventilation openings.
- Never fill the basket with oil.
3. Product Overview
Familiarize yourself with the components of your RAF Air Fryer R.5309 before first use.

Image 3.1: Front view of the RAF Air Fryer R.5309, showing the main unit and the pull-out basket handle.

Image 3.2: Detailed view highlighting the comfortable handle with double-layer heat insulation and the rear cooling hole for extended service life.
Components:
- Main Unit: Houses the heating element and fan.
- Control Panel: Digital interface for setting time, temperature, and selecting presets.
- Frying Basket: Removable basket for holding food.
- Crisper Plate/Rack: Sits inside the frying basket to allow air circulation.
- Handle: Ergonomic handle for safely pulling out the frying basket.
- Air Outlet Vent: Located at the back for heat dissipation.
4. Setup and First Use
4.1 Unpacking
- Remove all packaging materials, stickers, and labels from the appliance.
- Check that all parts are present and in good condition.
4.2 Cleaning Before First Use
- Wipe the exterior of the appliance with a damp cloth.
- Clean the frying basket and crisper plate with hot water, dish soap, and a non-abrasive sponge. Rinse thoroughly and dry completely.
- Do not immerse the main unit in water or any other liquid.
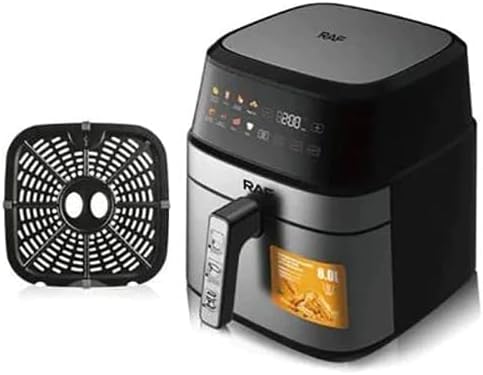
Image 4.1: The RAF Air Fryer R.5309 with its removable frying basket and crisper plate, illustrating components for cleaning.
4.3 Initial Operation (Burn-in)
It is recommended to run the air fryer empty for about 10-15 minutes on its highest temperature setting before first use to eliminate any manufacturing odors. Ensure good ventilation during this process.
- Place the crisper plate into the frying basket, then slide the basket into the main unit.
- Plug the power cord into a grounded wall outlet.
- Set the temperature to 200°C (400°F) and the timer to 15 minutes.
- Allow the appliance to run. A slight odor may be present; this is normal.
- Once complete, unplug the appliance and let it cool down completely.
5. Operating Instructions
5.1 Preparing for Cooking
- Place the appliance on a stable, level, and heat-resistant surface.
- Ensure the frying basket and crisper plate are clean and correctly assembled.
- Plug the power cord into a grounded wall outlet. The digital display will illuminate.
5.2 Cooking Process
- Place Food: Carefully place your ingredients onto the crisper plate inside the frying basket. Do not overfill the basket to ensure even cooking.
- Slide Basket In: Push the frying basket back into the main unit until it clicks into place.
- Power On: Press the Power button on the digital control panel.
- Select Program or Set Manually:
- Preset Programs: Use the menu button to cycle through preset options (Fries, Nuggets, Roasted Chicken, Pizza, Meat, Fish, Vegetables, Dessert). Each preset has a default time and temperature.
- Manual Setting: Use the temperature and time adjustment buttons to set your desired cooking parameters.
- Start Cooking: Press the Start/Pause button to begin the cooking cycle.
- Shake/Flip (Optional): For some foods, it is recommended to shake or flip the ingredients halfway through cooking. Pull out the basket, shake/flip, and then reinsert. The air fryer will resume cooking automatically.
- Cooking Complete: The air fryer will beep when the cooking time is finished. Carefully pull out the basket.
- Remove Food: Use heat-resistant tongs to remove the cooked food from the basket. Do not tip the basket directly as excess oil may collect at the bottom.
- Power Off: Press the Power button to turn off the appliance and unplug it from the wall outlet.
5.3 Cooking Tips
- Smaller ingredients usually require a shorter cooking time than larger ingredients.
- A small amount of oil can be added to fresh potatoes for a crispier result.
- Pre-packaged foods designed for oven preparation can also be cooked in the air fryer.
6. Maintenance and Cleaning
Regular cleaning ensures optimal performance and extends the lifespan of your air fryer.
6.1 Cleaning After Every Use
- Unplug the air fryer and allow it to cool down completely before cleaning.
- Wipe the exterior with a damp cloth.
- Remove the frying basket and crisper plate. Wash them with hot water, dish soap, and a non-abrasive sponge. For stubborn residue, soak them in hot water for about 10 minutes.
- Clean the interior of the appliance with a damp cloth. Avoid using abrasive cleaners or scouring pads.
6.2 Storage
Ensure the appliance is completely cool and clean before storing. Store the air fryer in a dry, cool place.
7. Troubleshooting
Refer to this section for common issues and their solutions.
| Problem | Possible Cause | Solution |
|---|---|---|
| Air fryer does not turn on. | Appliance not plugged in. | Ensure the power cord is securely plugged into a grounded outlet. |
| Food is not cooked evenly. | Basket is overfilled; food not shaken/flipped. | Do not overfill the basket. Shake or flip ingredients halfway through cooking. |
| White smoke coming from the appliance. | Grease residue from previous use; fatty ingredients. | Clean the basket and crisper plate thoroughly. For fatty foods, ensure the crisper plate is clean and drain excess fat if necessary. |
| Food is not crispy. | Too much moisture; not enough oil (for fresh items). | Pat food dry before air frying. Lightly coat fresh items with oil. Increase cooking time or temperature slightly. |
8. Specifications
Technical details for the RAF Air Fryer R.5309.
- Model Number: R.5309
- Brand: RAF
- Capacity: 8 Liters
- Output Wattage: 1700 Watts
- Voltage: 220 Volts
- Material: Aluminum
- Special Features: Temperature Control
- Item Weight: 3 Kilograms
- Recommended Uses: Bake, Reheat, Steam
- Nonstick Coating: No
- Dishwasher Safe: No (for main unit)

Image 8.1: Dimensions of the RAF Air Fryer R.5309, showing approximate measurements of 30cm in height, width, and depth.
9. Warranty and Support
For warranty information or technical support, please refer to the warranty card included with your purchase or contact your local RAF distributor. Keep your proof of purchase for warranty claims.


