
1. Introduction and Overview
This manual provides essential information for the safe and efficient operation of your RAF Air Fryer R.5293. This appliance is designed for low-fat cooking, utilizing rapid air circulation to prepare a variety of meals with little to no oil. It features a smart digital control panel and a generous 16-liter capacity, suitable for family meals.

Image: The RAF Air Fryer R.5293, showcasing its design and key features like 1700W power, multi-purpose functionality, easy cleaning, and 360° air circulation, alongside its packaging.
2. Important Safety Instructions
Read all instructions carefully before using the appliance. Failure to follow these instructions may result in electric shock, fire, or serious injury.
- Always ensure the appliance is placed on a stable, heat-resistant surface, away from walls or other appliances to allow adequate air circulation.
- Do not immerse the appliance, cord, or plug in water or any other liquid.
- Keep children and pets away from the appliance during operation. The exterior surfaces can become hot.
- Do not block the air inlet or outlet vents during operation.
- Unplug the appliance from the outlet when not in use and before cleaning. Allow it to cool completely before handling or cleaning.
- Do not operate the appliance if the cord or plug is damaged, or if the appliance malfunctions or has been damaged in any way.
- Use only accessories recommended by the manufacturer.
- Do not use the appliance for purposes other than those described in this manual.
3. Product Components
Familiarize yourself with the various parts of your RAF Air Fryer R.5293 and its accessories.

Image: The RAF Air Fryer R.5293 shown with its primary accessories: a turn cage, two grilled meshes, a slag tray, a fork, and a grilled chicken rotisserie attachment.
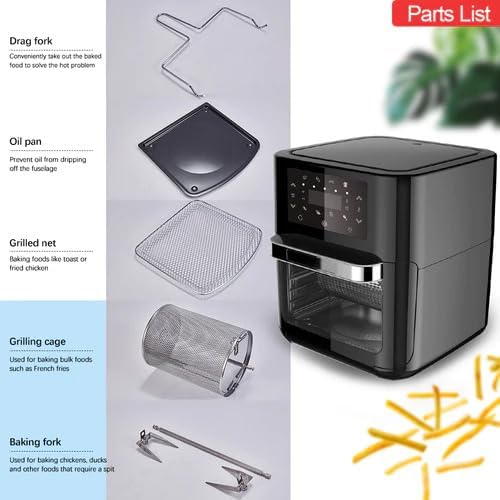
Image: A detailed view of the RAF Air Fryer R.5293 accessories, including the drag fork for removing hot food, an oil pan to collect drips, a grilled net for baking, a grilling cage for bulk items like fries, and a baking fork for rotisserie cooking.
Included Accessories:
- Turn Cage: For tumbling foods like fries or nuts.
- Grilled Mesh (x2): For baking or dehydrating.
- Slag Tray: Collects oil and food debris at the bottom.
- Fork (Rotisserie Fork): For roasting whole chickens or other meats.
- Drag Fork: Tool for safely removing hot accessories.
- Oil Pan: Placed at the bottom to prevent oil from dripping onto the heating element.
- Grilling Cage: A cylindrical cage for even cooking of smaller items.
4. Setup
Before first use, ensure all packaging materials are removed and the appliance is clean.
- Unpack: Carefully remove the air fryer and all accessories from the packaging.
- Clean: Wash all removable parts (turn cage, grilled meshes, slag tray, forks) with warm soapy water. Wipe the interior and exterior of the main unit with a damp cloth. Dry thoroughly.
- Placement: Place the air fryer on a stable, level, and heat-resistant surface. Ensure there is at least 10 cm (4 inches) of clear space around the back and sides, and above the appliance for proper ventilation.
- Power Connection: Plug the power cord into a grounded electrical outlet.
- Initial Run (Optional): For the first use, it is recommended to run the air fryer empty for about 10-15 minutes at 200°C (390°F) to burn off any manufacturing residues. A slight odor may be present, which is normal. Ensure good ventilation during this process.
5. Operating Instructions
The RAF Air Fryer R.5293 features an intuitive digital control panel for easy operation. It offers various pre-set programs and manual temperature/time adjustments.

Image: The RAF Air Fryer R.5293 displaying its multi-functional capabilities, including frying, baking, heating, roasting, grilling, holding, thawing, and roasting meat, with a visual of roasted chicken and fries.
Basic Operation:
- Prepare Food: Place your food inside the appropriate accessory (e.g., grilled mesh, turn cage, or rotisserie fork). Ensure food does not exceed the MAX fill line.
- Insert Accessory: Carefully slide the accessory with food into the air fryer.
- Power On: Press the Power button on the digital control panel.
- Select Program or Manual Settings:
- Pre-set Programs: Choose from programs like Fries, Nuggets, Roasted Chicken, Pizza, Meat, Fish, Vegetables, or Dessert. The appliance will automatically set the optimal time and temperature.
- Manual Settings: Use the temperature control buttons to adjust the cooking temperature (typically 80°C to 200°C) and the time control buttons to set the cooking duration (up to 60 minutes).
- Start Cooking: Press the Start/Pause button to begin the cooking cycle. The internal light may illuminate, and the fan will start.
- Monitor Cooking: You can open the door to check on food or shake/turn items if necessary. The appliance will pause automatically and resume when the door is closed.
- End of Cycle: The air fryer will beep when the cooking cycle is complete. Carefully remove the cooked food using heat-resistant gloves and the drag fork.
Tips for Best Results:
- For crispier results, lightly brush or spray food with oil.
- Shake smaller items halfway through cooking for even browning.
- Preheating the air fryer for 3-5 minutes can improve cooking times and results.
- Do not overcrowd the basket; cook in batches if necessary to ensure even air circulation.
6. Maintenance and Cleaning
Regular cleaning ensures optimal performance and extends the lifespan of your RAF Air Fryer R.5293. Always unplug the appliance and allow it to cool completely before cleaning.
- Exterior: Wipe the exterior of the air fryer with a damp cloth. Do not use abrasive cleaners or scouring pads.
- Interior: Wipe the interior with a damp cloth and mild detergent. For stubborn food residue, a non-abrasive sponge can be used. Ensure the interior is completely dry before next use.
- Accessories: All removable accessories (turn cage, grilled meshes, slag tray, forks) are dishwasher safe or can be washed by hand with warm soapy water. Ensure they are thoroughly dried before storage.
- Heating Element: Gently clean the heating element with a soft brush to remove any food particles. Do not use water or liquid cleaners directly on the heating element.
- Storage: Store the cleaned and dried air fryer in a cool, dry place.
7. Troubleshooting
If you encounter any issues with your RAF Air Fryer R.5293, refer to the following common problems and solutions:
- Appliance does not turn on:
- Check if the power cord is securely plugged into a grounded outlet.
- Ensure the appliance door is fully closed.
- Food is not cooked evenly:
- Do not overcrowd the cooking area. Cook in smaller batches if necessary.
- Shake or turn food items halfway through the cooking process.
- Ensure the correct temperature and time settings are used.
- White smoke comes from the appliance:
- This is usually caused by grease or oil residue from previous use. Clean the slag tray and interior thoroughly.
- If cooking fatty foods, excess oil may drip onto the heating element. Ensure the slag tray is in place.
- Food is not crispy:
- Ensure food is not overcrowded.
- Lightly brush or spray food with a small amount of oil.
- Increase cooking time or temperature slightly.
If the problem persists after checking these points, please contact customer support.
8. Specifications

Image: The RAF Air Fryer R.5293 with its dimensions indicated as 30cm (depth) x 30cm (width) x 30cm (height).
| Brand | RAF |
| Model Number | R.5293 |
| Color | Black |
| Product Dimensions (D x W x H) | 30 x 30 x 30 cm |
| Capacity | 16 Liters |
| Power / Wattage | 1700 Watts |
| Material | Aluminum |
| Special Features | Temperature Control, Digital Control Panel, 360° Air Circulation |
| Item Weight | 3 Kilograms |
| Recommended Uses | Bake, Reheat, Steam, Fry, Roast, Grill |
9. Warranty and Support
Information regarding specific warranty terms and conditions for the RAF Air Fryer R.5293 is not provided in this manual. Please refer to the product packaging or contact your retailer for warranty details.
For technical support, service, or inquiries, please contact the manufacturer or your local distributor. Keep your purchase receipt as proof of purchase for any warranty claims.


