Introduction
This manual provides detailed instructions for the setup, operation, and maintenance of your GANXIN 999 Days Countdown Clock Event Timer, Model GI9T-1.8R. This device features a large LED display, remote control functionality, and multiple timing modes to suit various event tracking needs.

Image: The GANXIN 999 Days Countdown Clock with its included remote control. The clock displays red LED digits.
1. Setup
1.1 Package Contents
- GANXIN 999 Days Countdown Clock (Model GI9T-1.8R)
- Remote Control
- Power Adapter
- Wall Mounting Hardware (screws, anchors)
- User Manual (this document)
1.2 Power Connection
- Locate the power input port on the side of the clock.
- Connect the provided power adapter to the clock.
- Plug the power adapter into a standard electrical outlet. The clock will power on automatically.


Image: Left: Side view of the clock showing the power input. Right: The included power adapter.
1.3 Mounting Options
The clock offers versatile installation options:
- Wall Mounting: Use the provided hardware to securely mount the clock to a wall.
- Tabletop Placement: The clock can be placed on any flat surface.
- Tripod Mounting: A tripod (not included) can be used for portable or temporary setups.

Image: Illustration of wall mounting using brackets and screws, and tripod mounting (tripod sold separately).
2. Operating Instructions
The GANXIN Countdown Clock is operated using the included remote control. Ensure the remote has working batteries and is pointed towards the clock for optimal response.

Image: The remote control used to operate the clock, featuring various buttons for settings and modes.
2.1 Setting the Current Time (CLOCK Mode)
- Press the CLOCK button on the remote to enter clock display mode.
- Press the EDIT button. The time digits will begin to flash.
- Use the number buttons (0-9) to input the current time in 24-hour format (HH:MM:SS).
- Press ENTER to confirm.
2.2 Adjusting Brightness
The clock features 5 levels of brightness adjustment.
- Press the BRIGHT button repeatedly to cycle through the 5 brightness levels.
2.3 Buzzer Control
The built-in buzzer can be enabled or disabled.
- Press the SOUND button to toggle the buzzer sound on or off.
2.4 Memory Function
The clock is equipped with a memory function that retains all settings and time information in case of a power failure. No re-setting is required after power is restored.
3. Operating Modes
The GANXIN Countdown Clock offers four distinct operating modes:

Image: The clock displaying a countdown, with text indicating three primary countdown modes.
3.1 UP Mode: Day Count Up - Clock (24H)
This mode counts up the number of days from a set past event, while simultaneously displaying the current time in 24-hour format.
- Press the UP button.
- Press EDIT.
- Input the target date (YYYY.MM.DD) or the number of days to count up from.
- Press ENTER to start the count up.
3.2 CLOCK Mode: Day Countdown - Clock (24H)
This mode counts down the number of days until a future event, displaying the remaining days alongside the current time in 24-hour format.
- Press the CLOCK button.
- Press EDIT.
- Input the target date (YYYY.MM.DD) for the countdown. The clock will automatically calculate the remaining days.
- Press ENTER to start the countdown.
3.3 DOWN Mode: Day Countdown - Clock Countdown
This mode provides a full countdown to a specific date and time, showing days, hours, minutes, and seconds remaining.
- Press the DOWN button.
- Press EDIT.
- Input the target date (YYYY.MM.DD) and time (HH:MM:SS) for the countdown.
- Press ENTER to start the countdown.

Image: The clock in countdown mode, demonstrating the ease of setting with the remote control.
3.4 STOPWATCH Mode: Day Count Up - Clock Count Up
This mode functions as a stopwatch, counting up days, hours, minutes, and seconds from a starting point.
- Press the STOPWATCH button.
- Press START to begin counting up.
- Press STOP to pause the count.
- Press RESET to clear the count.
4. Maintenance
4.1 Cleaning
To clean the clock, gently wipe the display and frame with a soft, dry, or slightly damp cloth. Avoid using abrasive cleaners, solvents, or excessive moisture, as these can damage the display or internal components.
4.2 Storage
When not in use for extended periods, store the clock in a cool, dry place away from direct sunlight and extreme temperatures.
5. Troubleshooting
| Problem | Possible Cause | Solution |
|---|---|---|
| Clock does not power on. | No power supply; faulty adapter. | Ensure power adapter is securely plugged into both the clock and a working electrical outlet. Check the power adapter for damage. |
| Remote control not responding. | Dead batteries; obstruction; out of range. | Replace remote control batteries. Ensure there are no obstructions between the remote and the clock. Operate within the 30ft control distance. |
| Display is dim or unreadable. | Brightness setting too low. | Press the BRIGHT button on the remote to adjust to a higher brightness level. |
| Countdown/Count-up is incorrect. | Incorrect date/time input. | Re-enter the target date or time carefully according to the instructions for the specific mode. |
6. Specifications
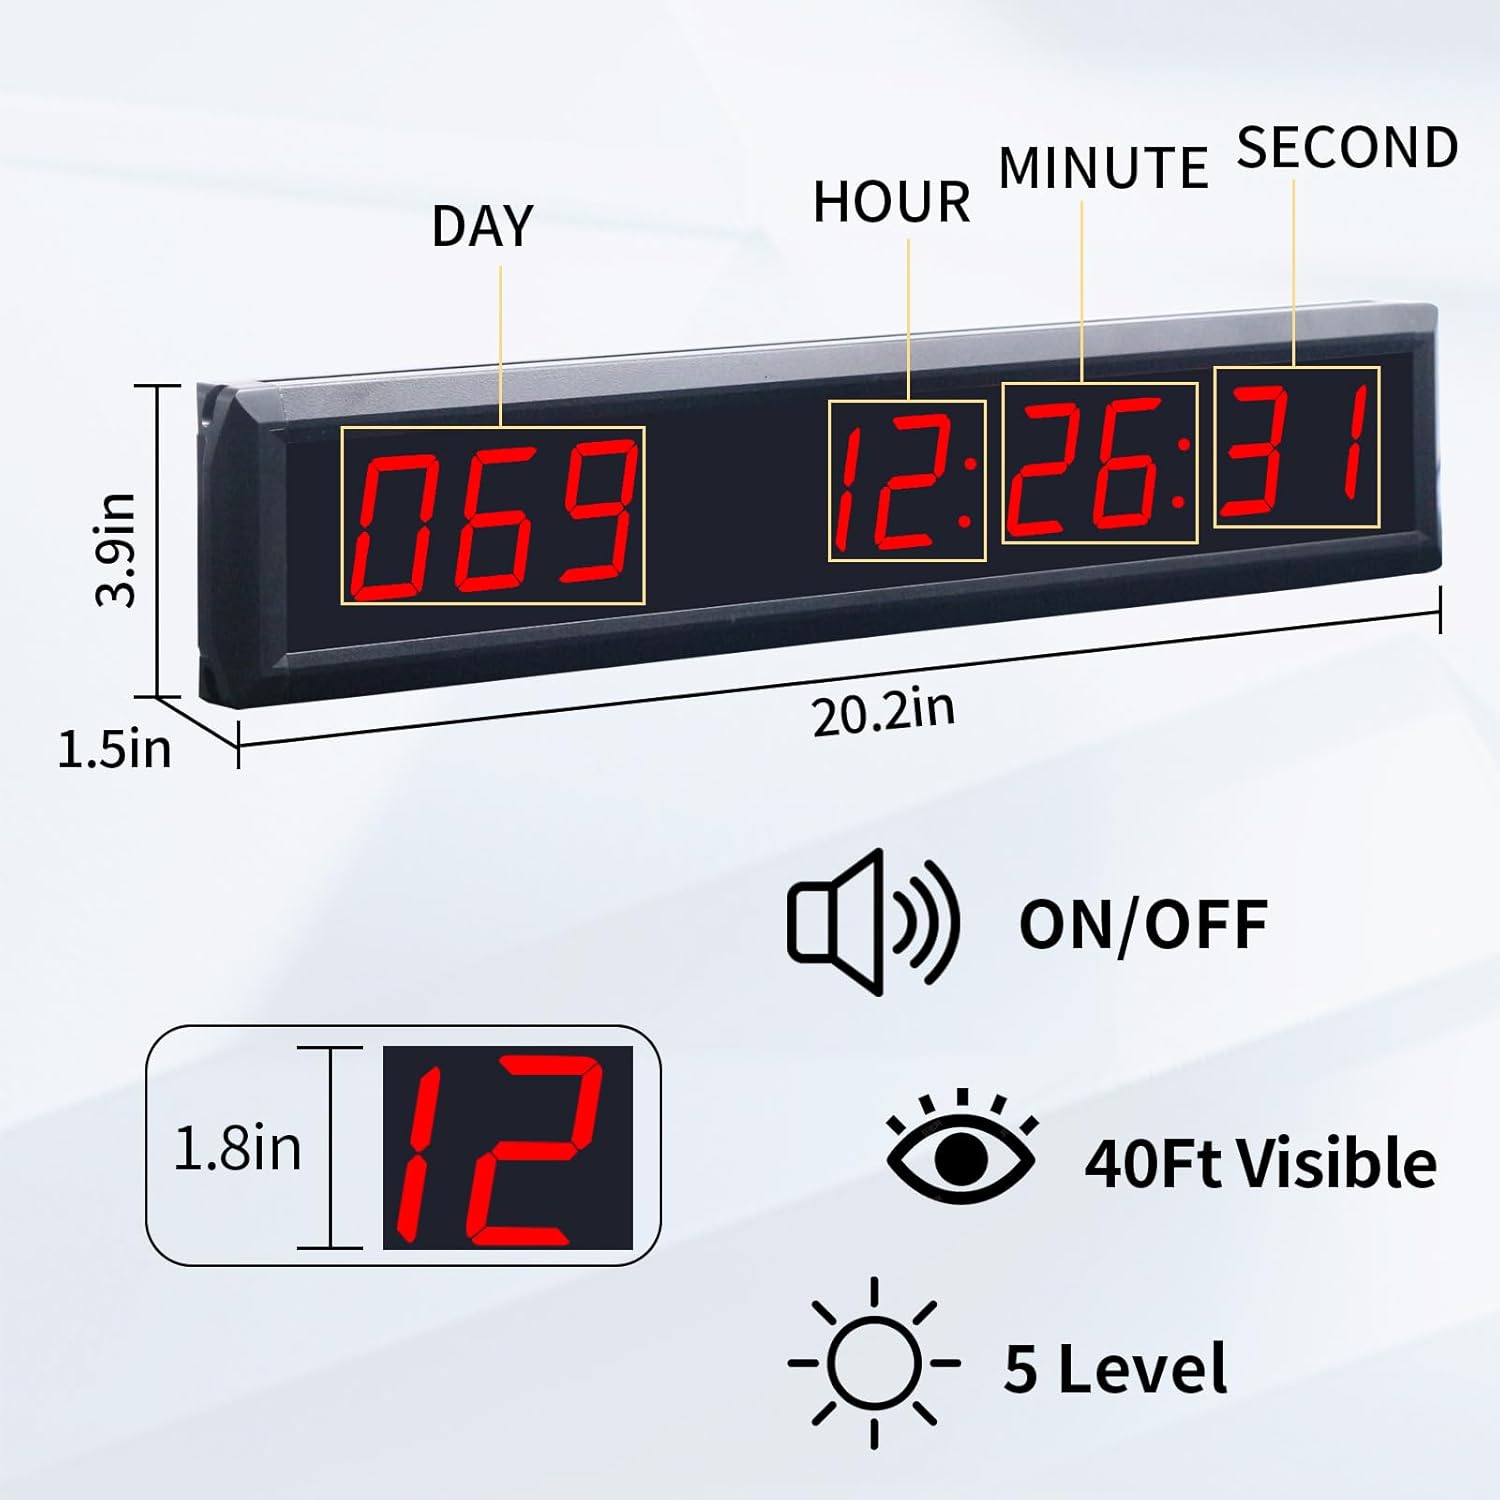
Image: Detailed view of the clock's dimensions and key features like digit size, visibility, and brightness levels.
- Brand: GAN XIN
- Model: GI9T-1.8R
- Display Type: LED, 1.8 inch red digits
- Product Dimensions (L x W x H): 20.2" x 3.9" x 1.5"
- Material: Aluminum Alloy Frame
- Item Weight: 8 ounces
- Brightness Levels: 5 levels adjustable
- Visibility: Up to 40 feet
- Control Method: Remote Control (30ft range)
- Timing Capacity: Max 999 Days 23 Hours 59 Minutes 59 Seconds
- Power: Plug-in use
- Special Features: Built-in buzzer (disable option), Power failure memory function
7. Warranty Information
GANXIN products are manufactured to high-quality standards. For specific warranty details, please refer to the warranty card included with your product or contact GANXIN customer support. This warranty typically covers manufacturing defects under normal use conditions for a specified period from the date of purchase.
8. Customer Support
If you encounter any issues or have questions regarding your GANXIN 999 Days Countdown Clock, please contact our customer support team. Please have your model number (GI9T-1.8R) and purchase information ready when contacting support.
For the most up-to-date contact information, please visit the official GANXIN website or refer to your product packaging.


