1. Introduction and Product Overview
This manual provides essential instructions for the safe and efficient assembly, operation, and maintenance of your DWVO 26x10x6.6ft Heavy Duty Walk-in Greenhouse. Please read this manual thoroughly before installation and retain it for future reference.
Key Features:
- Heavy Duty Construction: Features an upgraded and thickened galvanized steel frame for enhanced support against wind, rain, and snow.
- Durable PE Fabric: Made from 140g PE fabric designed to protect plants, block UV rays, retain warmth, and offer protection against severe weather.
- Optimal Ventilation: Equipped with 16 double-screen windows on both sides to ensure increased air circulation and better plant protection.
- Secure Access: Includes two zipper doors for easy entry and exit, with fixed door crossbars for added stability against wind.
- Enhanced Stability: Designed with drawstrings and ground pegs for effective outdoor fixation. The bottom cloth extension allows for weighting with stones or sandbags for maximum stability.

Image 1.1: The DWVO 26x10x6.6ft Heavy Duty Walk-in Greenhouse fully assembled in an outdoor environment.
2. Safety Information
- Always assemble the greenhouse on a level and stable surface.
- Ensure all connections are securely fastened before use.
- Do not use the greenhouse in extreme weather conditions (e.g., very strong winds, heavy snow) without additional reinforcement.
- Keep children and pets away from the assembly area to prevent accidents.
- Wear appropriate safety gear, such as gloves, during assembly.
- Regularly inspect the structure for any signs of damage or wear. Repair or replace damaged parts immediately.
- Ensure proper ventilation to prevent excessive heat buildup, especially on sunny days.
- Do not hang heavy objects from the frame.
3. Package Contents
Before beginning assembly, verify that all parts listed below are present and undamaged. If any parts are missing or damaged, please contact customer support.
| Component | Description | Quantity |
|---|---|---|
| Galvanized Steel Pipes | Various lengths and bends for frame construction. | (Refer to parts list in packaging) |
| Connectors/Joints | For joining frame pipes. | (Refer to parts list in packaging) |
| PE Fabric Cover | Green polyethylene cover with windows and zipper doors. | 1 |
| Ground Pegs & Ropes | For securing the greenhouse to the ground. | (Refer to parts list in packaging) |
| Fasteners (Bolts, Nuts) | For securing frame components. | (Refer to parts list in packaging) |
4. Setup and Assembly Instructions
Follow these steps carefully to assemble your DWVO Walk-in Greenhouse. It is recommended to have at least two people for assembly.
Video Guide: How to Install Greenhouse
Video 4.1: This video demonstrates the step-by-step assembly process for the greenhouse frame and cover.
Step-by-Step Assembly:
- Assemble Arch Sections:
Connect the curved galvanized steel pipes to form the arch sections. Ensure the holes align for secure fastening. Use the provided bolts and nuts to secure each connection point. You will create multiple arch sections.
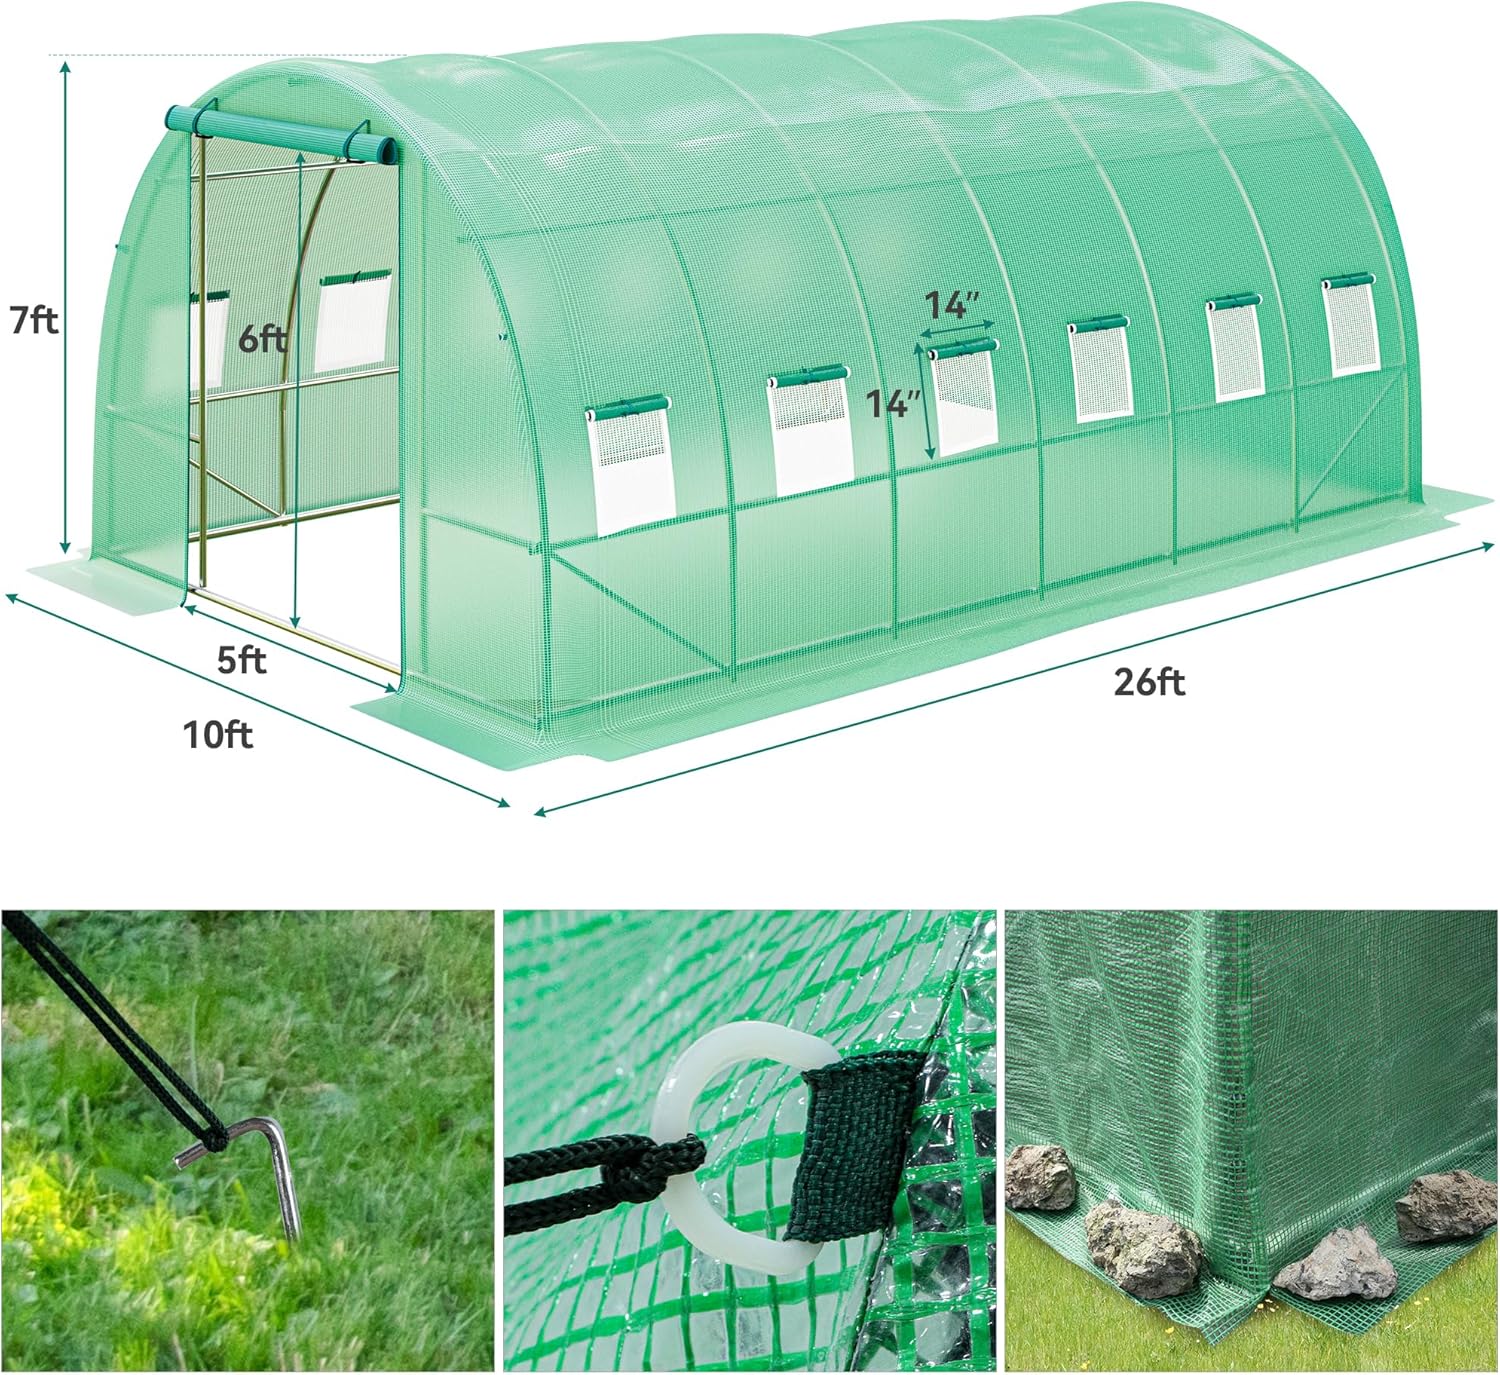
Image 4.1: Illustration of the greenhouse dimensions and various frame components.
- Assemble Base Corner Supports:
Connect vertical pipes to horizontal base pipes to form the corner supports for the greenhouse base. Secure these connections with bolts and nuts.
- Connect Arches to Corner Supports:
Stand the assembled arch sections upright and connect them to the base corner supports. Ensure they are properly aligned and secured with fasteners.
- Assemble Main Base Frame:
Connect the base corner supports with additional straight horizontal pipes to complete the rectangular base frame. Secure all connections firmly.
- Install Horizontal Crossbars:
Attach the horizontal crossbars between the arch sections and vertical supports. These bars provide crucial structural integrity. Secure them firmly with the provided fasteners.
- Drape and Secure the PE Fabric Cover:
Carefully drape the PE fabric cover over the assembled frame. Ensure it is centered and evenly distributed. Fasten the cover to the frame using the integrated ties, straps, or clips. The bottom edge of the cover has an extension designed to be weighted down with stones or sandbags for added stability.

Image 4.2: Two individuals carefully placing the green PE fabric cover over the greenhouse frame.
- Anchor the Greenhouse:
Utilize the provided ground pegs and ropes to anchor the greenhouse firmly to the ground. This is crucial for stability, especially in windy conditions. We highly advise installing all ground pegs. Place heavy objects like rocks or sandbags on the bottom skirt of the cover for additional security.

Image 4.3: The greenhouse secured with ropes and ground pegs, demonstrating the use of rocks on the bottom skirt for enhanced stability.
- Operate Doors and Windows:
Ensure the zipper doors operate smoothly and the window flaps can be rolled up and secured for ventilation. The fixed door crossbars should be in place to maintain door integrity.

Image 4.4: Detail of a double-screen window, zipper door, and safety buckle for securing rolled-up window flaps.
5. Operating Instructions
Ventilation:
Your greenhouse is equipped with 16 double-screen windows. To regulate temperature and humidity, roll up the window flaps and secure them using the safety buckles. This allows for cross-ventilation while keeping pests out. Close windows during cooler temperatures or adverse weather.
Access:
The greenhouse features two zipper doors located at each end. Use the zippers to open and close the doors. For extended periods of access or to maximize airflow, the doors can be rolled up and secured at the top.

Image 5.1: An interior view showcasing the spacious design of the greenhouse, suitable for multiple plant beds.
6. Maintenance
- Cleaning: Clean the PE fabric cover periodically with mild soap and water. Avoid harsh chemicals or abrasive cleaners that could damage the material.
- Frame Inspection: Regularly check all frame connections, bolts, and nuts for tightness. Tighten any loose fasteners to maintain structural integrity.
- Cover Inspection: Inspect the PE cover for any tears, punctures, or signs of wear. Small tears can often be repaired with specialized greenhouse repair tape to prevent further damage.
- Anchoring: Ensure ground pegs and ropes remain securely anchored, especially after strong winds or heavy rainfall. Re-secure or reinforce as needed.
- Snow Removal: In areas with heavy snowfall, gently remove accumulated snow from the roof to prevent excessive weight from damaging the structure.

Image 6.1: A detailed view of the durable 140g PE fabric, emphasizing its protective qualities.
7. Troubleshooting
- Greenhouse feels unstable: Ensure all frame connections are tightened. Verify that ground pegs are fully inserted and ropes are taut. Add additional weight to the bottom skirt (e.g., rocks, sandbags) as recommended.
- Water pooling on the roof: Check that the cover is stretched tightly and evenly over the frame. Ensure no structural components are bent or misaligned, which could create depressions.
- Excessive condensation inside: Increase ventilation by opening more windows or partially opening the doors. Ensure adequate airflow to reduce humidity.
- Zipper sticking: Apply a silicone-based lubricant to the zipper teeth. Ensure the fabric is not caught in the zipper mechanism.
8. Specifications
| Feature | Detail |
|---|---|
| Model Number | MADWVZXVka |
| Dimensions (L x W x H) | 26 x 10 x 6.6 ft (312"L x 120"W x 79.2"H) |
| Item Weight | 108.4 pounds |
| Frame Material | Alloy Steel (Galvanized) |
| Cover Material | 140g Polyethylene (PE) |
| Number of Doors | 2 (Zippered) |
| Number of Windows | 16 (Double Screen) |
| Color | Green |
| UPC | 840332349145 |
9. Warranty and Support
For warranty information or technical support, please refer to the contact details provided with your purchase or visit the official DWVO website. Keep your purchase receipt as proof of purchase.


