
1. Introduction
This manual provides essential information for the proper installation, operation, and maintenance of the ClimaTek 47618 OEM Upgraded Liquid Line Filter-Drier. This component is designed for use in HVAC and refrigeration systems utilizing R22 and R410A refrigerants. It serves to protect the system from moisture, acids, and solid contaminants, ensuring optimal performance and longevity of the equipment. This filter-drier directly replaces Emerson Part #47618.
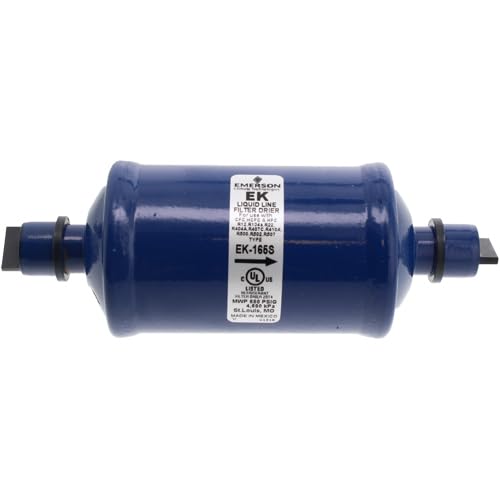
Figure 1: ClimaTek 47618 Liquid Line Filter-Drier. This image displays the blue cylindrical filter-drier with its identification label clearly visible, indicating its type and specifications.
2. Safety Information
Installation and servicing of HVAC and refrigeration components should only be performed by qualified and experienced technicians. Failure to follow these safety guidelines can result in property damage, personal injury, or death.
- Always disconnect power to the HVAC system before beginning any installation or maintenance.
- Wear appropriate personal protective equipment (PPE), including safety glasses and gloves.
- Refrigerants are under pressure and can cause severe frostbite. Handle with extreme care.
- Ensure proper ventilation when working with refrigerants.
- Comply with all local, state, and national codes and regulations.
- Never attempt to repair a damaged filter-drier. Replace it with a new, compatible unit.
3. Product Components
The ClimaTek 47618 Liquid Line Filter-Drier is a self-contained unit. It consists of a solid core desiccant and filter media encased in a durable steel shell, designed to be installed directly into the liquid line of a refrigeration or air conditioning system.
4. Installation Instructions
This filter-drier is designed for professional installation only. Incorrect installation can lead to system failure or safety hazards.
- System Preparation: Ensure the HVAC system is completely depressurized and evacuated according to industry standards. Recover all refrigerant into an approved recovery cylinder.
- Location: Install the filter-drier in the liquid line between the condenser and the metering device (e.g., expansion valve or capillary tube). Ensure the flow arrow on the filter-drier points in the direction of refrigerant flow towards the metering device.
- Cutting: Use a tubing cutter to remove the old filter-drier or to create space for the new unit. Ensure clean, burr-free cuts.
- Brazing: Braze the new filter-drier into the liquid line using appropriate brazing techniques and materials. Use a wet rag or heat sink paste to protect the filter-drier body from excessive heat during brazing, as overheating can damage the desiccant material.
- Leak Testing: After brazing, perform a thorough leak test on all new connections using nitrogen or an approved leak detection method.
- Evacuation: Evacuate the system to a deep vacuum (typically 500 microns or less) to remove all non-condensable gases and moisture.
- Refrigerant Charging: Recharge the system with the correct type and amount of R22 or R410A refrigerant as specified by the system manufacturer.
- System Start-up: Restore power and carefully monitor system pressures and temperatures during initial start-up to ensure proper operation.
5. Operation
The ClimaTek 47618 Liquid Line Filter-Drier operates passively within the refrigeration circuit. As refrigerant flows through the liquid line, the filter-drier's internal desiccant material absorbs moisture and acids, while its filter media traps solid contaminants. This continuous filtration process helps prevent corrosion, ice formation, and blockages, thereby protecting sensitive components like the expansion valve and compressor from damage and ensuring efficient system operation.
6. Maintenance
The filter-drier is a sealed component and does not require internal maintenance. Its effectiveness, however, diminishes over time as it absorbs contaminants. Regular system checks by a qualified technician are recommended.
- Replacement Frequency: It is generally recommended to replace the liquid line filter-drier whenever the refrigeration system is opened for major repairs, such as compressor replacement, or if there are indications of moisture or contamination in the system.
- Pressure Drop: A significant pressure drop across the filter-drier can indicate a clogged unit, necessitating replacement.
- Moisture Indicators: If the system's moisture indicator (sight glass) shows signs of moisture, the filter-drier may be saturated and require replacement.
7. Troubleshooting
While the filter-drier itself is not typically a source of malfunction, a saturated or clogged unit can lead to system performance issues. If you experience any of the following, consult a qualified HVAC technician:
- Reduced Cooling/Heating Capacity: A restricted filter-drier can impede refrigerant flow, leading to insufficient heat transfer.
- High Head Pressure / Low Suction Pressure: These symptoms can indicate a blockage within the liquid line, potentially caused by a clogged filter-drier.
- Excessive Compressor Run Time: The system may struggle to reach desired temperatures, causing the compressor to run longer.
- Ice Formation: Moisture in the system, if not absorbed by the drier, can freeze at the metering device, causing blockages.
8. Specifications
| Feature | Detail |
|---|---|
| Model Number | 47618 |
| Refrigerant Compatibility | R22, R410A |
| Type | Liquid Line Filter-Drier |
| Replaces Part # | Emerson 47618 |
| Product Dimensions | 9 x 11 x 1 inches |
| Product Weight | 1.38 Pounds |
| Manufacturer | Emerson (OEM upgraded by ClimaTek) |
| ASIN | B0C8ZRK2WB |
| Date First Available | June 22, 2023 |
9. Warranty and Support
For information regarding warranty coverage or technical support for your ClimaTek 47618 Liquid Line Filter-Drier, please refer to the original purchase documentation or contact your authorized ClimaTek dealer or customer service representative. Ensure you have your product model number and purchase date available when seeking support.