1. Introduction
This manual provides detailed instructions for the Y&H 100A MPPT Solar Charge Controller (Model SY10048-JP). It covers installation, operation, maintenance, and troubleshooting to ensure safe and efficient use of your solar power system. This controller is designed to manage power flow from solar panels to batteries, supporting 12V, 24V, 36V, and 48V systems with automatic voltage recognition.
2. Product Overview
The Y&H 100A MPPT Solar Charge Controller combines advanced technology with user-friendly features to optimize your solar charging experience.
Key Features:
- High Efficiency: Integrates MPPT and PWM charging technologies for high charging efficiency and cost-effectiveness. Offers at least 99.5% tracking efficiency.
- Battery Compatibility: Automatically adjusts for 12V, 24V, 36V, and 48V systems. Compatible with various battery types including sealed lead-acid, GEL, lithium, and LiFePO4 batteries.
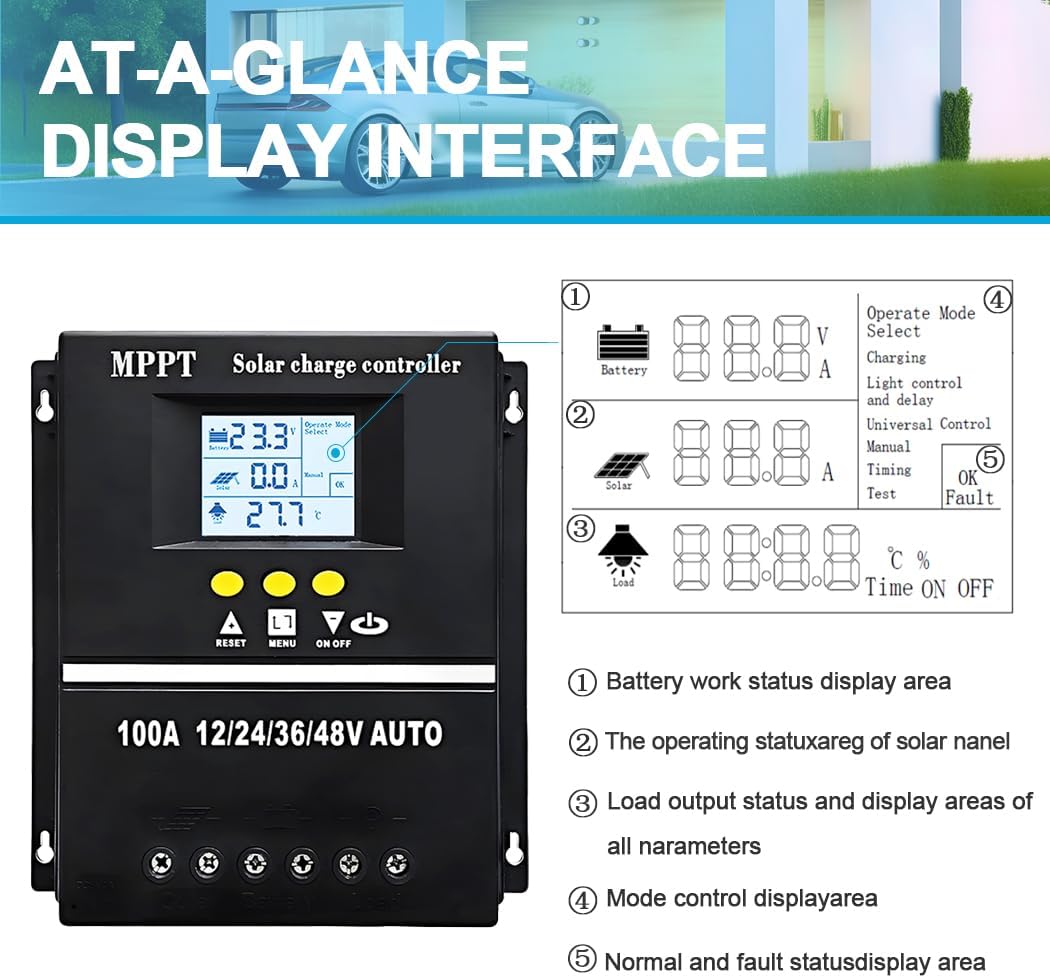
- Clear LCD Display: Features a multi-functional LCD screen with backlight and clock display. Clearly shows charging status, operating modes, and other information, ensuring visibility even in low light.
- Advanced Multi-functional Design: Offers 7 operating modes (charging mode, light control mode, light control + delay control mode, universal control mode, manual control mode, timer control mode) to adapt to various usage scenarios.
- Robust Security: Includes multiple protection functions such as overcharge, over-discharge, overload protection, reverse connection protection, and overheat protection. The aluminum alloy casing and portable size ensure the safety of both the battery and the device.
- Dual USB Ports: Equipped with dual 5V USB charging ports for simultaneous charging of smartphones and tablets.
Product Visuals:


3. Setup
Proper installation is crucial for the safe and efficient operation of your solar charge controller. Follow these steps carefully:
- Prepare for Installation: Ensure the installation location is dry, well-ventilated, and protected from direct sunlight and moisture. Leave sufficient space around the controller for heat dissipation.
- Connect the Battery: Connect the battery to the controller first. Ensure correct polarity (positive to positive, negative to negative). The controller will automatically detect the battery voltage (12V, 24V, 36V, or 48V).
- Connect the Solar Panel: Connect the solar panel to the controller. Again, observe correct polarity. The controller will begin charging the battery if sufficient sunlight is available.
- Connect the Load: Connect your DC load to the controller's load terminals. Ensure the load current does not exceed the controller's rated current.
- Select Battery Type: After initial connection, use the controller's menu to select the appropriate battery type (Sealed, GEL, Lithium, LiFePO4) for optimal charging. Refer to the 'Operating' section for detailed instructions on menu navigation.


4. Operating Instructions
The Y&H Solar Charge Controller features an intuitive LCD display and three control buttons for easy operation.
LCD Display:
The LCD screen provides real-time information about your solar system. Key indicators include:
- Battery voltage and charge status
- Solar panel current and voltage
- Load output status and current
- Ambient temperature
- Operating mode selection
- Time and fault status
Button Functions:
- RESET (▲): Used to increase values when setting parameters or to navigate upwards through menu options.
- MENU (L1): Used to enter the menu settings, cycle through different display screens, and confirm selections.
- ON/OFF (▼): Used to decrease values when setting parameters or to navigate downwards through menu options. Also used to manually turn the load on or off.
Setting Parameters:
To adjust settings such as high voltage disconnection, low voltage disconnection, or operating modes, follow these general steps:
- Enter Setting Mode: Press and hold the 'MENU' button for 5 seconds to enter the parameter setting interface.
- Navigate Parameters: Use the '▲' and '▼' buttons to scroll through different parameters.
- Adjust Values: Once the desired parameter is selected, press and hold '▲' or '▼' to modify its value. Briefly press '▲' or '▼' to fine-tune the adjustment.
- Confirm Settings: Press the 'MENU' button to confirm the new setting and move to the next parameter, or press 'OK' (if available on screen) to save and exit.
Load Working Modes:
The controller supports various load working modes, which can be configured via the menu:
- Manual Mode (24H): The load can be manually turned on or off using the ON/OFF button.
- Solar Light Control Mode (Sunset-Sunrise): The load automatically turns on at sunset and off at sunrise.
- Solar Light Time Control: The load turns on at sunset and stays on for a set duration.

Operation Demonstration Video:
This video demonstrates how to set the high voltage disconnection protection and adjust the light control mode on the Y&H 100A MPPT Solar Charge Controller. It shows the button presses and corresponding display changes.
5. Maintenance
Regular maintenance ensures the longevity and optimal performance of your solar charge controller.
- Check Connections: Periodically inspect all wiring connections (battery, solar panel, load) for tightness and corrosion. Loose connections can cause voltage drops and overheating.
- Clean the Controller: Keep the controller's exterior clean and free from dust and debris. Use a dry cloth for cleaning. Do not use liquids or abrasive cleaners.
- Ensure Ventilation: Verify that the controller's ventilation openings are not obstructed. Proper airflow is essential to prevent overheating, especially in warm environments.
- Monitor Display: Regularly check the LCD display for any unusual readings or error codes. Refer to the troubleshooting section if any issues are observed.
- Battery Inspection: Follow the manufacturer's maintenance guidelines for your specific battery type.
6. Troubleshooting
If you encounter issues with your Y&H Solar Charge Controller, refer to the following common problems and solutions:
| Problem | Possible Cause | Solution |
|---|---|---|
| Controller display is off / No power | Loose battery connection, low battery voltage, reverse polarity. | Check battery wiring and ensure connections are secure. Verify battery voltage is above the minimum operating voltage. Correct any reverse polarity. |
| Battery not charging | No solar input, low solar panel voltage, incorrect battery type setting, faulty solar panel. | Ensure solar panels are exposed to sunlight. Check solar panel connections and voltage. Verify the correct battery type is selected in the settings. Test solar panel output. |
| Load not working | Load disconnected, low battery voltage, incorrect load control mode, overload protection activated. | Check load wiring. Ensure battery voltage is above the low voltage disconnection threshold. Adjust load control mode settings. Reduce load to prevent overload. |
| Overcharge/Over-discharge protection frequently activates | System components (solar panel, battery) are mismatched, incorrect voltage settings. | Review your solar panel wattage and battery capacity to ensure they are appropriately sized for each other. Adjust high/low voltage disconnection settings if necessary, ensuring they align with your battery's specifications. |
7. Specifications
| Feature | Specification |
|---|---|
| Model | SY10048-JP |
| Max Current | 100A |
| System Voltage | 12V/24V/36V/48V (Auto-detection) |
| Max Solar Input (Voc) for 12V Battery | 15-25V |
| Max Solar Input (Voc) for 24V Battery | 30-50V |
| Max Solar Input (Voc) for 36V Battery | 45-75V |
| Max Solar Input (Voc) for 48V Battery | 60-100V |
| USB Output | Dual 5V |
| Manufacturer | Y&H |
| Package Size | 19.5 x 18.4 x 6.6 cm |
| Package Weight | 0.89 kg |
| Color | Black |
| Display Type | LCD |
| UPC | 716963254700 |
8. Warranty and Support
For warranty information and technical support, please refer to the product packaging or contact Y&H customer service directly. You can also visit the Y&H store on Amazon for additional resources and contact options. Your satisfaction is our priority.


