1. Introduction
This manual provides essential information for the safe and effective operation, maintenance, and troubleshooting of your Ingco 20V Lithium-Ion Rotary Hammer Drill, model CRHLI202287. Please read this manual thoroughly before using the tool and retain it for future reference.

Image 1.1: Ingco 20V Lithium-Ion Rotary Hammer Drill CRHLI202287. This image displays the main rotary hammer drill unit.
2. Safety Information
Always observe basic safety precautions to reduce the risk of fire, electric shock, and personal injury when operating power tools. Keep this manual for future reference.
General Power Tool Safety Warnings:
- Work Area Safety: Keep your work area clean and well-lit. Cluttered or dark areas invite accidents. Do not operate power tools in explosive atmospheres, such as in the presence of flammable liquids, gases, or dust.
- Electrical Safety: Avoid body contact with earthed or grounded surfaces such as pipes, radiators, ranges, and refrigerators. There is an increased risk of electric shock if your body is earthed or grounded.
- Personal Safety: Always wear eye protection. Use personal protective equipment such as dust masks, non-skid safety shoes, hard hats, or hearing protection when appropriate. Stay alert, watch what you are doing, and use common sense when operating a power tool.
- Tool Use and Care: Do not force the power tool. Use the correct power tool for your application. Do not use the power tool if the switch does not turn it on and off. Disconnect the plug from the power source and/or the battery pack from the power tool before making any adjustments, changing accessories, or storing power tools.
- Battery Tool Use and Care: Recharge only with the charger specified by the manufacturer. Use power tools only with specifically designated battery packs.
3. Package Contents
Carefully unpack the box and ensure all items are present and in good condition. If any items are missing or damaged, contact your retailer immediately.
- 1 Pcs Rotary Hammer (CRHLI202287)
- 1 Pcs Charger
- 2 Pcs 4Ah Battery
- 3 pcs drill bits (SDS-plus)
- 1 Pcs auxiliary Handle
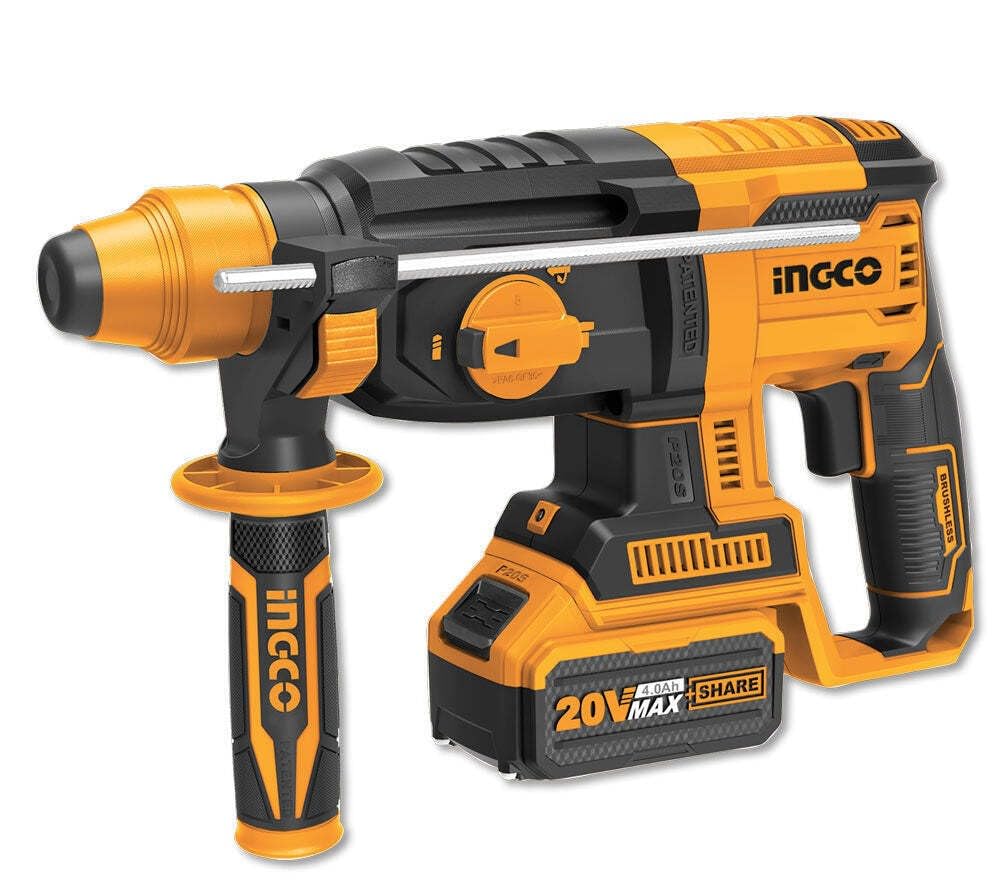
Image 3.1: Two 4Ah Batteries. This image shows two 20V 4Ah lithium-ion battery packs.

Image 3.2: Battery Charger. This image displays the dedicated charger for the 20V lithium-ion batteries.

Image 3.3: SDS-plus Drill Bits. This image shows three SDS-plus drill bits and one chisel bit.
4. Product Features
The Ingco CRHLI202287 Rotary Hammer Drill is designed with several features to enhance performance and user experience:
- Powerful Performance: Equipped with a robust 20V lithium-ion battery for demanding drilling and hammering tasks.
- Versatile Functionality: Functions as a rotary hammer, allowing for drilling into concrete, brick, stone, and masonry.
- Three Modes: Offers drill-only, hammer-only, and rotary hammer modes for various applications.
- SDS-plus Chuck: Features an SDS-plus chuck system for quick and easy bit changes.
- Variable Speed: Adjustable speed control for precise drilling and hammering, catering to different materials.
- Ergonomic Design: Ergonomically designed handle and anti-vibration system reduce user fatigue.
- LED Light: Integrated LED light illuminates the work area, improving visibility.
- Portable and Convenient: Cordless design provides freedom of movement and portability.
5. Setup
5.1. Charging the Battery
- Connect the charger to a suitable power outlet.
- Slide the 20V lithium-ion battery pack onto the charger until it clicks into place.
- The charger's indicator light will show the charging status. Refer to the charger's specific instructions for light indications.
- Once fully charged, remove the battery from the charger.
5.2. Attaching the Auxiliary Handle
- Loosen the auxiliary handle by rotating it counter-clockwise.
- Slide the handle over the front of the drill body.
- Position the handle to your desired angle for optimal control and comfort.
- Tighten the handle by rotating it clockwise until it is securely fastened.
5.3. Inserting SDS-plus Drill Bits
- Clean the shank of the SDS-plus drill bit.
- Pull back the chuck collar on the rotary hammer.
- Insert the drill bit into the chuck until it locks into place.
- Release the chuck collar. Pull on the bit to ensure it is securely seated. The SDS-plus system allows for slight axial movement of the bit, which is normal.
6. Operating Instructions
6.1. Installing the Battery Pack
- Align the charged battery pack with the battery port on the tool.
- Slide the battery pack into the tool until it clicks securely into place.
- To remove, press the battery release button and slide the battery out.
6.2. Selecting Operating Mode
The rotary hammer features a mode selector switch to choose between three operating modes:
- Drill Mode: For drilling in wood, metal, and plastic without hammering action.
- Rotary Hammer Mode: For drilling in concrete, masonry, and stone with both rotation and hammering action.
- Hammer Only Mode (Chiseling): For light chiseling, chipping, or demolition work. Use with appropriate chisel bits.
Rotate the mode selector switch to the desired icon. Ensure the switch is fully engaged in the chosen mode before operation.
6.3. Variable Speed Control
The tool features a variable speed trigger. Pressing the trigger further increases the speed. This allows for precise control depending on the material and application. Always start at a lower speed for better control and gradually increase as needed.
6.4. Starting and Stopping the Tool
- To start the tool, press the trigger switch.
- To stop the tool, release the trigger switch.
7. Maintenance
Regular maintenance ensures optimal performance and extends the life of your tool.
- Cleaning: Keep the tool's ventilation openings clean to prevent overheating. Use a soft, damp cloth to clean the exterior. Do not use harsh chemicals or abrasive cleaners.
- Lubrication: The tool's internal components are factory-lubricated and generally do not require additional lubrication.
- Battery Care: Store batteries in a cool, dry place away from direct sunlight. Do not store fully discharged batteries for extended periods.
- Inspection: Regularly inspect the power tool, battery pack, and charger for any signs of damage, wear, or loose parts. Replace damaged parts immediately.
- Storage: Store the tool, batteries, and charger in a secure, dry place out of reach of children.
8. Troubleshooting
If you encounter issues with your rotary hammer drill, refer to the following common problems and solutions:
| Problem | Possible Cause | Solution |
|---|---|---|
| Tool does not start | Battery not charged or improperly installed | Ensure battery is fully charged and correctly inserted. |
| Reduced power or performance | Low battery charge | Recharge the battery pack. |
| Bit not rotating or hammering | Incorrect mode selected; Bit not properly inserted | Check mode selector switch; Re-insert bit into SDS-plus chuck. |
| Overheating | Blocked ventilation slots; Prolonged heavy use | Clean ventilation slots; Allow tool to cool down. |
If the problem persists after attempting these solutions, contact Ingco customer support or an authorized service center.
9. Specifications
| Feature | Specification |
|---|---|
| Model Number | CRHLI202287 |
| Power Source | Battery Powered |
| Voltage | 20 Volts |
| Battery Capacity | 4 Amp Hours (per battery) |
| Maximum Rotational Speed | 1100 RPM |
| Speed | 1400 RPM (Impact Rate) |
| Amperage | 3 Amps |
| Drill Type | Hammer Drill |
| Product Dimensions | 46L x 31W x 12H Centimeters |
| Item Weight | 0.21 Kilograms (Tool only, approximate) |
| Special Feature | Variable Speed |
10. Warranty and Support
For warranty information, please refer to the warranty card included with your product or visit the official Ingco website. For technical support, spare parts, or service inquiries, please contact Ingco customer service or an authorized service center in your region. Keep your purchase receipt as proof of purchase for warranty claims.
Manufacturer: AVENGERS ENTERPRISES, INGCO POWER TOOLS PVT. LTD.


