
Devoko DV-storage shed
Devoko 5x3 FT Lockable Metal Garden Storage Shed Instruction Manual
Model: DV-storage shed
1. Product Overview
The Devoko 5x3 FT Lockable Metal Garden Storage Shed is designed to provide secure and durable outdoor storage. Constructed from electro-galvanized steel with paint treatment, it offers anti-corrosion properties suitable for various climates. Its compact design is ideal for organizing garden tools and outdoor items in your backyard or patio.
Key Features:
- Security and Durability: Steel frame structure with electro-galvanized steel and paint treatment for anti-corrosion and weather resistance.
- Ample Storage: 67 cubic feet capacity for garden tools, lawn mowers, ladders, bikes, and tents.
- Lockable Door: Single lockable door (61.2" high) to secure belongings.
- Ventilation: Integrated side vents for air circulation.
- Sloped Roof: Pitched roof design to reduce stress area and prevent water accumulation.
2. Important Safety Information
WARNING: Always wear gloves during assembly to prevent cuts from sharp edges. After assembly, ensure all plastic protective caps are placed over screw tips to prevent injury.
Ensure the shed is assembled on a level and stable surface. If placing on ground, consider a platform or curb underneath for stability and to prevent moisture issues. Two people are recommended for assembly to ensure safety and efficiency.
3. Package Contents
Before beginning assembly, please verify that all components listed in your product's packing list are present and undamaged. Typical components include:
- Metal wall panels
- Roof panels
- Frame components (base, vertical, horizontal supports)
- Door panels and hardware (hinges, latch)
- Screws, washers, and nuts
- Plastic protective caps for screws and corners
- Assembly manual
Contact customer support immediately if any parts are missing or damaged.
4. Assembly Instructions
Please read the entire manual and identify all parts before beginning assembly. It is highly recommended to have at least two people for assembly. Ensure you have a level surface for construction.
4.1. Preparation
- Unpack all components and lay them out. Verify against the packing list.
- Remove any protective plastic films from panels before assembly, as it becomes harder once assembled.
- Gather necessary tools: screwdriver (preferably electric with torque adjustment), gloves, measuring tape.
4.2. Visual Assembly Guide
Refer to the following images and videos for visual guidance during the assembly process.

Figure 1: Fully assembled Devoko 5x3 FT Gray Metal Storage Shed.
4.3. Step-by-Step Assembly
- Base Frame Assembly:
Assemble the base frame components (ZB1, ZB2, ZB3) using the provided corner brackets (K18), screws (S14), and pins (S15). Ensure the frame is square by measuring diagonals before fully tightening all bolts.
Video 1: Detailed base frame assembly steps. (Source: Brandline)
- Wall Panel Installation:
Attach the wall panels (BP1, BP2, BP3) to the base frame using screws (S14). Ensure panels are correctly oriented and aligned. Secure the panels to each other and to the top frame components (D1, D2, D3) as per the manual diagrams.

Figure 2: Interior view of the shed, demonstrating potential storage capacity.
Video 2: Step-by-step wall panel and frame installation. (Source: BreezZ)
- Roof Installation:
Place the roof panels (BP11) onto the top frame, ensuring proper overlap for weather resistance. Secure with screws (M3) and washers (M4). Install the gable ends (ZT2, ZT3) and vents (MV1) as shown in the diagrams, ensuring vents face upwards for proper air circulation.
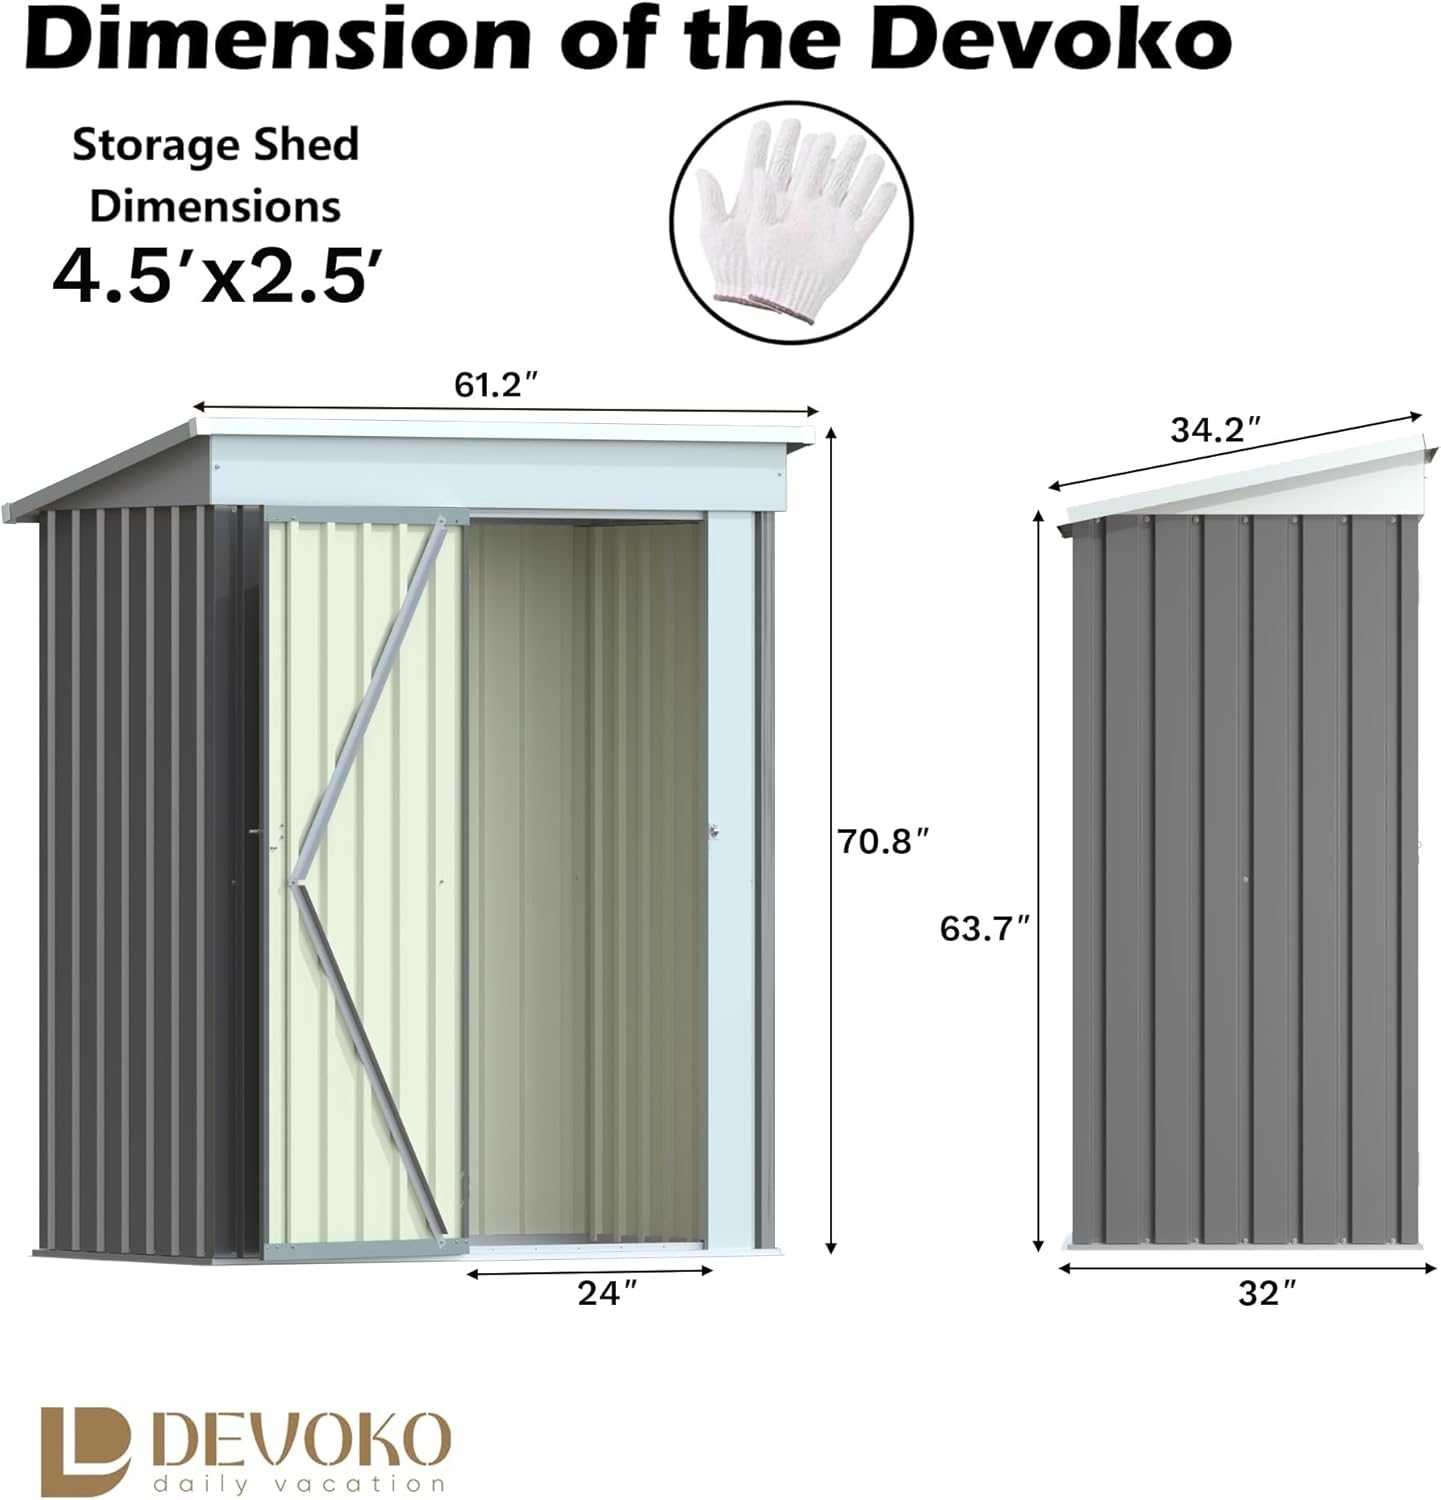
Figure 3: Detail of the shed's pitched roof for weather protection.
- Door Installation:
Attach the door panels (BPD1, BPD2) to the frame using hinges (K27) and screws (S21). Install the door latch (L4) and ensure smooth operation. The shed features a single lockable door for security.

Figure 4: Security features including the lockable latch and protective caps.
Video 3: Assembly and setup demonstration, including door installation. (Source: Patio-well)
- Final Touches:
Install all remaining plastic protective caps (M4) over exposed screw tips and corner edges (G1) to prevent injury and enhance aesthetics.
5. Operating Instructions
5.1. Opening and Closing the Door
To open the shed door, slide the latch mechanism to the unlocked position and pull the door outwards. To close, push the door firmly until it aligns with the frame, then slide the latch into the locked position.
5.2. Locking the Shed
For added security, a padlock (not included) can be attached to the door latch. Ensure the latch is fully engaged before applying the padlock.
6. Maintenance
- Cleaning: Periodically clean the shed's exterior with mild soap and water to remove dirt and debris. Avoid abrasive cleaners that could damage the paint finish.
- Inspection: Regularly inspect all screws and connections to ensure they remain tight. Tighten any loose fasteners to maintain structural integrity.
- Anti-Corrosion: The shed features electro-galvanized steel and paint treatment for anti-corrosion. If any scratches or damage to the paint occur, touch up with appropriate outdoor metal paint to prevent rust.
- Ventilation: Ensure the side vents remain clear of obstructions to allow for proper air circulation and prevent moisture buildup inside the shed.
7. Troubleshooting
- Water Leakage: If water leakage occurs, inspect all seams and screw points. Apply silicone sealant to any gaps or areas where water might penetrate. Ensure all washers are correctly placed under screw heads.
- Bent Panels: Minor bends in panels can sometimes occur during shipping or handling. Carefully straighten any bent panels before assembly to ensure proper fit and alignment.
- Door Misalignment: If doors do not close properly, check the base frame for squareness and ensure hinges are securely fastened. Minor adjustments to the frame or hinges may be necessary.
- Difficulty during Assembly: If you encounter significant difficulty, re-read the instructions carefully and watch the assembly videos. Ensure all parts are correctly identified and oriented. Having a second person can greatly assist.
8. Specifications
| Brand | Devoko |
| Model Number | DV-storage shed |
| Color | Gray |
| Material | Alloy Steel |
| Product Dimensions (D x W x H) | 34.2"D x 63.3"W x 71"H |
| Item Weight | 74.6 pounds |
| Door Height | 61.2 Inches |
| Door Width | 34.3 Inches |
| Water Resistance Level | Water Resistant |
| Assembly Required | Yes |
9. Warranty and Customer Support
Devoko is committed to providing full customer support and excellent after-sales service. If you have any questions, concerns, or require assistance with your product, please do not hesitate to contact our dedicated support team. Refer to your purchase documentation for specific warranty details and contact information.
Related documentsDV-storage shed


Ask a question about this manual
Ask about setup, troubleshooting, compatibility, parts, safety, or missing instructions. Manuals+ will review the question and use this page’s manual context to help answer it.