1. Introduction
Thank you for choosing the BEITONG Asura 2 Pro+ PC Gaming Controller. This manual provides essential information for setting up, operating, and maintaining your controller. Please read it thoroughly to ensure optimal performance and a satisfying gaming experience.
2. Package Contents
- BEITONG Asura 2 Pro+ Gaming Controller
- 2.4GHz Wireless Receiver
- USB-C Charging Cable
- User Manual
3. Product Layout
Familiarize yourself with the buttons and features of your BEITONG Asura 2 Pro+ controller:

Image 3.1: Detailed diagram of the BEITONG Asura 2 Pro+ controller, highlighting the Home button, Indicator Light, Back button, Start button, Left Stick (LS), Right Stick (RS), Turbo button, Shift button, D-pad, A/B/X/Y buttons, LB/RB/LT/RT triggers, M1/M2 macro buttons, USB-C charging port, and 2.4G wireless USB dongle storage.
- Home Button: Powers on/off, enters pairing mode.
- Indicator Light: Shows connection status, battery level, and mode.
- Back/Start Buttons: Standard menu navigation.
- Left Stick (LS)/Right Stick (RS): Hall Effect joysticks for precise movement. Press down for L3/R3.
- Turbo Button: Activates turbo function for rapid button presses.
- Shift Button: Used for mode switching and advanced functions.
- D-pad: Directional input.
- A/B/X/Y Buttons: Mechanical buttons for primary actions.
- LB/RB/LT/RT Triggers: Hall Effect triggers for precise analog input.
- M1/M2 Macro Buttons: Programmable back paddles for custom commands.
- USB-C Charging Port: For charging and wired connection.
- 2.4G Wireless USB Dongle Storage: Convenient storage for the wireless receiver.
4. Setup and Connectivity
The BEITONG Asura 2 Pro+ supports multiple connection methods:
4.1. 2.4GHz Wireless Connection (PC, Steam Deck, Android TV Box)
- Insert the 2.4GHz wireless receiver into an available USB port on your device (PC, Steam Deck, Android TV Box).
- Press and hold the Home button on the controller until the indicator light flashes rapidly, indicating pairing mode.
- Once connected, the indicator light will become solid.
4.2. Bluetooth 5.0 Connection (PC, Nintendo Switch, Android, iOS)
- Ensure Bluetooth is enabled on your device.
- Press and hold the Home button on the controller until the indicator light flashes rapidly.
- On your device, search for Bluetooth devices and select "BEITONG Asura 2 Pro+" to pair.
- Once connected, the indicator light will become solid.
4.3. Wired Connection (PC)
- Connect the USB-C charging cable to the controller and the other end to an available USB port on your PC.
- The controller will automatically be recognized and ready for use.

Image 4.1: The BEITONG Asura 2 Pro+ controller demonstrating its compatibility with various platforms including PC, Laptop, Nintendo Switch, Steam Deck, Mobiles, and Android TV & TV Box.
5. Operating Instructions
5.1. Basic Controls
The controller features standard gamepad buttons for intuitive gaming. The Hall Effect joysticks and triggers provide enhanced precision and durability, preventing stick drift and offering accurate input down to 0.1mm.

Image 5.1: Illustration of the 'Dual Hall' high precision control technology for both Hall Sticks and Hall Triggers, emphasizing millimetre response times and 0.1mm pressing accuracy.
5.2. Turbo Function
The Turbo function allows for rapid, repeated presses of a button. To activate:
- Press and hold the Turbo button.
- While holding Turbo, press the desired action button (e.g., A, B, X, Y, LB, RB, LT, RT).
- Release both buttons. The selected action button will now rapidly repeat its input when held down.
- To deactivate, repeat the process.

Image 5.2: Visual guide on how to set the Turbo function, showing the Turbo button and an example of activating Turbo for the 'B' button.
5.3. Motion Control (6-Axis Gyroscope)
The controller features a 6-axis gyroscope for motion sensing games, particularly useful on Nintendo Switch and PC titles that support motion input. This allows for intuitive control based on the physical movement of the controller.

Image 5.3: Depiction of the 6-axis gyroscope enabling somatosensory control for PC and Nintendo Switch, offering full flexibility for motion-sensing games.
6. Customization with BEITONG Gamepad Assistant
Unlock the full potential of your controller with the BEITONG Gamepad Assistant software. This application allows for extensive customization of various settings:
- Macro Key Mapping: Program M1/M2 back paddles to any button or complex command sequences.
- Overclocking Mode: Adjust polling rate for faster response times (up to 600Hz on PC).
- Joystick Dead Zone: Fine-tune joystick sensitivity and eliminate unwanted input.
- Turbo Speed: Customize the rapid-fire rate of the Turbo function.
- Vibration Strength: Adjust the intensity of the dual rumble motors.
- RGB Light Effects: Personalize the controller's lighting.
- Joystick/Trigger Calibration: Ensure optimal performance and accuracy.
Image 6.1: Overview of highly customizable gamepad functions accessible through the BEITONG Gamepad Assistant, including stick sensitivity, vibration intensity, key customization, and turbo frequency.
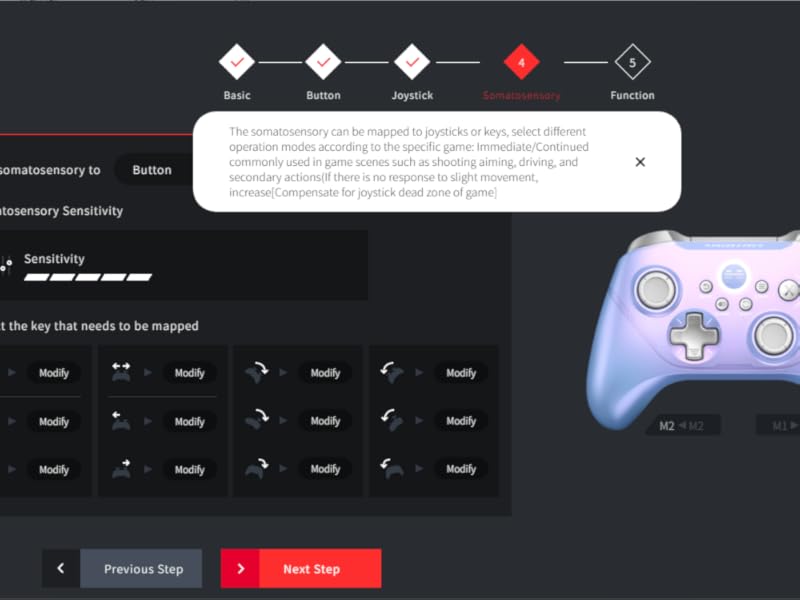
Image 6.2: Screenshot of the BEITONG Gamepad Assistant interface for button customization, showing options for normal and extended buttons (M1/M2) and macro settings.

Image 6.3: Screenshot of the BEITONG Gamepad Assistant for joystick settings, allowing adjustment of joystick sensitivity curves and dead zone settings.
7. Charging and Battery
The controller is equipped with a 600mAh battery, providing 12-17 hours of gameplay on a 2-hour charge. Use the provided USB-C cable to charge the controller. You can continue playing while the controller is charging via a wired connection.
8. Maintenance
- Keep the controller clean by wiping it with a dry, soft cloth.
- Avoid exposing the controller to extreme temperatures, humidity, or direct sunlight.
- Do not attempt to disassemble or repair the controller yourself, as this will void the warranty.
9. Troubleshooting
9.1. Controller Not Connecting
- Ensure the controller is charged.
- For 2.4GHz, verify the receiver is properly inserted and the controller is in pairing mode.
- For Bluetooth, ensure Bluetooth is enabled on your device and the controller is discoverable.
- Try restarting both the controller and your device.
9.2. Input Lag or Disconnections
- Ensure the controller is within range of the receiver/Bluetooth device.
- Minimize interference from other wireless devices.
- For critical gaming, consider using a wired connection.
9.3. Buttons Not Responding
- Check if the controller's battery is low.
- Reset the controller using the reset hole (refer to Image 3.1 for location).
- If the left stick isn't working, ensure you didn't accidentally press the SHIFT key, which can alter its function.
- Use the BEITONG Gamepad Assistant to calibrate joysticks and triggers.
10. Specifications
| Feature | Specification |
|---|---|
| Model Number | Asura 2Pro Plus |
| Connectivity | 2.4GHz Wireless, Bluetooth 5.0, USB-C Wired |
| Compatibility | PC, Android, iOS, Nintendo Switch, Steam Deck (Does NOT support Mac/Xbox/PS4/PS5) |
| Joysticks & Triggers | Hall Effect (Anti-drift, 0.1mm accuracy) |
| Buttons | Mechanical (0.7mm trigger stroke) |
| Polling Rate | Up to 600Hz (Overclocking mode on PC) |
| Battery Capacity | 600mAh |
| Battery Life | 12-17 hours (approx.) |
| Charging Time | 2 hours (approx.) |
| Motion Control | 6-Axis Gyroscope |
| Macro Buttons | 2 (M1/M2, customizable) |
11. Warranty and Support
BEITONG provides a limited warranty for this product against defects in materials and workmanship under normal use. For warranty claims or technical support, please contact the BEITONG technology team through their official channels or the retailer where you purchased the product. Please retain your proof of purchase for warranty service.
Video 11.1: An official video from BEITONG showcasing the Asura 2 Pro Game Controller, highlighting its design, features, and performance.


