1. Product Overview
The Tera FUN-EV-Charger-W01-BK is a high-performance, three-phase Type 2 electric vehicle charging station designed for efficient and reliable charging. It supports a maximum power of 22 kW, a maximum current of 32A, and a maximum voltage of 400V. This charging station is CE certified (NºN8A 104780 0028, TÜV Report No: 64105223147901) and manufactured in strict compliance with the European standard IEC 62196-2.
Key features include:
- Premium Quality: Certified to European standards for safety and performance.
- Simplified and User-Friendly Installation: Plug-and-charge functionality with integrated LED indicators for clear operational status.
- Pure Copper Charging Cables: Ensures excellent conductivity, fast charging, waterproof performance, and minimal heat generation.
- Manual & App Scheduled Charging: Offers flexibility to schedule charging sessions directly on the charger screen or via a dedicated mobile application.
- Cable Holder: Includes an additional charger holder for convenient cable storage.
- Vehicle Compatibility: Supports up to 22kW on a three-phase (3-phase, 400V) power supply. Users should verify their vehicle's compatibility with three-phase AC charging.
Product Presentation Video
Video: Overview of the Tera Electric Vehicle Charging Station.

Image: Illustrates compatibility with various Type 2 electric vehicles including Tesla, Nissan, Volkswagen, Audi, BMW, Jeep, Fiat, Toyota, and Hyundai.
2. Safety Information
Before installing or operating the charging station, please read and understand all safety instructions. Failure to follow these instructions may result in electric shock, fire, or serious injury.
- Professional Installation: Installation should be performed by a qualified electrician in accordance with local electrical codes and regulations.
- Power Supply: Ensure the power supply matches the charger's specifications (3-phase, 400V, 32A).
- Environmental Conditions: The charger is rated IP54/IP66 for water and dust resistance and can operate in temperatures from -30°C to 50°C. However, avoid submerging the unit in water or exposing it to extreme conditions beyond its rating.
- Cable Integrity: Regularly inspect the charging cable for any signs of damage. Do not use if the cable is frayed, cut, or has exposed wires.
- Emergency Stop: Familiarize yourself with the location of the emergency stop button (if applicable) and your home's circuit breaker.
- Children and Pets: Keep children and pets away from the charging station during operation.

Image: Highlights the CE certification and various protection features of the Type 2 and CEE 3-phase plug, including overvoltage, undervoltage, overtemperature, ground, overload, earth leakage, and short circuit protection.

Image: Shows the charger's IP66 rating for water and dust resistance, along with icons representing protection against undervoltage, overvoltage, earth leakage, overload, ground faults, overtemperature, and short circuits.

Image: Demonstrates the charger's ability to operate reliably in a wide range of temperatures, from -30°C to 50°C, suitable for all weather conditions.
3. What's in the Box
Carefully unpack the box and ensure all items are present and undamaged. If any items are missing or damaged, please contact customer support.
- EV charger type 2 (1 unit)
- Charger holder (1 unit)
- User manual (1 unit)
- Storage bag (1 unit)
- Wall mounting bracket (1 unit)

Image: Displays the package contents, including the EV charger, charger holder, user manual, storage bag, wall mounting bracket, screws, tools, and CEE 3-phase plug.

Image: Shows the EV charger, mounting plate, CEE 3-phase plug, screws, tools, and user manual, highlighting a 2-year warranty.
4. Installation
The Tera EV charging station is designed for simplified installation. It is recommended that installation be performed by a qualified professional to ensure safety and compliance with local electrical codes.
Installation Video Guide
Video: Detailed installation guide for the charging station.
Step-by-Step Installation:
- Prepare the Mounting Surface: Choose a flat, solid wall surface for mounting.
- Mark Drilling Points: Use the mounting bracket as a template to mark the drilling points on the wall. Ensure the bracket is level.
- Drill Holes: Drill holes at the marked points and insert wall anchors.
- Mount the Bracket: Secure the mounting bracket to the wall using the provided screws.
- Wire the Charger: Connect the electrical wiring to the charging station's terminal block. Ensure correct phase, neutral, and ground connections.
- Attach the Charger: Secure the charger unit to the mounted bracket.
- Finalize: Ensure all connections are tight and the unit is securely fastened.

Image: Visual representation of the 5-step installation process: unscrewing, mounting to the wall, placing on the plate, assembling the anti-theft screw, and completion.
5. Setup
The Tera EV charger offers both manual and app-controlled setup options for charging. For manual and app-programmed charging, configure the current and schedule before plugging into your vehicle. Plugging in first will activate plug-and-play mode.
App Setup and Scheduled Charging Video
Video: Guide on using the Elecq app for smart charging and cost savings.
Manual Setup:
- Adjust Current: Use the touch screen to select the desired charging current (16A/20A/24A/32A).
- Schedule Charging: Set a charging schedule (1-12 hours) directly on the device's screen.
App Setup (Tera Smart Life App):
- Download App: Download the 'Tera Smart Life' app from your device's app store (available for Android and iOS).
- Connect Charger: Follow the in-app instructions to connect your charging station via Bluetooth or Wi-Fi.
- Configure Settings: Use the app to adjust charging current, set charging schedules (e.g., for off-peak hours), and monitor charging status.
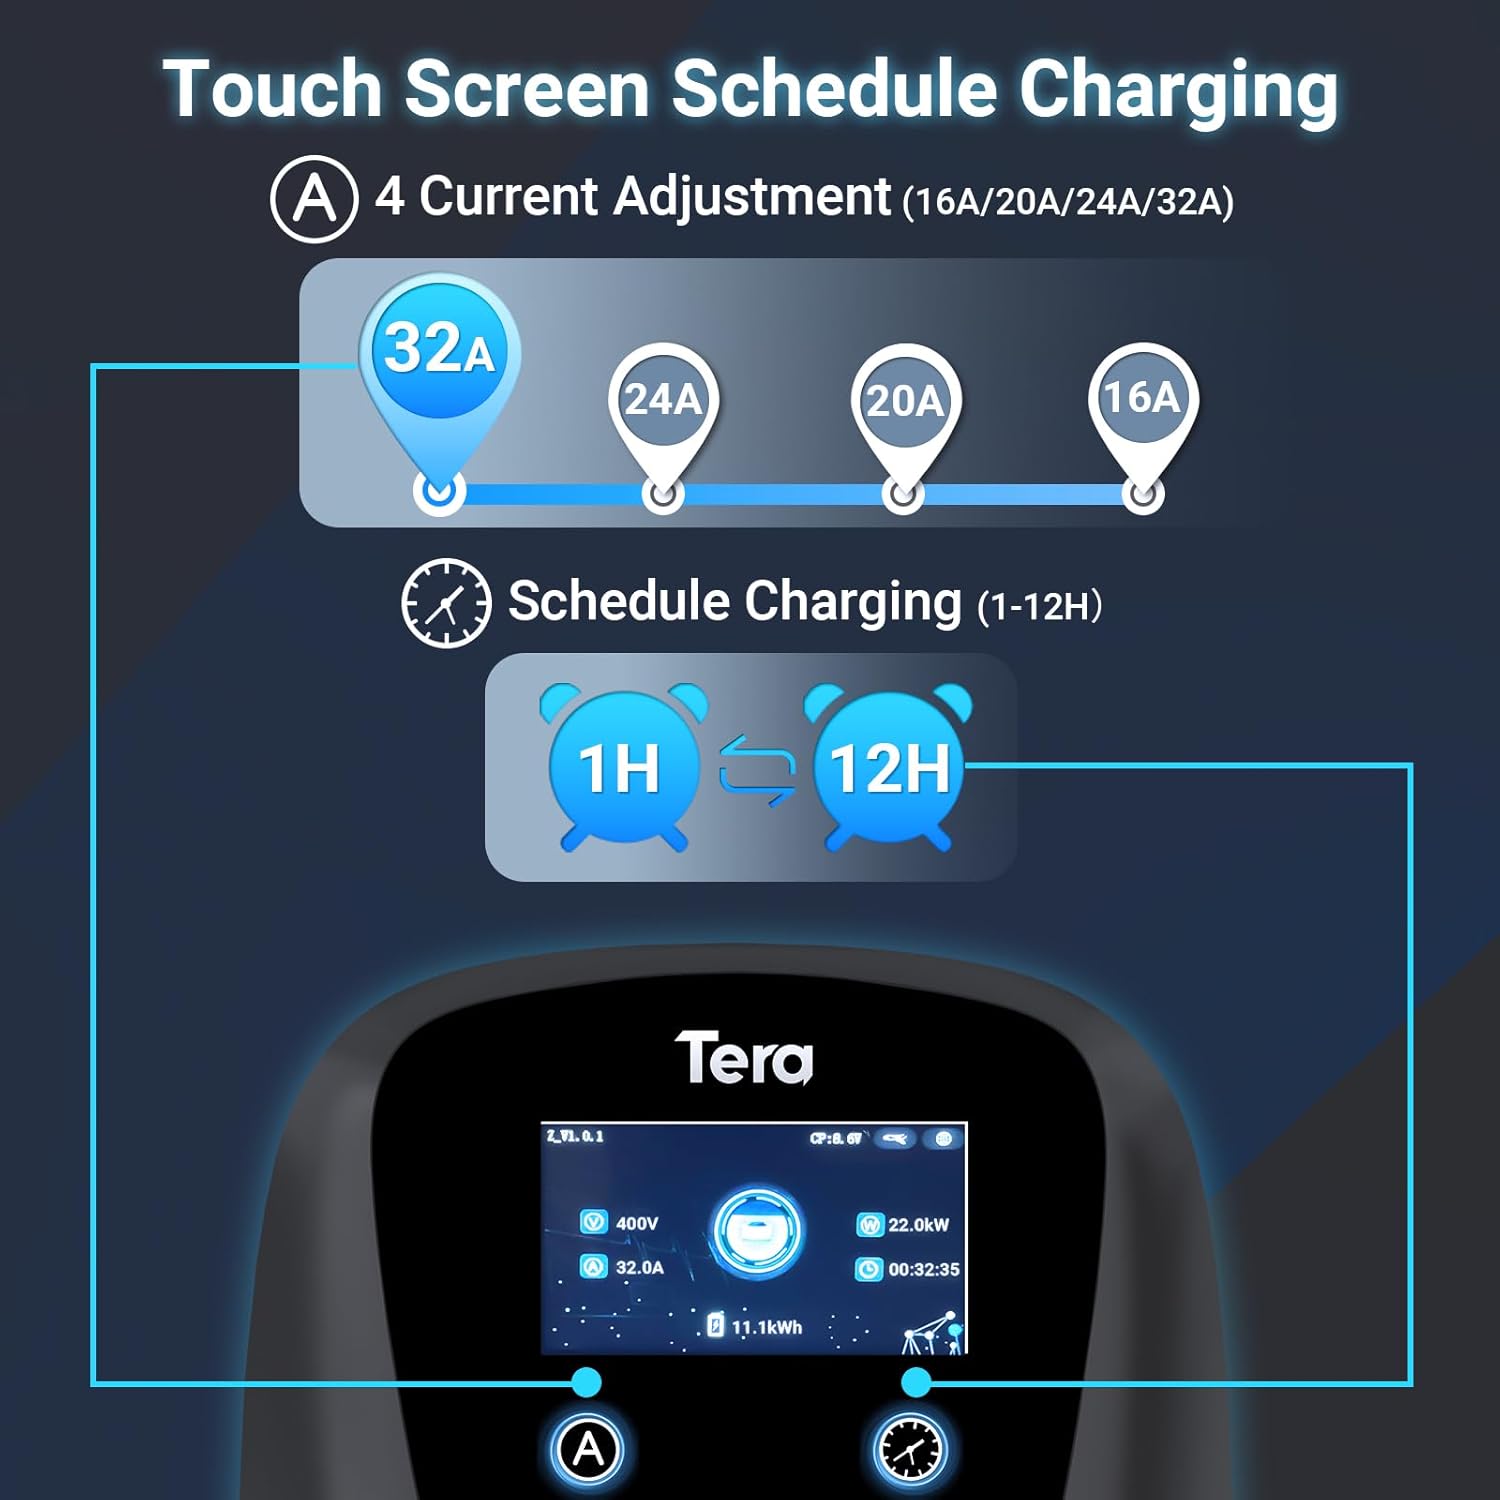
Image: Shows the charger's touch screen for adjusting current (16A, 20A, 24A, 32A) and scheduling charging sessions (1-12 hours).

Image: Illustrates the touch screen interface for adjusting current and setting charging schedules (1-12 hours). Note: For manual scheduling, configure current and planning before connecting your car. Plugging in first activates plug-and-play mode.

Image: Emphasizes the importance of configuring current and schedule first for manual and app programming, then plugging into the vehicle. Plugging in first activates plug-and-play mode.

Image: Displays a graph showing how scheduled charging can be used to charge during off-peak hours (e.g., 22:00-06:00) to save on electricity costs, compared to peak hours (e.g., 18:00-21:00).

Image: Shows the Tera Smart Life app interface for Android and iOS, featuring options for charging planning, adjustable current, and charge records.
6. Operating Instructions
The Tera EV charger is designed for simple and efficient operation.
Usage Introduction Video
Video: Introduction to the usage of the EV charging station.
Starting a Charge:
- Connect to Power: Ensure the charging station is properly connected to the power source.
- Connect to Vehicle: Plug the Type 2 connector into your electric vehicle's charging port.
- Initiate Charging:
- Plug-and-Play: If no schedule or current is set, charging will begin automatically upon connection.
- Manual/App Control: If a schedule or specific current is set, charging will follow the configured parameters.
- Monitor Status: The integrated LED indicators and the display screen will show the charging progress and current status.
Stopping a Charge:
- Via Vehicle: Stop charging through your vehicle's infotainment system or app.
- Via Charger: Disconnect the cable from the vehicle.
- Via App: Use the Tera Smart Life app to stop the charging session.

Image: Illustrates the high-speed charging capability of the Type 2 charger, showing 400V, up to 32A, and an estimated range of 126 km per hour of charging.

Image: Highlights the 7-meter ultra-long cable, allowing for flexible and effortless charging of electric vehicles in various locations.

Image: Shows the charger's display screen providing real-time information such as voltage (400V), current (32.0A), power (22.0kW), charging duration (00:32:35), and energy delivered (11.1kWh).

Image: Emphasizes the versatility of the 7-meter long cable, suitable for various charging scenarios.
7. Maintenance
Regular maintenance ensures the longevity and safe operation of your Tera EV charging station.
- Cleaning: Clean the exterior of the charging station with a soft, damp cloth. Do not use abrasive cleaners or solvents.
- Cable Inspection: Periodically inspect the charging cable and connector for any signs of wear, damage, or corrosion. Replace if necessary.
- Storage: When not in use, store the charging cable neatly using the provided cable holder to prevent damage.
- Environmental Protection: While the unit is IP54/IP66 rated, ensure it is not exposed to prolonged direct sunlight or extreme weather conditions if possible, to extend its lifespan.
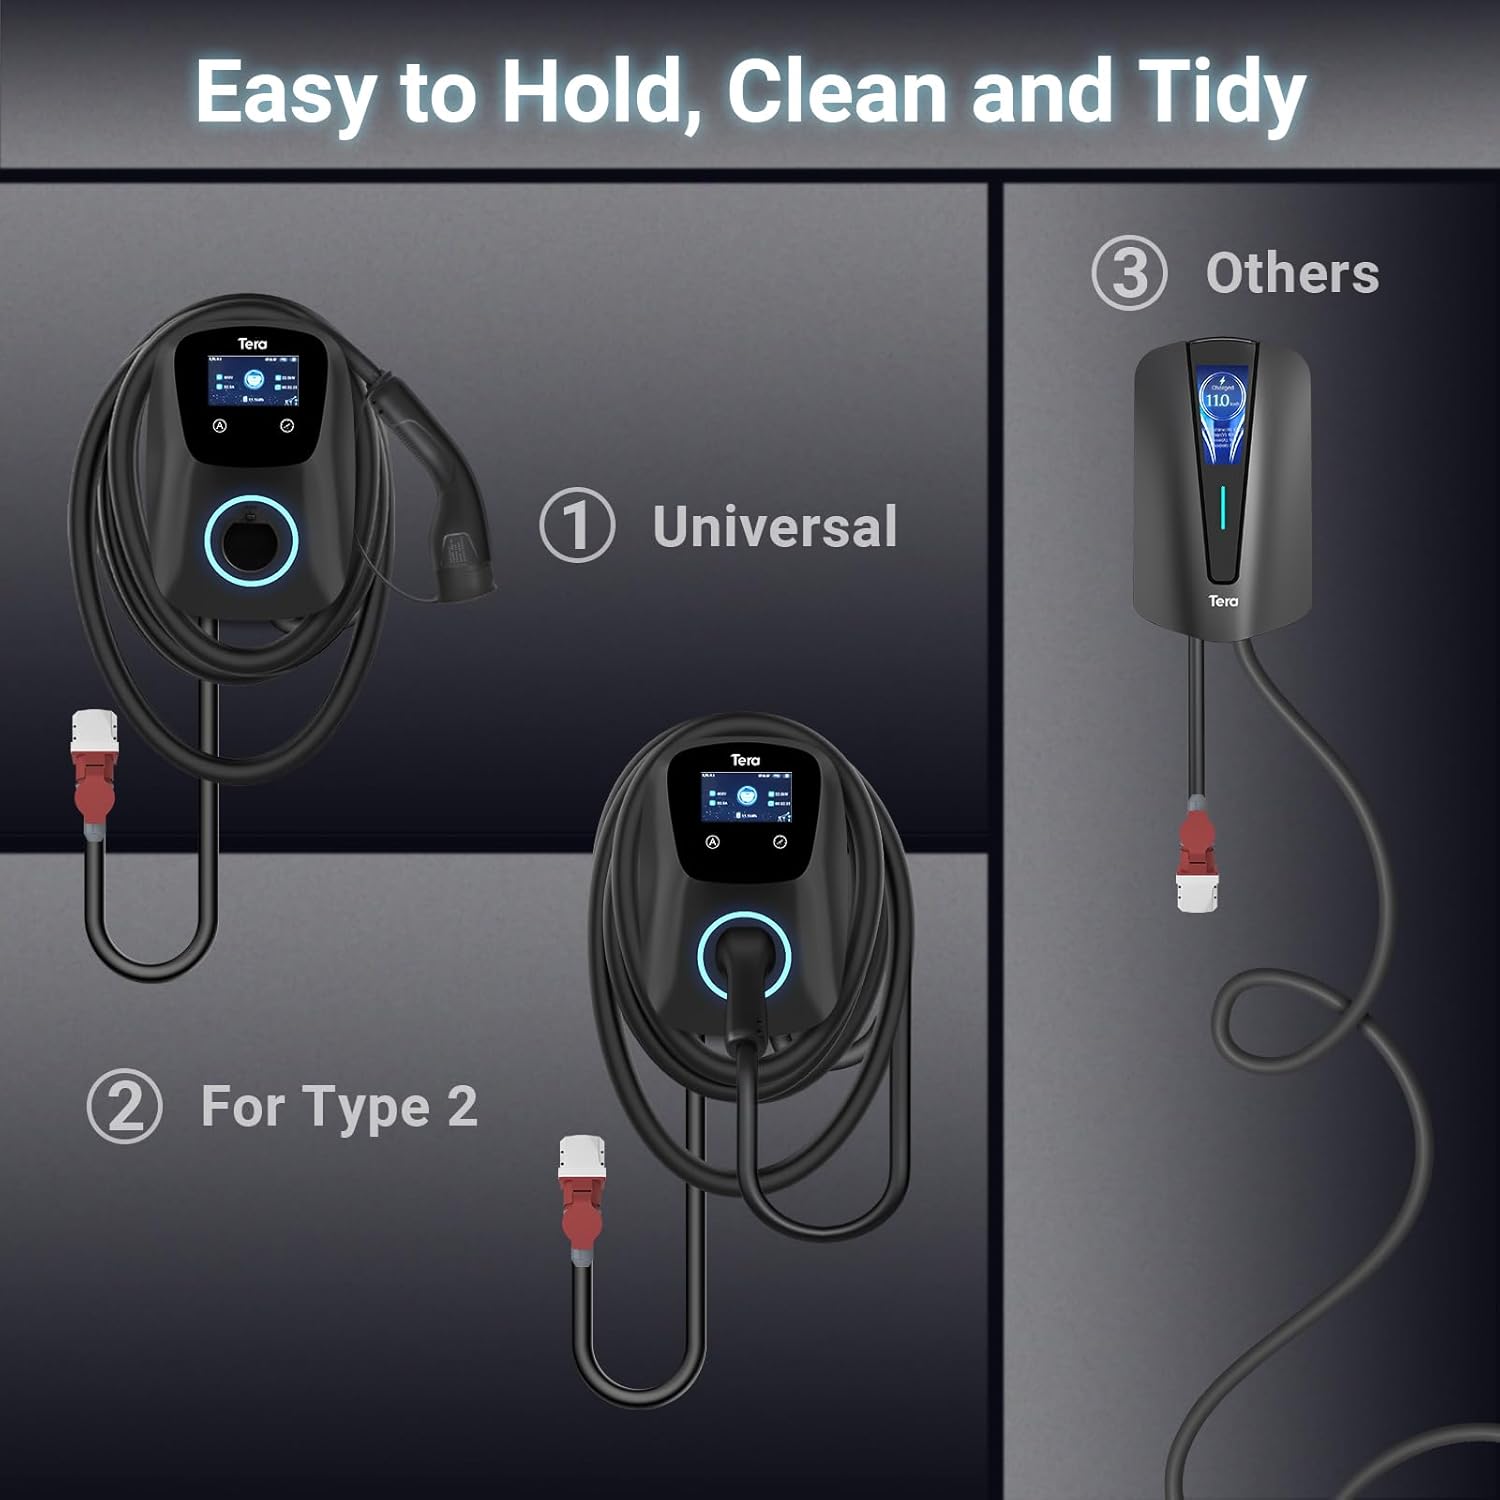
Image: Shows the charger with its dedicated cable holder, promoting easy organization and a tidy charging area.
8. Troubleshooting
If you encounter issues with your charging station, refer to the following common problems and solutions. For persistent issues, contact customer support.
LED Indicator Status:

Image: Explains the meaning of different LED indicator states: blue (always on) for standby, green (flashing every 1s) for charging, green (always on) for charger inserted, red (always on) for CP abnormal/over/undervoltage, red (flashing every 2s) for ground fault, red (flashing every 3s) for overcurrent protection, red (flashing every 4s) for adhesion protection, and magenta (flashing every 1s) for leakage, magenta (flashing every 2s) for overheating protection.
| Problem | Possible Cause | Solution |
|---|---|---|
| Charger not starting | No power, vehicle not connected properly, schedule not met, or error. | Check power supply, ensure cable is fully inserted, verify schedule settings, check LED indicators for error codes. |
| Slow charging | Low current setting, vehicle limitation, or power supply issue. | Increase current setting via app or touch screen. Verify vehicle's AC charging capacity. Consult an electrician if power supply is suspected. |
| Error indicator (Red LED) | Various electrical faults (overvoltage, ground fault, etc.). | Refer to the LED indicator guide above. Disconnect and reconnect the charger. If the error persists, contact a qualified electrician or customer support. |
9. Specifications
| Feature | Specification |
|---|---|
| Brand | Tera |
| Model Number | FUN-EV-Charger-W01-BK |
| Power (Watts) | 22 kW |
| Current (Amperage) | 32 A |
| Output Voltage | 400 Volts |
| Input Voltage | 16 Volts (likely a typo in source, typically 400V for 3-phase) |
| Connector Type | Type 2 |
| Cable Length | 7 meters |
| Product Dimensions (L x W x H) | 39 x 31 x 21 cm |
| Item Weight | 4.4 Kilograms |
| Water/Dust Resistance | IP54 / IP66 (mentioned in feature bullets and images) |
| Operating Temperature | -30 °C to 50 °C |
| Certifications | CE, IEC 62196-2 |
Image: Highlights the 7-meter long cable, emphasizing its suitability for various charging scenarios.
10. Warranty and Support
The Tera FUN-EV-Charger-W01-BK comes with a 2-year warranty. For any technical assistance, warranty claims, or support inquiries, please refer to the contact information provided in your user manual or visit the official Tera website.
Image: Shows the package contents and prominently features a '2-YEAR WARRANTY' badge.