1. Introduction
Welcome to the user manual for your new Philips All-in-One Filter Coffee Maker. This appliance is designed to provide you with a superior coffee brewing experience, featuring an integrated conical grinder and versatile brewing options. Please read this manual carefully before using the appliance to ensure safe and optimal operation.
2. Safety Instructions
Always follow basic safety precautions when using electrical appliances.
- Do not immerse the appliance, power cord, or plug in water or any other liquid.
- Ensure the voltage indicated on the appliance matches your local mains voltage before connecting.
- Keep the appliance and its cord out of reach of children.
- Do not operate the appliance if the plug, the power cord, or the appliance itself is damaged.
- Always unplug the appliance before cleaning and when not in use.
- Avoid contact with hot surfaces. Use handles or knobs.
- Do not place the appliance on or near a hot gas or electric burner, or in a heated oven.
- This appliance is intended for household use only.
3. Product Overview
The Philips All-in-One Filter Coffee Maker combines convenience with advanced brewing technology.

Figure 3.1: Philips All-in-One Filter Coffee Maker with reusable filter, cleaning brush, and coffee scoop.
Key Features:
- Integrated Conical Grinder: Allows customization of grind size for optimal aroma extraction from fresh beans. Can be deactivated for pre-ground coffee.
- Dual Bean Container with Aroma Seal: Store and blend two different types of beans, or easily switch between regular and decaffeinated.
- All-in-One Brewing: Brew directly into the included 1.25L glass carafe, or use your preferred cup, mug, or travel mug.
- Smart Dosing Function: Automatically ensures the perfect coffee-to-water ratio for consistent, balanced flavor without guesswork.
- Removable Water Tank: Easy to refill, with clear markings for up to 10 cups.
- Permanent Filter: Reusable filter for consistent extraction and optimal flavor.
- Automatic Shut-off and Keep Warm Function: Automatically turns off or keeps coffee warm for up to 5 hours after brewing.
- LED Display Timer: Program the brewing start time to wake up to fresh coffee.
4. Setup
- Unpacking: Carefully remove all packaging materials. Retain packaging for future transport or storage.
- Initial Cleaning: Before first use, wash the glass carafe, carafe lid, filter holder, and permanent filter in warm soapy water. These parts are also dishwasher safe. Wipe the exterior of the appliance with a damp cloth.
- Positioning: Place the coffee maker on a stable, flat, heat-resistant surface, away from water sources and direct sunlight.
- Water Tank Installation: Ensure the removable water tank is securely in place.

Figure 4.1: Removable water tank for easy refilling.
- Power Connection: Plug the power cord into a grounded electrical outlet.
5. Operating Instructions
5.1. Filling the Water Tank
Remove the water tank and fill it with fresh, cold water up to the desired level indicated by the cup markings. Reinsert the tank securely.
5.2. Adding Coffee Beans or Ground Coffee
For Whole Beans: Open the lid of the dual bean container. Fill one or both compartments with your desired coffee beans. The conical grinder will process them.

Figure 5.1: Filling the dual bean container.
For Pre-Ground Coffee: If using pre-ground coffee, ensure the grinder function is deactivated (refer to the control panel section for specific button). Place the permanent filter into the filter holder and add the desired amount of ground coffee.
5.3. Selecting Brewing Mode
You can brew into the glass carafe or directly into a single serving cup/mug/travel mug.
- Carafe Brewing: Place the glass carafe with its lid on the warming plate.
- Single Serve Brewing: Place your cup, mug, or travel mug (max height 10 cm for travel mugs) directly under the coffee dispenser.
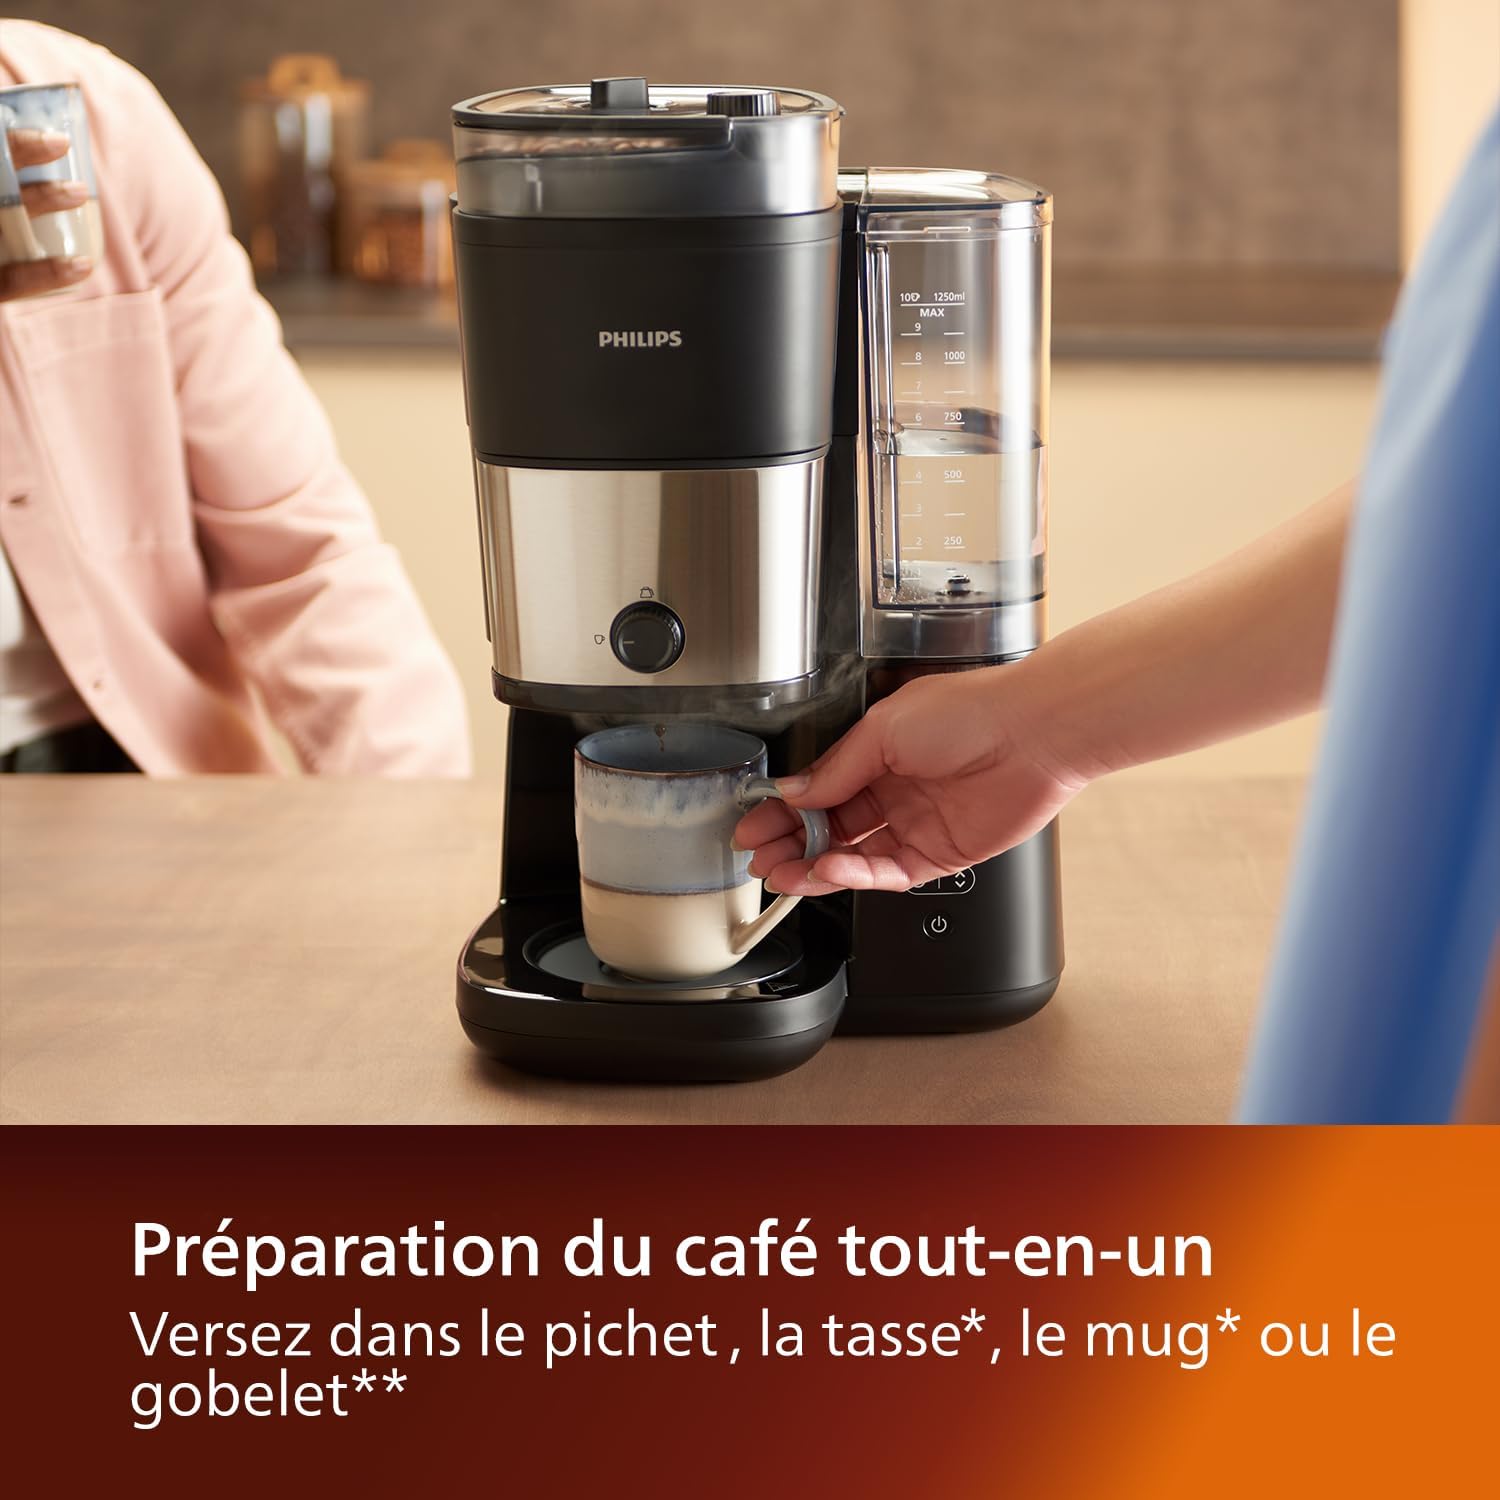
Figure 5.2: Brewing directly into a mug.
5.4. Starting the Brewing Process
Use the control panel to select your desired settings (e.g., grind size if using whole beans, number of cups). Press the start button to begin brewing. The Smart Dosing function will ensure the correct coffee-to-water ratio.
5.5. Hot or Iced Coffee
This coffee maker can brew both hot coffee and concentrate for iced coffee. For iced coffee, place ice in your cup before brewing.

Figure 5.3: Preparing iced coffee.
6. Maintenance
6.1. Daily Cleaning
- Always unplug the appliance and allow it to cool before cleaning.
- Remove and empty the permanent filter and filter holder. Rinse them under running water.
- Wash the glass carafe and its lid.
- The glass carafe, carafe lid, filter holder, and permanent filter are dishwasher safe.

Figure 6.1: Dishwasher safe components for easy cleaning.
- Wipe the exterior of the appliance with a soft, damp cloth. Do not use abrasive cleaners or scouring pads.
6.2. Descaling
Regular descaling is essential to maintain optimal performance and extend the lifespan of your coffee maker. The frequency depends on water hardness in your area.
- Prepare a descaling solution according to the descaler manufacturer's instructions, or use a mixture of white vinegar and water (1:1 ratio).
- Pour the solution into the water tank.
- Place the empty carafe on the warming plate.
- Run a brewing cycle without coffee.
- After the cycle, discard the solution and rinse the carafe thoroughly.
- Run at least two full cycles with fresh, clean water to rinse out any remaining descaling solution.
7. Troubleshooting
| Problem | Possible Cause | Solution |
|---|---|---|
| Coffee does not brew. | No water in tank; appliance not plugged in; power outage. | Fill water tank; check power connection; check circuit breaker. |
| Coffee tastes weak. | Not enough coffee; grind size too coarse; descaling needed. | Add more coffee; adjust grinder to finer setting; descale the appliance. |
| Coffee overflows from filter. | Too much coffee; filter clogged; grind size too fine. | Reduce coffee amount; clean filter; adjust grinder to coarser setting. |
| Grinder not working. | No beans; grinder deactivated; beans jammed. | Add beans; activate grinder function; clean grinder chamber. |
If the problem persists after trying these solutions, please contact Philips customer support.
8. Specifications
| Attribute | Detail |
|---|---|
| Brand | Philips |
| Model Number | HD7900/50 |
| Color | Black / Silver |
| Product Dimensions (L x W x H) | 24.5 x 27.7 x 43.4 cm |
| Item Weight | 5 Kilograms |
| Capacity | 1250 Milliliters (1.25 Liters) |
| Voltage | 230 Volts (AC) |
| Material | Glass |
| Features | Integrated coffee grinder, dual bean reservoir |
| Coffee Maker Type | Filter Coffee Maker with Grinder |
| Filter Type | Reusable |
| Style | All-in-One |
9. Warranty and Support
For warranty information and customer support, please refer to the warranty card included with your product or visit the official Philips website.
Philips Official Website: www.philips.com
Please have your model number (HD7900/50) and purchase date ready when contacting support.


