Della 048-OPAC-6H
Della 10000 BTU Portable Air Conditioner User Manual
Model: 048-OPAC-6H | Brand: Della
1. Important Safety Information
Please read this manual carefully before operating your portable air conditioner. Keep this manual for future reference. Always follow basic safety precautions to reduce the risk of fire, electric shock, or injury.
- Ensure the unit is placed on a flat, stable surface to prevent tipping.
- Do not operate the unit with a damaged cord or plug.
- Do not insert fingers or objects into the air inlet or outlet.
- Keep the unit away from flammable materials and open flames.
- Always unplug the unit before cleaning or performing any maintenance.
- This appliance is not intended for use by persons (including children) with reduced physical, sensory or mental capabilities, or lack of experience and knowledge, unless they have been given supervision or instruction concerning use of the appliance by a person responsible for their safety.
2. Product Overview
The Della 10000 BTU Portable Air Conditioner is a versatile unit designed to provide cooling, heating, dehumidification, and fan functions for spaces up to 450 sq. ft. It features smart WiFi connectivity for convenient control via a mobile app, a remote control, and an intuitive soft-touch control panel.

Image: Della Portable Air Conditioner unit, remote control, and smartphone displaying the control app.
Key components include the main unit with integrated handle, exhaust hose, window installation kit, and remote control.

Image: Diagram showing the dimensions of the portable air conditioner: 12.2 inches (width) x 12.2 inches (depth) x 27.6 inches (height).
3. Setup
3.1 Unpacking
Carefully remove the unit and all accessories from the packaging. Retain the original packaging for future storage or transport. Allow the unit to stand upright for at least 24 hours before initial use to allow the refrigerant to settle.
3.2 Placement
Place the air conditioner on a firm, level surface in a location that allows for proper air circulation. Ensure there is at least 20 inches (50 cm) of space from walls or other objects to allow for adequate airflow around the unit.
3.3 Window Kit Installation
The included window kit is designed for easy installation in both horizontal and vertical sliding windows. No drilling is required.

Image: Diagrams illustrating the installation of the window kit in both horizontal and vertical sliding windows, showing compatibility with window openings from 25.5 to 64.1 inches.
- Assemble the window slider kit by sliding the adjustable panels together to fit your window opening. The kit is compatible with window sizes from 25.5 to 64.1 inches.
- Secure the panels with the provided screws.
- Open the window and place the assembled window kit into the window frame. Extend the panels to fit snugly and close the window against the kit to secure it.
- Ensure the window kit is sealed properly to prevent air leakage. Use foam seals if necessary.
3.4 Exhaust Hose Connection
- Attach the exhaust hose connector to one end of the exhaust hose.
- Attach the window kit adapter to the other end of the exhaust hose.
- Insert the exhaust hose connector into the exhaust outlet on the back of the air conditioner unit.
- Insert the window kit adapter into the opening on the window slider kit.
- Ensure all connections are secure to prevent hot air from re-entering the room.
3.5 Power Connection
Plug the power cord into a grounded 115V/60Hz electrical outlet. Do not use extension cords or power strips.
4. Operating Instructions
4.1 Control Panel
The unit features an intuitive soft-touch control panel on the top of the unit.
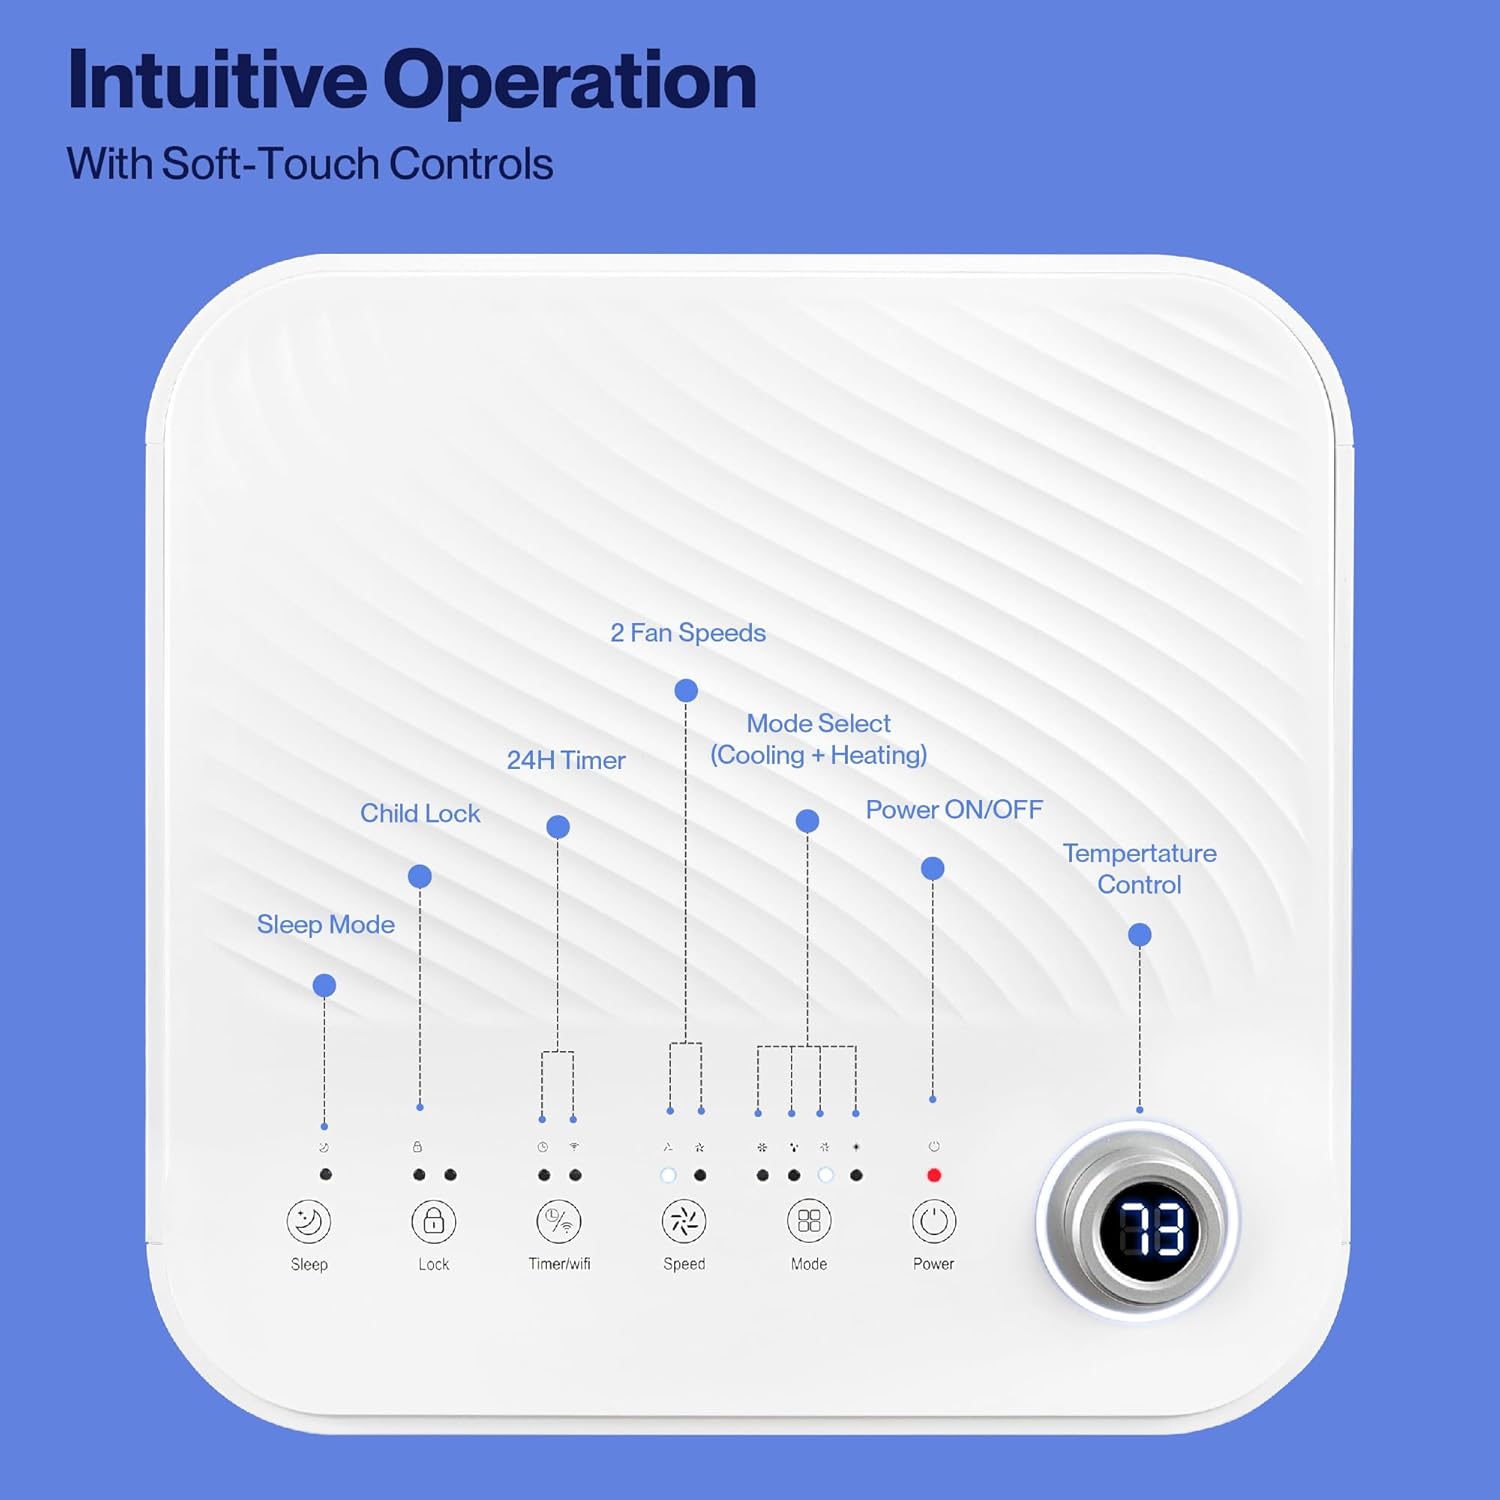
Image: Detailed diagram of the control panel with labels for each button: Sleep, Child Lock, Timer/WiFi, Fan Speed, Mode Select (Cooling + Heating), Power ON/OFF, and Temperature Control with digital display.
- Power ON/OFF: Press to turn the unit on or off.
- Mode Select: Cycle through Cooling, Heating, Dehumidification, Ventilation (Fan), and Sleep modes.
- Temperature Control: Use the up/down arrows to adjust the desired temperature.
- Fan Speed: Select between 2 fan speeds (Low, High).
- Timer: Set a 24-hour timer for automatic on/off operation.
- Child Lock: Activates or deactivates the child lock function.
- Sleep Mode: Activates sleep mode for quieter operation and gradual temperature adjustment.
4.2 Remote Control
The unit comes with a remote control for convenient operation from a distance. All functions available on the control panel can be accessed via the remote.
4.3 WiFi/Smart App Control
Control your Della Portable Air Conditioner from anywhere using the free DELLA+ app on your smartphone. The unit is compatible with Google Assistant and Amazon Alexa for voice control.

Image: A person relaxing on a couch, using a smartphone to control the air conditioner, with text indicating compatibility with Google Assistant and Amazon Alexa.
- Download the DELLA+ app from your smartphone's app store.
- Follow the in-app instructions to connect your air conditioner to your home WiFi network.
- Once connected, you can control modes, temperature, fan speed, and set schedules remotely.
The app also supports Smart Geo Location, allowing the unit to automatically turn on or off based on your proximity to home.

Image: A smartphone screen showing a map with a car icon and a notification indicating the AC unit automatically turned on due to Smart Geo Location.
5. Maintenance
Regular maintenance ensures optimal performance and extends the lifespan of your unit. Always unplug the unit before cleaning.
5.1 Cleaning the Air Filter
The air filter should be cleaned every two weeks or more frequently depending on usage and air quality.
- Locate the air filter panel (usually on the back or side of the unit).
- Remove the filter.
- Wash the filter with warm, soapy water. Rinse thoroughly and allow it to air dry completely before reinserting.
5.2 Draining Water
The unit has a self-evaporating system, but in high humidity conditions, water may accumulate. The "Water-full indicator" will illuminate when the water tank needs draining.
- Place a shallow pan or tray under the drain port (located at the bottom rear of the unit).
- Remove the drain plug.
- Allow all accumulated water to drain out.
- Replace the drain plug securely.
5.3 Storage
If storing the unit for an extended period:
- Drain all accumulated water.
- Clean the air filter.
- Run the unit in fan-only mode for a few hours to dry the interior.
- Unplug the power cord and coil it neatly.
- Store the unit in a cool, dry place, preferably in its original packaging.
6. Troubleshooting
Refer to this section for common issues and their solutions.
| Problem | Possible Cause | Solution |
|---|---|---|
| Unit does not turn on | No power; Power cord unplugged; Circuit breaker tripped; Water tank full | Check power outlet; Plug in power cord; Reset circuit breaker; Drain water tank |
| Unit not cooling effectively | Air filter dirty; Exhaust hose not properly installed; Room too large; Doors/windows open; Temperature setting too high | Clean air filter; Ensure exhaust hose is sealed; Close doors/windows; Lower temperature setting |
| Unit is noisy | Unit not on level surface; Air filter dirty; Obstruction in fan | Place unit on level surface; Clean air filter; Check for obstructions |
| Water leakage | Drain plug loose or missing; Unit tilted | Secure drain plug; Ensure unit is level |
| WiFi connection issues | Incorrect WiFi password; Unit too far from router; Router issues | Verify password; Move unit closer to router; Restart router |
If the problem persists after trying these solutions, please contact customer support.
7. Specifications
| Feature | Specification |
|---|---|
| Model Number | 048-OPAC-6H |
| Cooling Capacity | 10000 BTU |
| Coverage Area | Up to 450 Sq. Ft. |
| Functions | Cooling, Heating, Dehumidifier, Fan, Sleep Mode |
| Voltage | 115 Volts |
| Noise Level | 54 dB |
| Refrigerant | R 410A |
| Dimensions (L x W x H) | 12.2 x 12.2 x 27.6 inches |
| Material | ABS Plastic |
| Special Features | Portable, Dehumidifier, WiFi Enabled, Remote Control, Built-in Handle, 24-hour timer, Child Lock |
8. Warranty and Customer Support
For warranty information or technical assistance, please refer to the warranty card included with your product or visit the official Della website. You may also contact Della customer support directly for further assistance with troubleshooting or parts replacement.
Related Documents - 048-OPAC-6H
 |
Della Portable Air Conditioner Instruction Manual (048-OPAC-5H, 048-OPAC-6H) Comprehensive instruction manual for the Della 048-OPAC-5H and 048-OPAC-6H portable air conditioners. Covers installation, operation, safety, maintenance, troubleshooting, and disposal. |
 |
Della Portable Air Conditioner 048-OPAC-5 / 048-OPAC-6 Instruction Manual Instruction manual for Della portable air conditioner models 048-OPAC-5 and 048-OPAC-6. Includes installation, operation, troubleshooting, and safety guidelines. |
 |
DELLA Portable Air Conditioner User Manual - Model 048-OPAC-5H/6H Comprehensive user manual for the DELLA Portable Air Conditioner (Models 048-OPAC-5H and 048-OPAC-6H). Learn about installation, operation, safety precautions, features, troubleshooting, and maintenance for your DELLA air conditioning unit. |
 |
DELLA 048-OPAC-5 Portable Air Conditioner User Manual Comprehensive user manual for the DELLA 048-OPAC-5 Portable Air Conditioner. Covers installation, operation, safety, maintenance, and troubleshooting for this 8000 BTU Smart WiFi enabled cooling, dehumidifying, and fan unit. |
 |
Della 048-OPAC-9H Portable Air Conditioner Instruction Manual This instruction manual provides comprehensive guidance for the Della 048-OPAC-9H portable air conditioner, covering installation, operation, safety, maintenance, and troubleshooting procedures. |
 |
Della 048-OPAC-9H Portable Air Conditioner User Manual: Setup, Operation & Safety Get detailed instructions for your Della 048-OPAC-9H portable air conditioner. This manual covers installation, operation modes, safety warnings for R32 refrigerant, maintenance, and troubleshooting. |
Ask a question about this manual
Ask about setup, troubleshooting, compatibility, parts, safety, or missing instructions. Manuals+ will review the question and use this page’s manual context to help answer it.