1. Introduction
This manual provides detailed instructions for the safe installation, operation, and maintenance of your DAKASON 8FT LED Linear Light Fixture, Model LSC-8FT80WH-TCP. Please read all instructions carefully before beginning installation and retain this manual for future reference.
Important Safety Information:
- Always turn off power at the circuit breaker before installation or servicing.
- Installation should be performed by a qualified electrician in accordance with all local electrical codes.
- Do not install near flammable materials.
- Ensure the fixture is securely mounted to prevent falling.
- This fixture is designed for indoor use only.
2. Package Contents
Verify that all components are present and undamaged before proceeding with installation.
- LED Linear Light Fixture Housing
- Integrated LED Chips
- Frosted Acrylic Lens
- Junction-box Cover
- Mounting Screws
- Wire Nuts (typically 5 per fixture)
- Wall Anchors (typically 4 per fixture)
- Safety Ropes (pre-attached or included)

Figure 2.1: DAKASON 8FT LED Linear Light Fixtures (4-pack shown).

Figure 2.2: Product dimensions (96.06 inches length, 3.15 inches width, 2.68 inches height) and accessories including screws, wire nuts, and wall anchors.
3. Specifications
| Model Number | LSC-8FT80WH-TCP |
| Dimensions (L x W x H) | 96" x 4" x 4" (243.84 cm x 10.16 cm x 10.16 cm) |
| Wattage | Selectable: 80W / 70W / 60W |
| Lumen Output | Up to 10400 Lumens (at 80W) |
| Efficacy | 130 lm/W |
| Color Temperature (CCT) | Selectable: 3500K (Warm White) / 4000K (Day White) / 5000K (Day White) |
| Voltage | 120-277Vac |
| Dimming | 0-10V Dimming (dimmer not included) |
| Material | Solid Metal Housing, Frosted Acrylic Lens |
| Installation Type | Flush Mount / Surface Mount (Suspension mount possible with additional hardware) |
| Certifications | UL Listed |
| Lifespan | 50,000 hours |

Figure 3.1: Key components and features of the DAKASON LED Linear Light Fixture.
4. Setup and Installation
Before starting, ensure power is OFF at the circuit breaker. This fixture requires hardwiring.
4.1 Mounting Options
The fixture supports flush mount (surface mount) directly to the ceiling or wall. Suspension mount is also possible with additional hanging hardware (not included).
- Prepare Mounting Surface: Mark the desired mounting locations for the fixture. Ensure the surface can support the weight of the fixture.
- Secure Fixture Base: Use the provided mounting screws and wall anchors (if necessary) to securely attach the fixture's metal housing to the ceiling or wall.
- Junction Box Cover: A white plate is included to cover the junction box opening, providing a clean finish.
- Safety Rope: Utilize the pre-attached safety rope and fast clip to secure the fixture during wiring, preventing accidental drops.
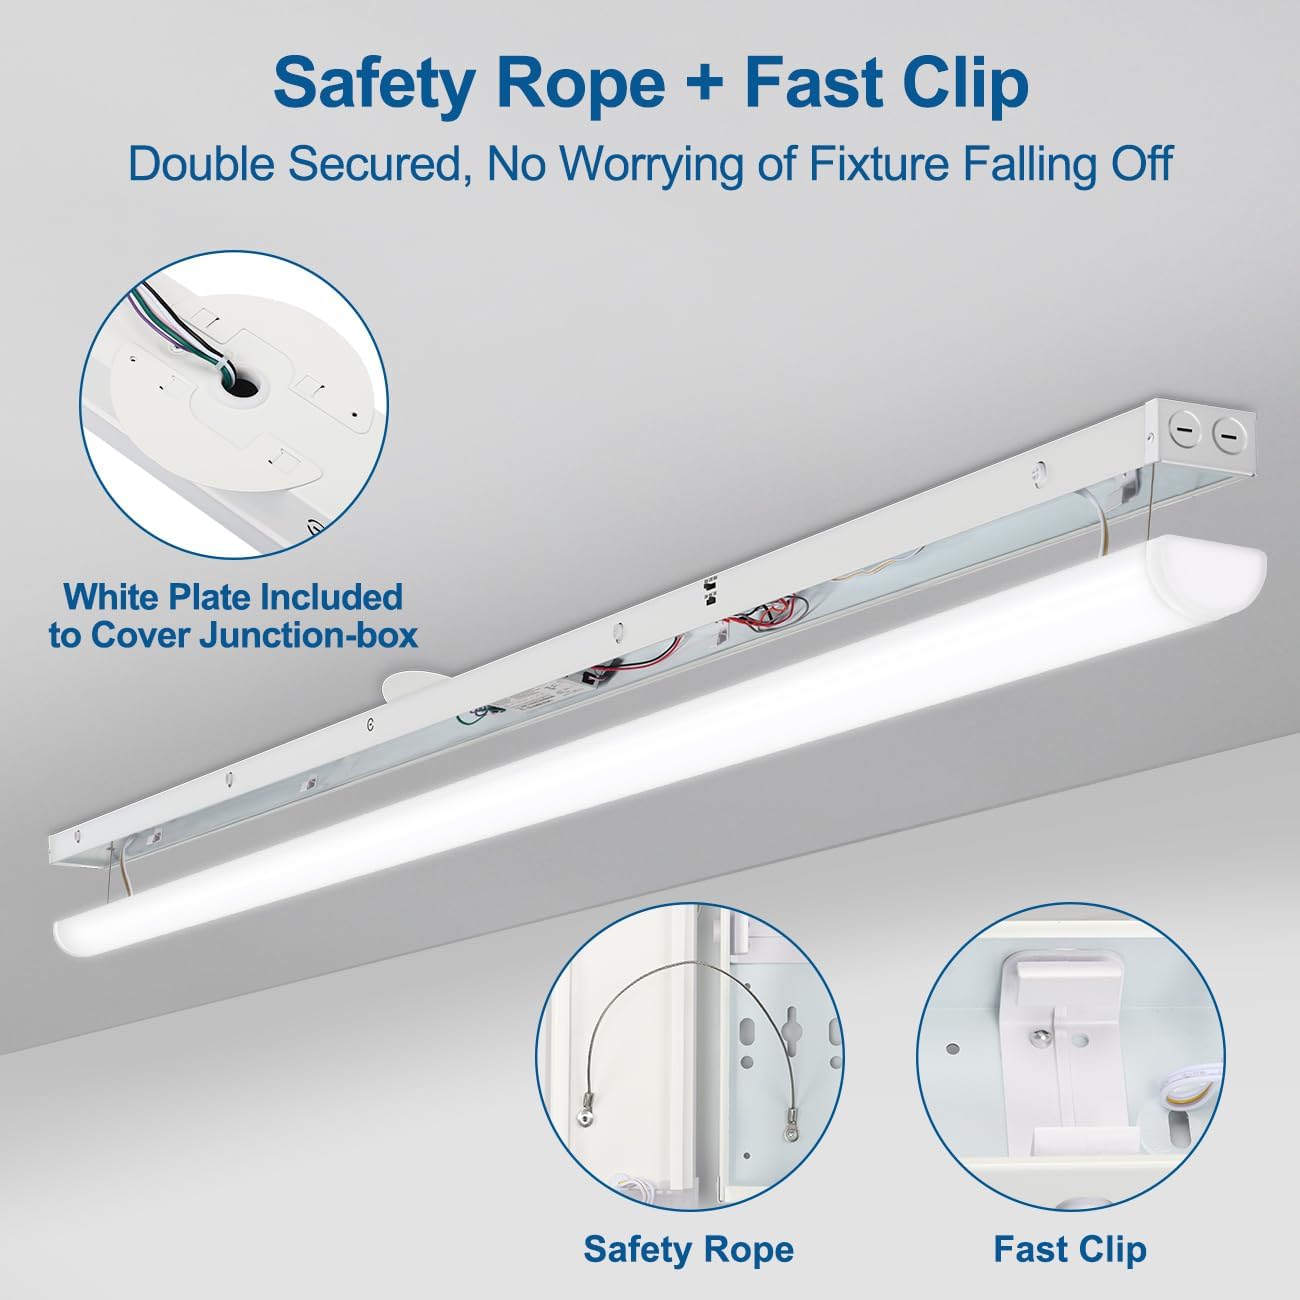
Figure 4.1: Safety features and junction box cover for secure installation.

Figure 4.2: Example of flush-mounted fixtures in a garage environment.
4.2 Electrical Wiring
Connect the fixture's wires to your building's electrical system. This fixture is designed for 120-277Vac input.
- Connect the black wire from the fixture to the live (hot) wire from the power supply.
- Connect the white wire from the fixture to the neutral wire from the power supply.
- Connect the green or bare copper wire from the fixture to the ground wire from the power supply.
- If using 0-10V dimming, connect the purple wire to the dimmer's positive (+) terminal and the gray wire to the dimmer's negative (-) terminal. Ensure the dimmer is compatible with 0-10V systems.
- Secure all connections with the provided wire nuts.
4.3 Linking Multiple Fixtures
The fixture features pre-drilled knockouts for end-to-end linking of up to 6 lights. Ensure total wattage does not exceed circuit capacity.

Figure 4.3: Illustration of linking multiple fixtures.
4.4 Reattaching the Lens Cover
After wiring and mounting, reattach the frosted acrylic lens cover. This step is crucial for proper light distribution and protection.
- Align the lens cover with the fixture housing.
- Gently squeeze the lens on both sides.
- Press the lens firmly into the housing until you hear a "click" sound, indicating it is securely in place.

Figure 4.4: Visual guide for reattaching the lens cover.
5. Operating Instructions
5.1 Power and Color Temperature (CCT) Selection
Your DAKASON LED Linear Light Fixture features selectable wattage and color temperature settings. These switches are located on the fixture housing, typically near one end.
- Wattage Selection: Use the toggle switch to select between 80W, 70W, or 60W to adjust brightness.
- CCT Selection: Use the toggle switch to select between 3500K (Warm White), 4000K (Day White), or 5000K (Day White) to adjust the light color.
Note: Adjust these settings before reattaching the lens cover for easier access.
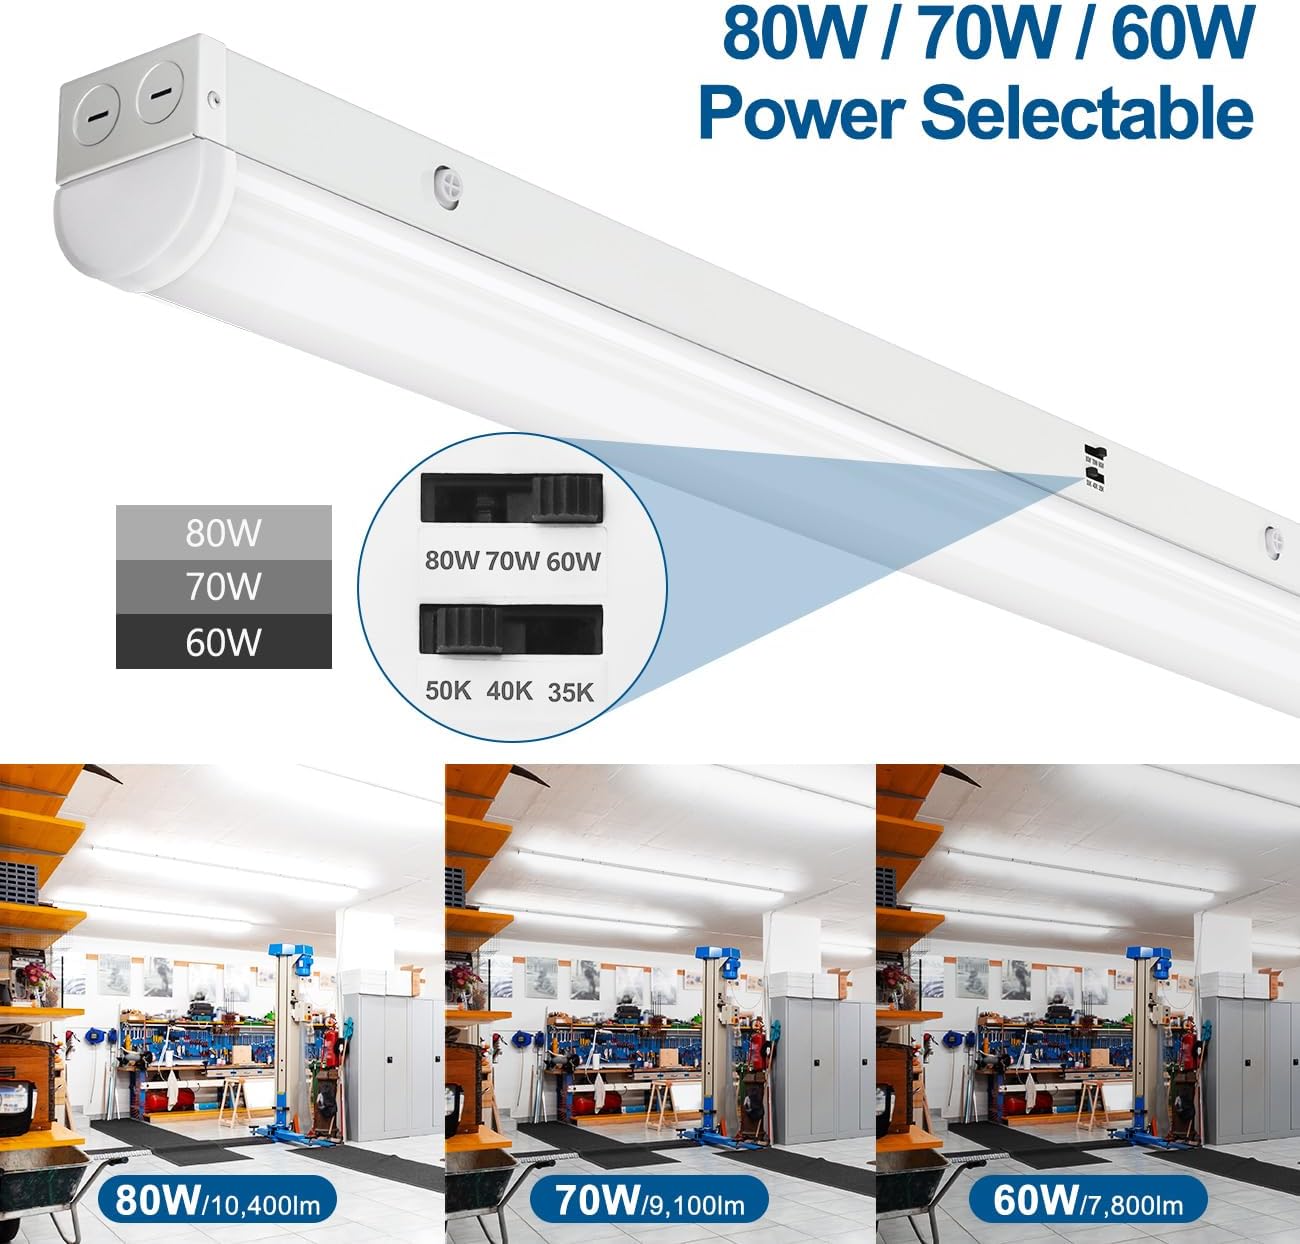
Figure 5.1: Power selectable options and corresponding lumen output.

Figure 5.2: Color temperature selectable options and visual representation.
5.2 Dimming Functionality
This fixture supports smooth 0-10V dimming when paired with a compatible 0-10V low voltage dimmer (not included). Connect the dimmer according to the instructions in Section 4.2.

Figure 5.3: Illustration of 0-10V dimming capability.

Figure 5.4: Visual representation of dimming range.
6. Maintenance
The DAKASON LED Linear Light Fixture is designed for minimal maintenance with a long lifespan of 50,000 hours. Regular cleaning will help maintain optimal performance and appearance.
- Cleaning: Ensure power is off before cleaning. Use a soft, dry, or slightly damp cloth to wipe the exterior of the fixture and lens. Do not use abrasive cleaners or solvents.
- Inspection: Periodically inspect the fixture for any signs of damage, loose connections, or wear. Address any issues promptly.
- LEDs: The integrated LED chips are not user-replaceable. Do not attempt to open the sealed LED compartment.
7. Troubleshooting
If you encounter issues with your fixture, refer to the following common troubleshooting steps:
| Problem | Possible Cause | Solution |
|---|---|---|
| Light does not turn on. |
|
|
| Light flickers or dims unexpectedly. |
|
|
| Lens cover does not stay attached. |
|
|
If troubleshooting steps do not resolve the issue, please contact DAKASON customer support.
8. Warranty and Support
DAKASON LED Linear Light Fixtures are UL listed and designed for quality and longevity, with a rated lifespan of 50,000 hours.
Warranty: This product comes with a limited warranty. Specific warranty terms and duration may vary. Please refer to your purchase documentation or contact DAKASON customer support for details.
Customer Support: If you have any questions, require assistance with installation, or experience any issues with your DAKASON product, please do not hesitate to contact us. Our customer service team is available to help.
You can visit the official DAKASON store for more information and contact options: DAKASON Store on Amazon.


