Introduction
This manual provides detailed instructions for the setup, operation, and maintenance of your FIFINE AmpliGame SC3 Gaming Audio Mixer. Please read this manual thoroughly before using the product to ensure proper functionality and to maximize your experience.
Package Contents
Verify that all items listed below are included in your package:
- FIFINE AmpliGame SC3 Audio Mixer Unit
- USB-C to USB-A/C Cable
- User Manual (Japanese)

Image: FIFINE AmpliGame SC3 Audio Mixer, USB-C to USB-A/C cable, and user manual.
Product Overview
Interface Description
The FIFINE AmpliGame SC3 features multiple ports for versatile connectivity:
- OTG/PC Port (USB-C): Connects to a computer (PC/Mac) or smartphone for data transfer and power supply.
- LINE OUT Port (3.5mm): Connects to speakers or a smartphone for live streaming output.
- HEADPHONE Port (3.5mm): Connects to headphones (TRS or TRRS) for audio monitoring.
- LINE IN Port (3.5mm): Connects to external audio sources like smartphones or tablets for background music or auxiliary audio input.
- HEADSET Port (3.5mm): Connects to a TRRS headset for recording and monitoring.
- Combo Input Interface (XLR/1/4-inch): Connects to XLR dynamic or condenser microphones, or 1/4-inch dynamic microphones.
- Dynamic/Condenser Switch: Selects between dynamic and condenser microphone modes for optimal performance.
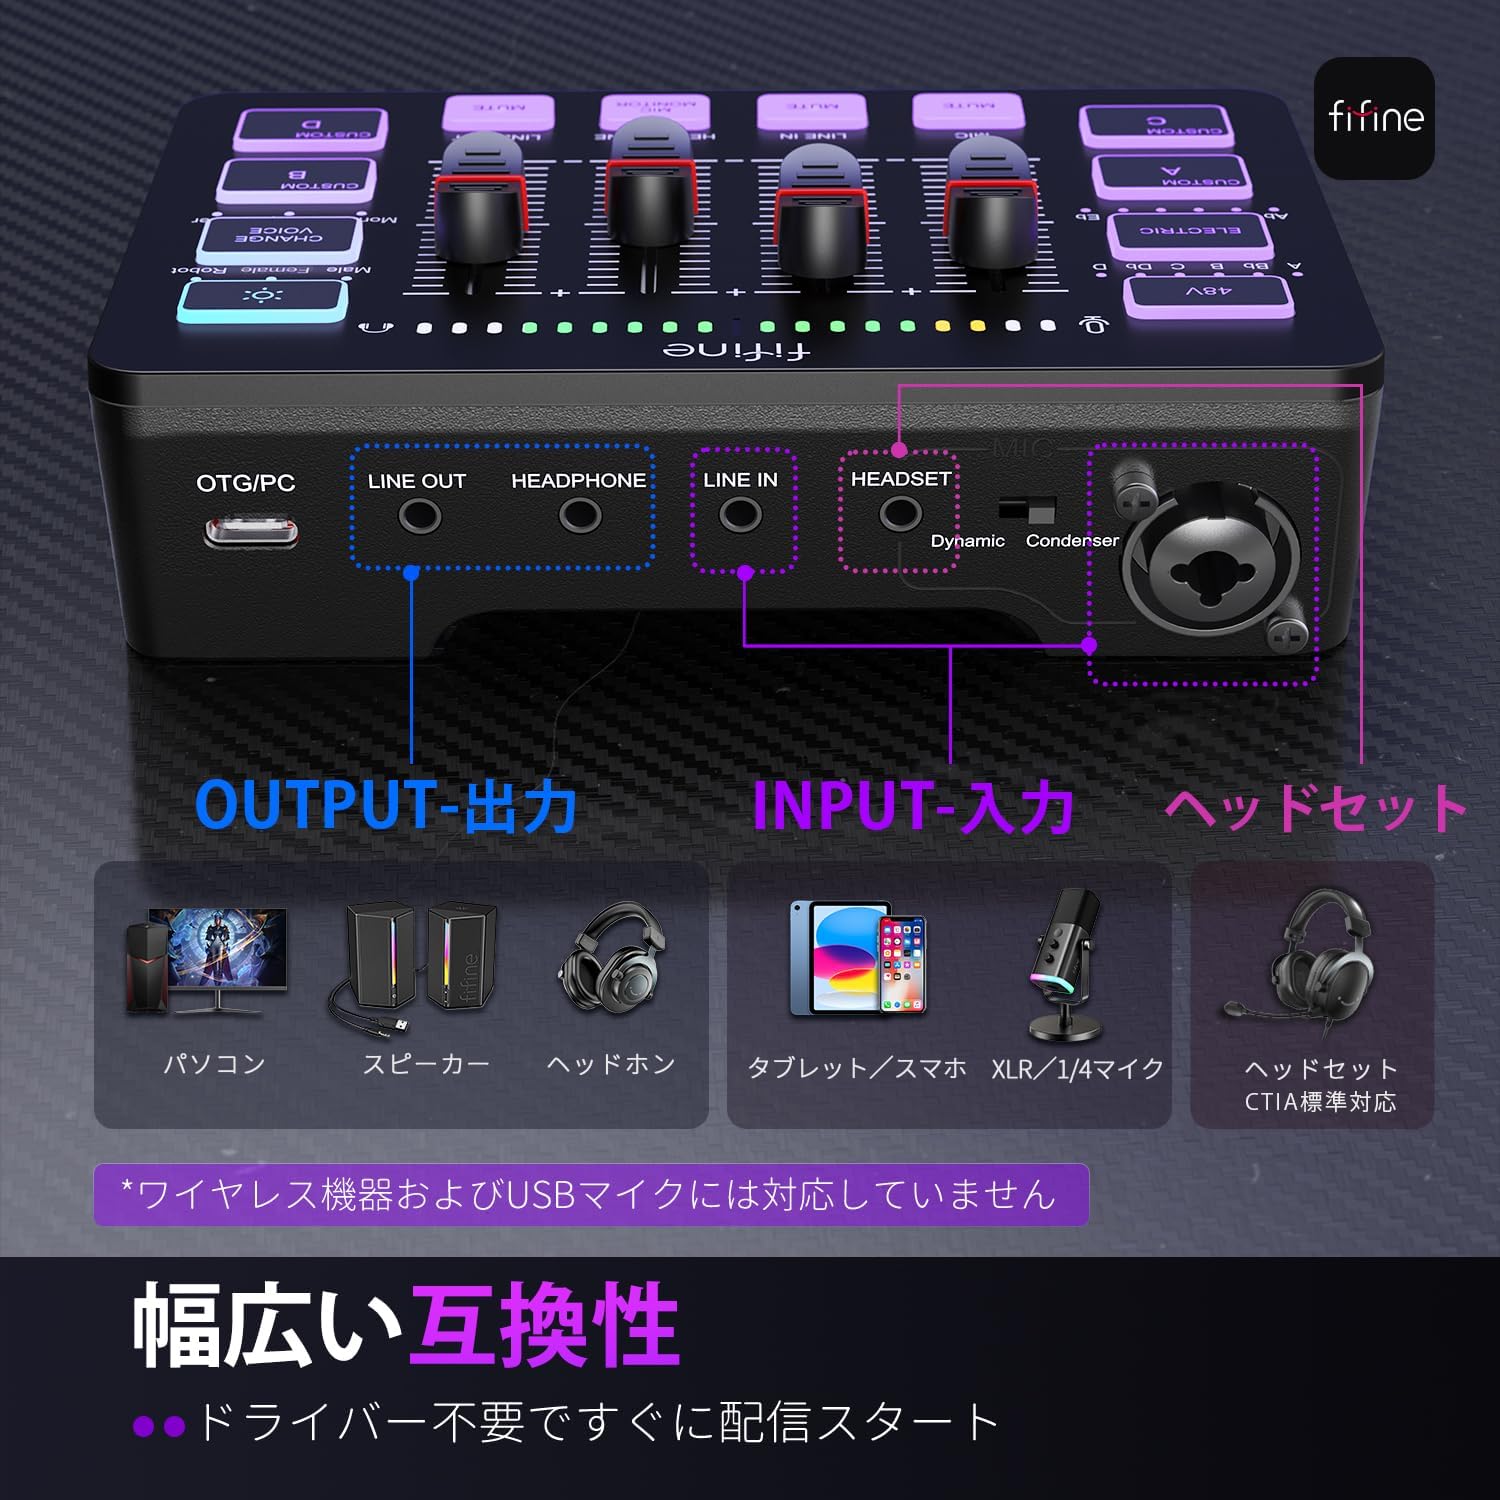
Image: Rear panel of the mixer with labels for each port and switch.
Control Panel Description
The top panel features intuitive controls for audio management:
- 48V Phantom Power Button: Activates/deactivates 48V phantom power for condenser microphones.
- Auto-Tune Button: Toggles auto-tune on/off with 12 tuning options.
- RGB Light Button: Controls RGB lighting modes and colors.
- Voice Changer Button: Activates voice changing effects with 6 voice modes.
- Custom Sound Effect Buttons (A, B, C, D): Records and plays back custom sound effects (up to 15 seconds each).
- Volume Slider Faders: Independently adjust volume levels for Microphone, Line In, Headphone, and Line Out channels.
- Mute Buttons: Mute/unmute individual channels (Mic, Line In, Headphone, Line Out).
- MIC MONITOR Button: Toggles microphone monitoring on/off.
- LED Indicators: Displays audio levels and status for various functions.
Image: Top panel controls of the mixer.
Setup Guide
1. Power Supply and PC Connection
- Connect the USB-C end of the provided cable to the OTG/PC port on the mixer.
- Connect the USB-A or USB-C end of the cable to your computer. The mixer's buttons and indicators will light up, indicating it is powered on.
2. Microphone Connection
- Connect one end of an XLR cable (sold separately) to your microphone.
- Connect the other end of the XLR cable to the Combo Input Interface on the mixer.
- Adjust the Dynamic/Condenser switch on the mixer to match your microphone type (Dynamic for dynamic mics, Condenser for condenser mics).
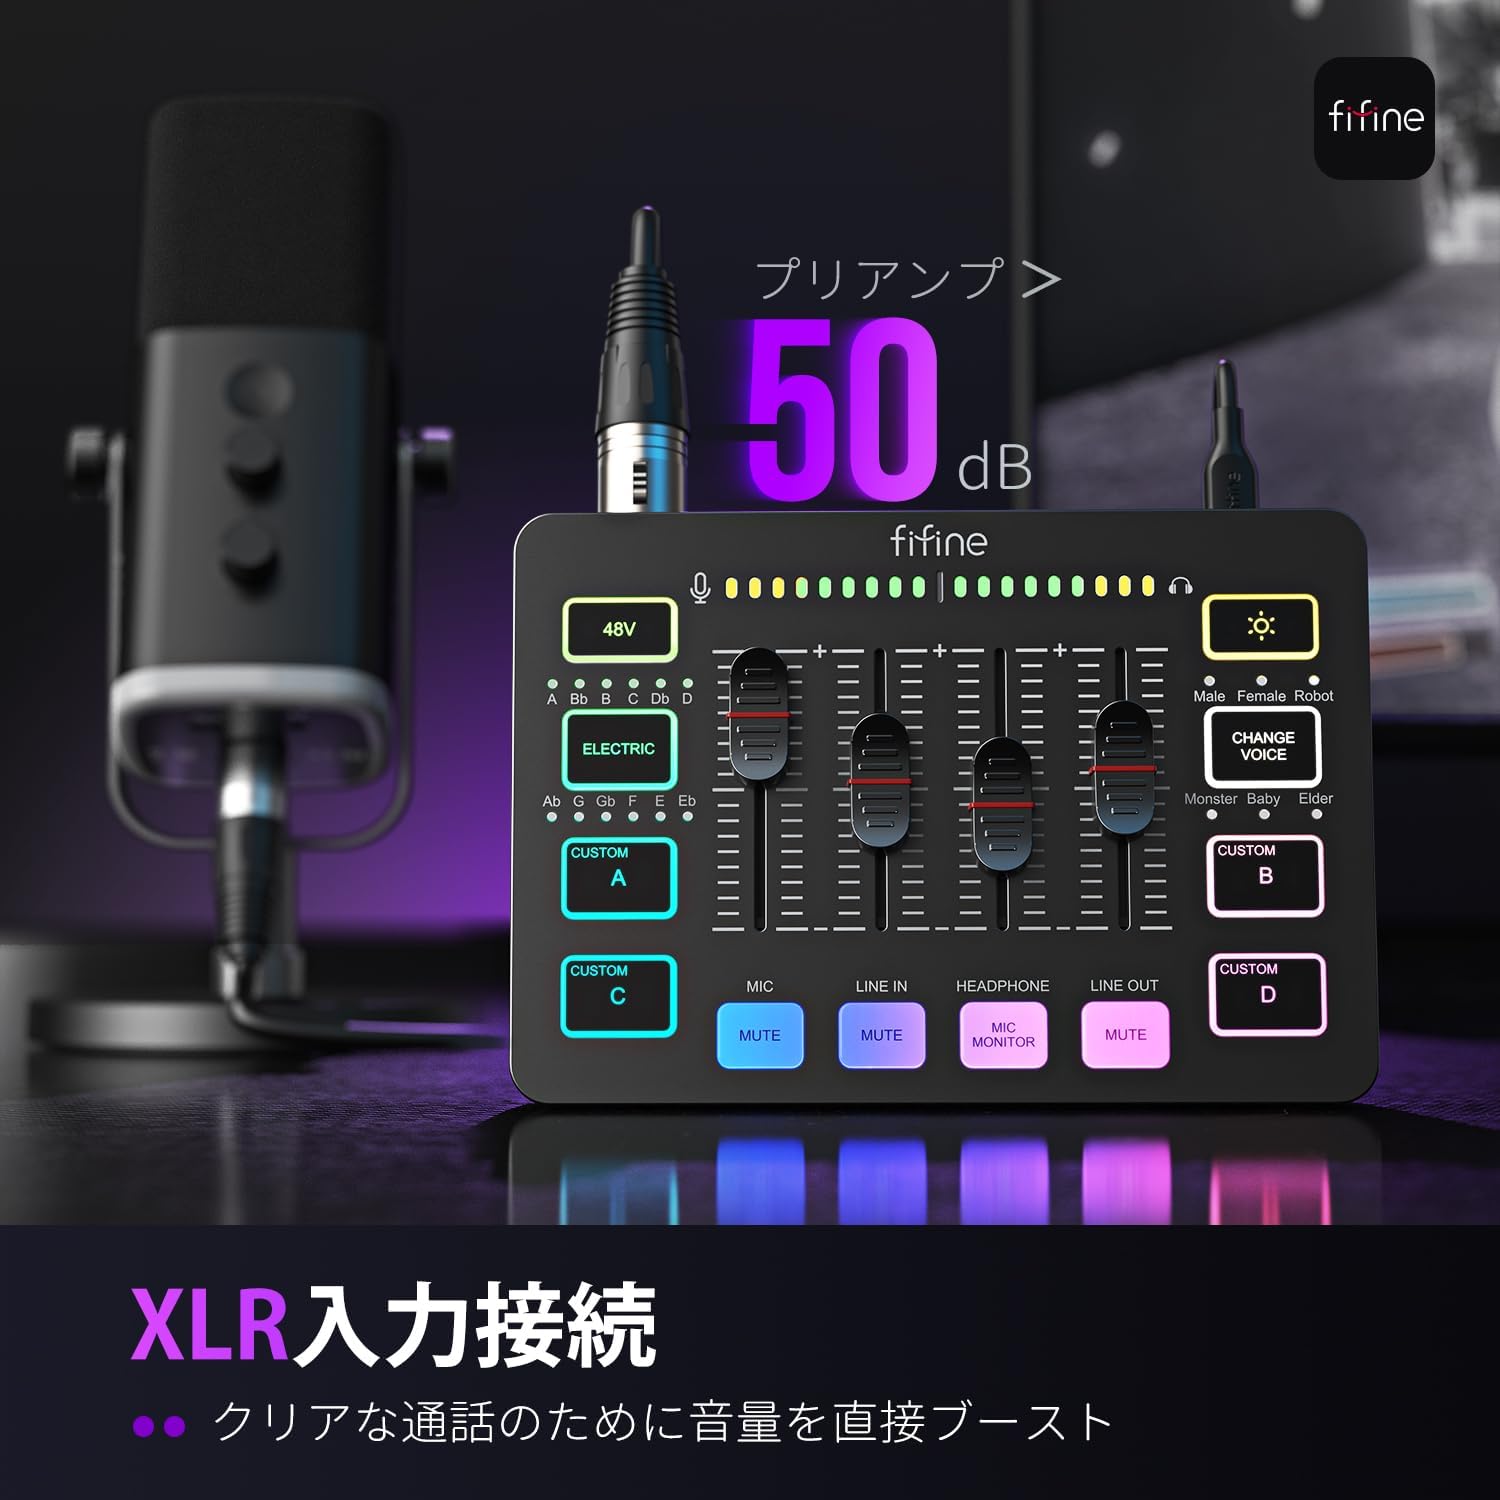
Image: Mixer connected to a microphone and laptop, highlighting XLR input.
3. Headphone Connection
For monitoring your audio, connect a 3.5mm headphone (TRS or TRRS) to the HEADPHONE interface on the mixer.
4. AUX Audio Connection
To use background music or external audio, connect a 3.5mm audio device (like a smartphone or tablet) to the LINE IN interface on the mixer.
5. Output Device Connection
- Speakers: Connect 3.5mm speakers to the LINE OUT interface to output recorded audio.
- Smartphone for Live Streaming: Connect the TRS end of an audio cable to the mixer's LINE OUT port, and the TRRS end to your smartphone. This enables live streaming using your smartphone.
Important Note:
- If connecting an iPhone or iPad to LINE OUT or LINE IN, ensure the mixer is first supplied with external power.
- The HEADSET interface and Combo Input Interface cannot be used simultaneously for recording. Choose one for recording.
- This product does not support USB microphones.
- This product is not compatible with non-international standard (CTIA standard) headsets. If connected to the HEADSET jack, the headset microphone may not input audio.
Video: A comprehensive user guide demonstrating the setup and basic functions of the FIFINE AmpliGame SC3.
Operating Instructions
Volume Adjustment
Adjust the volume for each channel (MIC, LINE IN, HEADPHONE, LINE OUT) using the corresponding slider faders. Push up to increase volume, pull down to decrease. LED lights indicate the current volume level.
Mute Function
Press the MUTE button for each channel (MIC, LINE IN, HEADPHONE, LINE OUT) to toggle mute on/off. A white light indicates the channel is muted.
Microphone Monitoring
Press the MIC MONITOR button to toggle microphone monitoring on/off. This allows you to hear your own voice through your headphones with zero latency.
48V Phantom Power
Short press the 48V button to turn phantom power on/off. A white light indicates it's on. Caution: If your microphone does not require phantom power, ensure this is turned off to prevent noise.
Auto-Tune
Short press the ELECTRIC button to turn auto-tune on. A white light indicates it's on. There are 12 tuning options (A, Bb, B, C, Db, D, Ab, G, Gb, F, E, Eb). Short press to cycle through options. Long press for 2 seconds to turn off. Note: Auto-tune and Voice Changer cannot be used simultaneously.
Voice Changer
Short press the CHANGE VOICE button to turn the voice changer on. A white light indicates it's on. There are 6 voice modes (Male, Female, Robot, Monster, Baby, Elder). Short press to cycle through options. Long press for 2 seconds to turn off. Note: Auto-tune and Voice Changer cannot be used simultaneously.
Custom Sound Effects
The SC3 has 4 customizable sound effect buttons (CUSTOM A, B, C, D). Long press a button until the white light illuminates to start recording (up to 15 seconds). Release the button to stop recording. Short press to play the recorded sound effect. A flashing white light indicates playback. Custom sound effects can be recorded from PC playback, microphone input, or LINE IN input.
RGB Lighting
Short press the RGB light button to turn RGB lighting on. A white light indicates it's on. There are 5 RGB modes and over 8 color options. Short press to cycle through modes and colors. Long press for 3 seconds to turn off.
Video: A quick overview of the FIFINE AmpliGame SC3's features, including RGB lighting, mute functions, and voice effects.
Computer Settings
Mac OS Settings
- Click the Apple icon in the top-left corner of the screen and select "System Preferences...".
- Click the "Sound" icon.
- In the "Input" tab, confirm that "FIFINE SC3" is selected as the default input device. Adjust the input volume slider as needed.
- In the "Output" tab, confirm that "FIFINE SC3" is selected as the default output device. Adjust the output volume slider as needed.
Windows Settings
- Right-click the speaker icon in the bottom-right corner of the screen and click "Open Sound settings".
- Click "Sound Control Panel".
- In the "Recording" tab, select "Microphone (FIFINE SC3)" as the default device. Adjust the microphone level by speaking into the mic until the bar type icon turns green and jumps within the appropriate range.
- In the "Playback" tab, select "Speaker (FIFINE SC3)" as the default output device. Adjust the volume level as needed.
PS5 Connection Guide
To connect your FIFINE AmpliGame SC3 to a PS5:
- Connect the USB-C end of the provided cable to the OTG/PC port on the mixer.
- Connect the USB-A end of the cable to an available USB port on your PS5.
- Connect your XLR microphone to the Combo Input Interface and your headphones to the HEADPHONE port on the mixer.
- On your PS5, navigate to Settings > Sound > Microphone > Input Device and select "USB Headset (fifine SC3)".
- Adjust the microphone level in the PS5 settings to ensure optimal input.
- For audio output, go to Settings > Sound > Audio Output > Output Device and select "USB Headset (fifine SC3)". Adjust headphone volume as needed.
Video: Detailed steps on connecting the FIFINE AmpliGame SC3 to a PS5 console and configuring audio settings.
Troubleshooting
- No Sound Output: Ensure all cables are securely connected. Check volume levels on the mixer and your connected devices. Verify that the correct input/output devices are selected in your computer or console's sound settings.
- Microphone Not Working: Confirm the microphone is properly connected to the Combo Input Interface. Check the Dynamic/Condenser switch setting matches your microphone type. If using a condenser mic, ensure 48V phantom power is enabled.
- Noise in Input: If using a microphone that does not require 48V phantom power, ensure the 48V button is turned off. Check for loose connections or interference from other electronic devices.
- Voice Changer/Auto-Tune Not Working: These functions cannot be used simultaneously. Ensure only one is active at a time. Note that these functions are not available when connected to PS4/PS5 or smartphones (only on PC).
- USB Microphone Incompatibility: This mixer is designed for XLR and 1/4-inch microphones and does not support USB microphones due to differing signal transmission methods.
- Headset Microphone Not Working: Ensure your headset uses the international standard (CTIA standard). Non-CTIA standard headsets may not function correctly with the HEADSET jack.
Specifications
| Feature | Detail |
|---|---|
| Model Number | FIFINE SC3 |
| Color | Black |
| Power Source | Corded Electric |
| Voltage | 5 Volts |
| Channels | 4 |
| Product Dimensions | 11.3D x 16.5W x 4.2H cm |
| Connectivity Technology | AUX, USB, XLR |
Warranty and Support
FIFINE offers customer support for its products. For any inquiries or issues, please contact FIFINE Japan customer service. Operating hours are Monday to Friday (excluding holidays) from 10:00 to 19:00 JST.
For further support and detailed information, please visit the official FIFINE website.
Warranty Policy:
Generally, warranty support is provided for products purchased directly from FIFINE Japan. In some cases, support may be offered for products not purchased directly, depending on the situation. Please contact customer service for details.


