Product Overview
The DieseRC Wireless LED Light Strip Dimmer Switch is designed to provide remote control and dimming capabilities for LED light strips and other DC 5V-30V devices. It features a relay receiver and two remote controls, offering convenient operation and adjustable brightness from 0% to 100% duty cycle.
Key Features:
- Wireless Control: Operate your LED lights remotely using the included 433MHz RF remote controls.
- Stepless Dimming: Adjust brightness from 0% to 100% for optimal lighting.
- Preset Brightness Levels: Quickly switch between 50% and 100% brightness with dedicated buttons.
- Wide Voltage Compatibility: Supports DC 5V to 30V input, suitable for various LED applications.
- High Load Capacity: Equipped with a 10A relay, capable of handling up to 720 watts.
- Long Range: Effective control distance of approximately 50 meters in open areas.
- Durable Relay: Designed for over 400,000 operations.
- Programmable: Easily program and reset the receiver to pair with multiple remotes (up to 20 stations).

Figure 1: The DieseRC Wireless LED Light Strip Dimmer Switch receiver and two remote controls.
Safety Information
- Ensure the power supply is disconnected before installation or maintenance to prevent electric shock.
- Verify that the input voltage (DC 5V-30V) and current do not exceed the receiver's maximum ratings (10A, 720W).
- Install the receiver in a dry, well-ventilated area, away from direct sunlight or extreme temperatures.
- Do not attempt to modify or repair the device. Refer to qualified personnel for service.
- Keep the device out of reach of children.
Setup and Installation
The receiver is designed for easy integration between your power supply and the LED device. Follow these steps for proper setup:
- Prepare Wiring: Identify the positive (+) and negative (-) terminals for both input (power supply) and output (LED strip/device) on the receiver.
- Connect Power Input: Connect the positive (+) wire from your DC 5V-30V power supply to the "Input V+" terminal on the receiver. Connect the negative (-) wire from your power supply to the "Input V-" terminal.
- Connect LED Output: Connect the positive (+) wire from your LED light strip or device to the "Output V+" terminal on the receiver. Connect the negative (-) wire from your LED light strip or device to the "Output V-" terminal.
- Secure Connections: Ensure all wire connections are secure and properly insulated.
- Power On: Once all connections are verified, connect your power supply to the main power source.
Video 1: This video demonstrates the wiring and programming process for the DieseRC Wireless LED Light Strip Dimmer Switch, showing how to connect the receiver to an LED strip and pair it with the remote controls.
Programming the Remote Control:
The remote controls are typically pre-paired, but if re-pairing is needed or to add new remotes, follow these steps:
- Enter Programming Mode: Press the learning button on the receiver 2 times. The indicator LED on the receiver will turn off, indicating it's ready for pairing.
- Pair Remote: Within a few seconds, press any button on the remote control you wish to pair. The indicator on the receiver will flash several times and then light up, confirming successful pairing.

Figure 2: Instructions for programming the remote control with the receiver.
Resetting the Receiver:
- Reset: Press the learning button on the receiver 8 times. The indicator LED will flash, and all previously paired remotes will be cleared. After resetting, you will need to re-program any remotes you wish to use.
Operating Instructions
The remote control provides intuitive operation for your connected LED lights:

Figure 3: Multifunction remote control button layout and functions.
- Power Button (⏻): Press to turn the connected LED lights ON or OFF.
- 50% Brightness Button (◑): Press to set the brightness to 50%.
- 100% Brightness Button (○): Press to set the brightness to 100%.
- Brightness Up Button (☀+): Press to gradually increase the brightness.
- Brightness Down Button (☀-): Press to gradually decrease the brightness.

Figure 4: The stepless dimming feature allows fine control over light intensity.
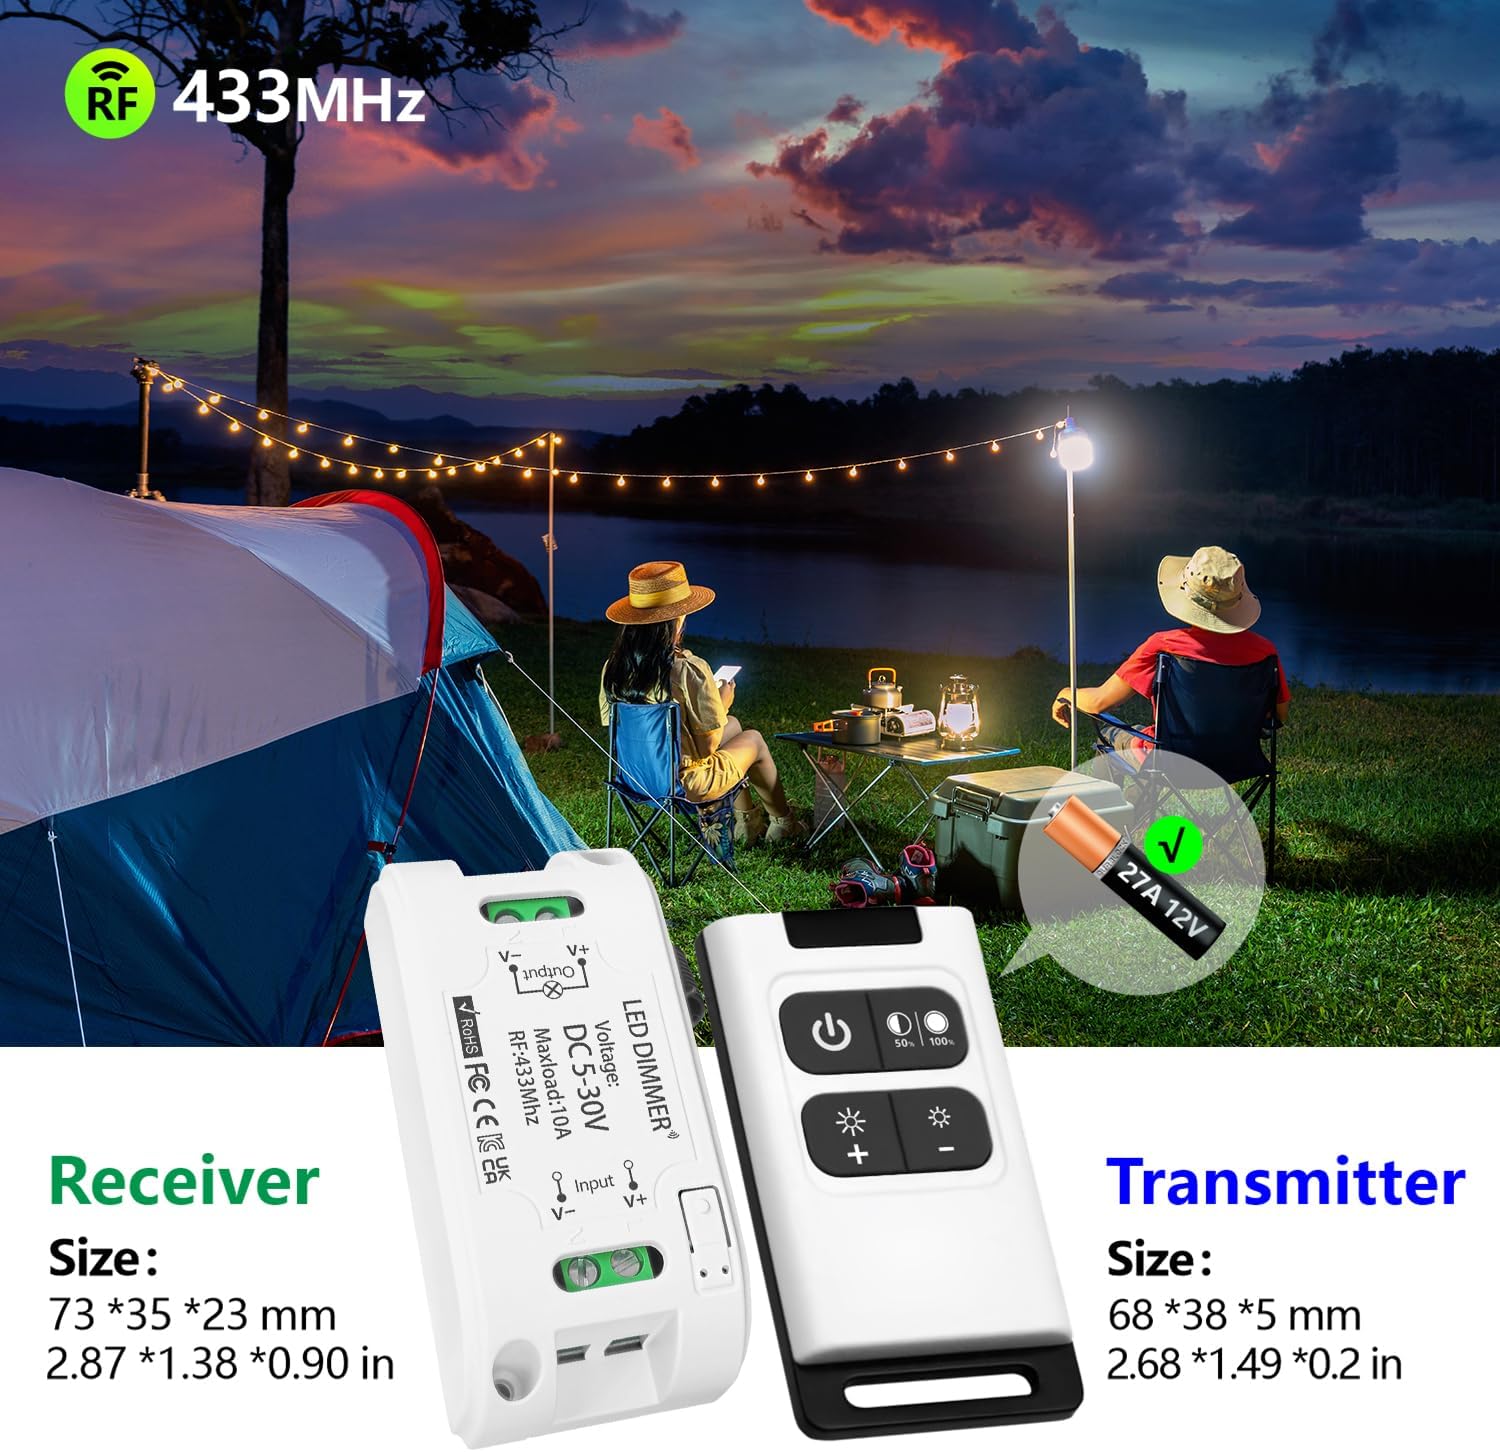
Figure 5: Easy switching between 50% and 100% brightness levels.
Maintenance
- Cleaning: Wipe the receiver and remote controls with a soft, dry cloth. Do not use abrasive cleaners or solvents.
- Battery Replacement: The remote control requires a 27A 12V battery. If the remote's range decreases or it becomes unresponsive, replace the battery. The battery can be replaced after disassembling the remote.
- Storage: Store the device in a cool, dry place when not in use for extended periods.

Figure 6: Receiver and Transmitter dimensions, noting the 27A 12V battery for the remote.
Troubleshooting
| Problem | Possible Cause | Solution |
|---|---|---|
| LEDs do not turn on or respond to remote. |
|
|
| Remote control range is reduced. |
|
|
| Dimming is not smooth or responsive. |
|
|
Specifications
- Model: Dimmer01
- Brand: DieseRC
- Input Voltage: DC 5V-30V
- Max Load Current: 10A
- Max Load Wattage: 720 watts
- RF Frequency: 433MHz
- Control Distance: Approx. 50 meters (open area)
- Remote Control Battery: 27A 12V (estimated 3-year lifespan)
- Receiver Dimensions: 73 x 35 x 23mm (2.87 x 1.38 x 0.91 inches)
- Material: Plastic
- Certifications: CE
- Switch Type: 1-way
- Mounting Type: Through Hole Mount
- Switch Style: Push Button
Warranty and Support
DieseRC is committed to providing high-quality products and excellent after-sales service. If you encounter any issues or have questions regarding your Wireless LED Light Strip Dimmer Switch, please do not hesitate to contact us.
Customer Service Email: dieseelectronic@163.com
We strive to resolve any customer problems efficiently and effectively.


