
GCSOAR GCVT8048
GCSOAR 80A PWM Solar Charge Controller User Manual
Model: GCVT8048
1. Introduction
This manual provides essential instructions for the safe and efficient operation of your GCSOAR 80A PWM Solar Charge Controller. This controller is designed for 12V, 24V, 36V, and 48V solar systems, featuring automatic voltage detection and compatibility with various battery types including lead-acid (Sealed, Gel, Flooded) and lithium-ion (LiFePO4, Li[NiCoMn]O2). It incorporates advanced PWM 3-stage charging technology to optimize battery life and includes multiple protection features for system safety. The integrated backlit LCD screen allows for real-time monitoring and parameter adjustment, and it offers Quattro USB outputs for charging external devices.

Image 1.1: Front view of the GCSOAR 80A PWM Solar Charge Controller, showing the LCD display, control buttons, and terminal connections.
2. Safety Instructions
Please read all instructions and warnings carefully before installation and operation. Failure to follow these instructions may result in electric shock, fire, or severe injury.
- Ensure all connections are tight and correct to avoid excessive heat buildup.
- Install the controller indoors in a well-ventilated area, away from direct sunlight, high temperatures, and moisture.
- Do not install the controller in environments with flammable gases.
- Connect the battery first, then the solar panel, and finally the load. Disconnect in the reverse order.
- Use appropriate wire gauges for all connections to prevent overheating.
- The controller is common positive grounding.
- Do not attempt to disassemble or repair the controller yourself. Contact qualified personnel for service.
3. Product Overview
The GCSOAR 80A PWM Solar Charge Controller features a clear LCD display and intuitive controls for monitoring and managing your solar power system.

Image 3.1: Detailed view of the controller's dimensions and key components, including the LCD screen, control buttons, USB ports, and connection terminals.
Key Components:
- LCD Screen: Displays real-time system data and settings.
- Browse/Set Buttons: Used to navigate menus and adjust parameters.
- USB Ports: Four 5V/2A (max) USB outputs for charging mobile devices.
- Solar Panel Terminals: Connect to your solar array.
- Battery Terminals: Connect to your battery bank.
- Load Terminals: Connect to your DC loads.
4. Setup and Installation
Follow these steps carefully to ensure proper and safe installation of your solar charge controller.
Connection Order:
- Connect the Battery: Connect the battery to the controller's battery terminals. Ensure correct polarity (+ to + and - to -).
- Connect the Load: Connect your DC loads to the controller's load terminals. Ensure correct polarity.
- Connect the PV Array: Connect the solar panels to the controller's PV terminals. Ensure correct polarity.
Disconnection Order: To disconnect the system, follow the reverse order: 3. PV array → 2. Load → 1. Battery.

Image 4.1: Comprehensive wiring diagram illustrating the connection sequence for solar panels, battery, DC loads, and an optional inverter for AC loads.
Wiring Recommendations:
- For the 80A model, use #4AWG (25mm²) wire for controller terminals.
- Ensure all wires are securely fastened to prevent loose connections and potential hazards.
5. Operation
The controller's backlit LCD screen provides real-time information and allows for easy parameter adjustments.

Image 5.1: Examples of different information screens displayed on the LCD, including battery voltage, temperature, charging status, and power metrics.
LCD Display and Navigation:
- Use the 'Browse' button to cycle through different display screens (e.g., battery voltage, ambient temperature, charging current, power generation).
- Use the 'Set' button to enter parameter adjustment mode. Long press to save changes.
- The LCD backlight time is 30 seconds by default.

Image 5.2: A comprehensive guide to the LCD symbols and their corresponding meanings, aiding in understanding the controller's status and operations.
PWM 3-Stage Charging:
The controller utilizes a 3-stage PWM charging algorithm to efficiently charge batteries and extend their lifespan:
- Bulk Charge: Delivers maximum current to rapidly charge the battery.
- Boost Charge: Charges the battery to a higher voltage to ensure full charge.
- Float Charge: Maintains the battery at a safe voltage level once fully charged, preventing overcharging.
6. Battery Compatibility
The GCSOAR controller is compatible with a wide range of 12V, 24V, 36V, or 48V batteries.

Image 6.1: Visual representation of the controller's compatibility with various lead-acid and lithium-ion battery types.
Supported Battery Types:
- Lead-Acid: Sealed, Gel (AGM), Flooded, and User-defined.
- Lithium-ion: LiFePO4 (3.2V series) and Li(NiCoMn)O2 (3.7V series), and User-defined.
For lithium batteries, the voltage cannot be identified automatically; please select the correct battery type manually in the controller settings.

Image 6.2: Detailed table of battery parameters for various types, including voltage levels for different charging and protection stages. Note: Values for 24V, 36V, and 48V systems are multiples of the 12V system values.
7. Specifications
Technical data for the GCSOAR 80A PWM Solar Charge Controller.
| Parameter | Value |
|---|---|
| Model | GCVT8048 |
| Rated Charge Current | 80Amp |
| Rated Discharge Current | 40Amp |
| Nominal System Voltage | 12V/24V/36V/48V DC auto |
| Max. PV Input Power | 1000W@12V; 2000W@24V; 3000W@36V; 4000W@48V |
| Max. PV Open Circuit Voltage | 50V@12V/24V BAT system; 100V@36V/48V BAT system |
| Battery Voltage Range | 8V ~ 68V |
| Grounding | Common positive grounding |
| Temperature Compensation | -4mV/℃/2V (25℃) |
| Working Environment Temperature | -20℃ ~ +50℃ |
| Protection Category | IP30 |
| USB Output | 5V/2A (max) |
| Controller Terminals | #4AWG (25mm²) |
| Mounting Hole Size | 190*104mm - Φ5mm |
| Dimensions | 200*131.6*72mm (7.87 x 5.18 x 2.83 inches) |
| Weight | 1KG (2.1 pounds) |
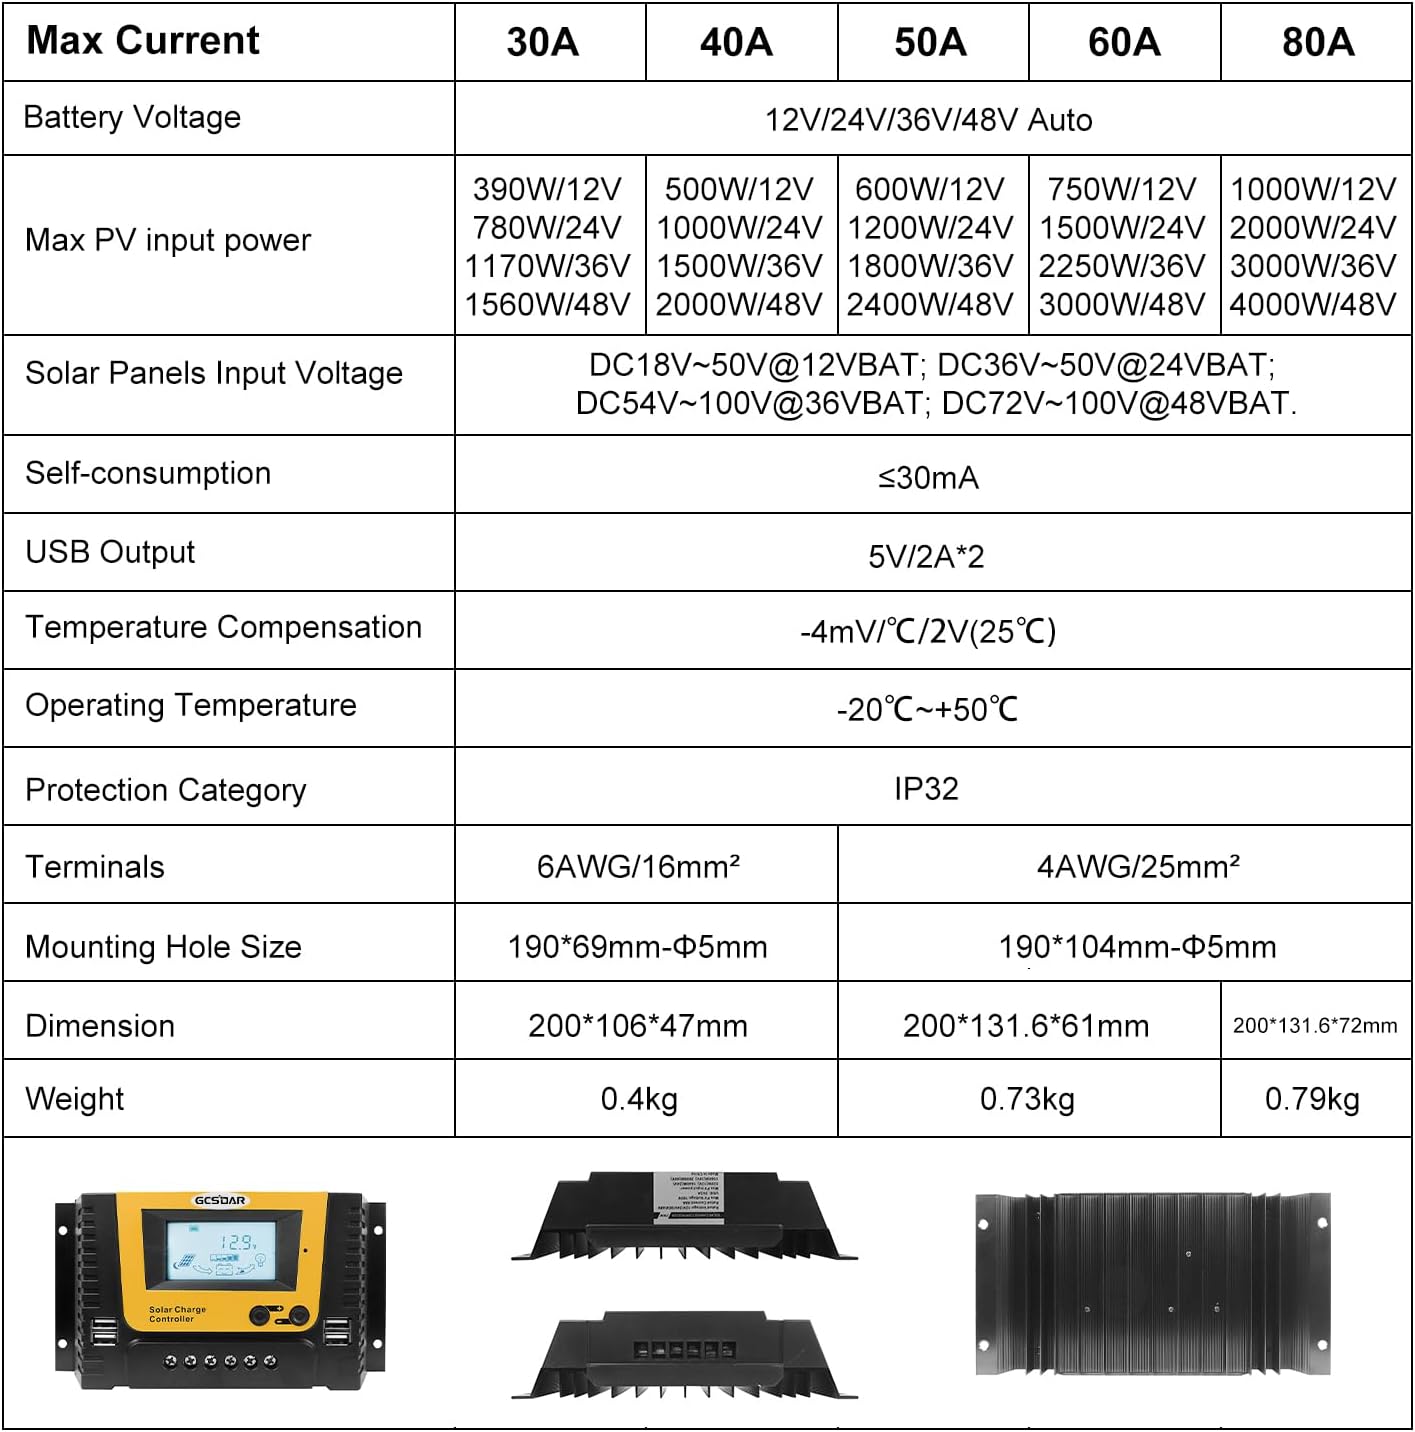
Image 7.1: Comparative table of specifications across different current ratings for GCSOAR solar charge controllers, including the 80A model.
8. Troubleshooting
The controller is equipped with multiple protection features to ensure system safety and stability. If you encounter issues, refer to the LCD display for error codes and consider the following common problems:
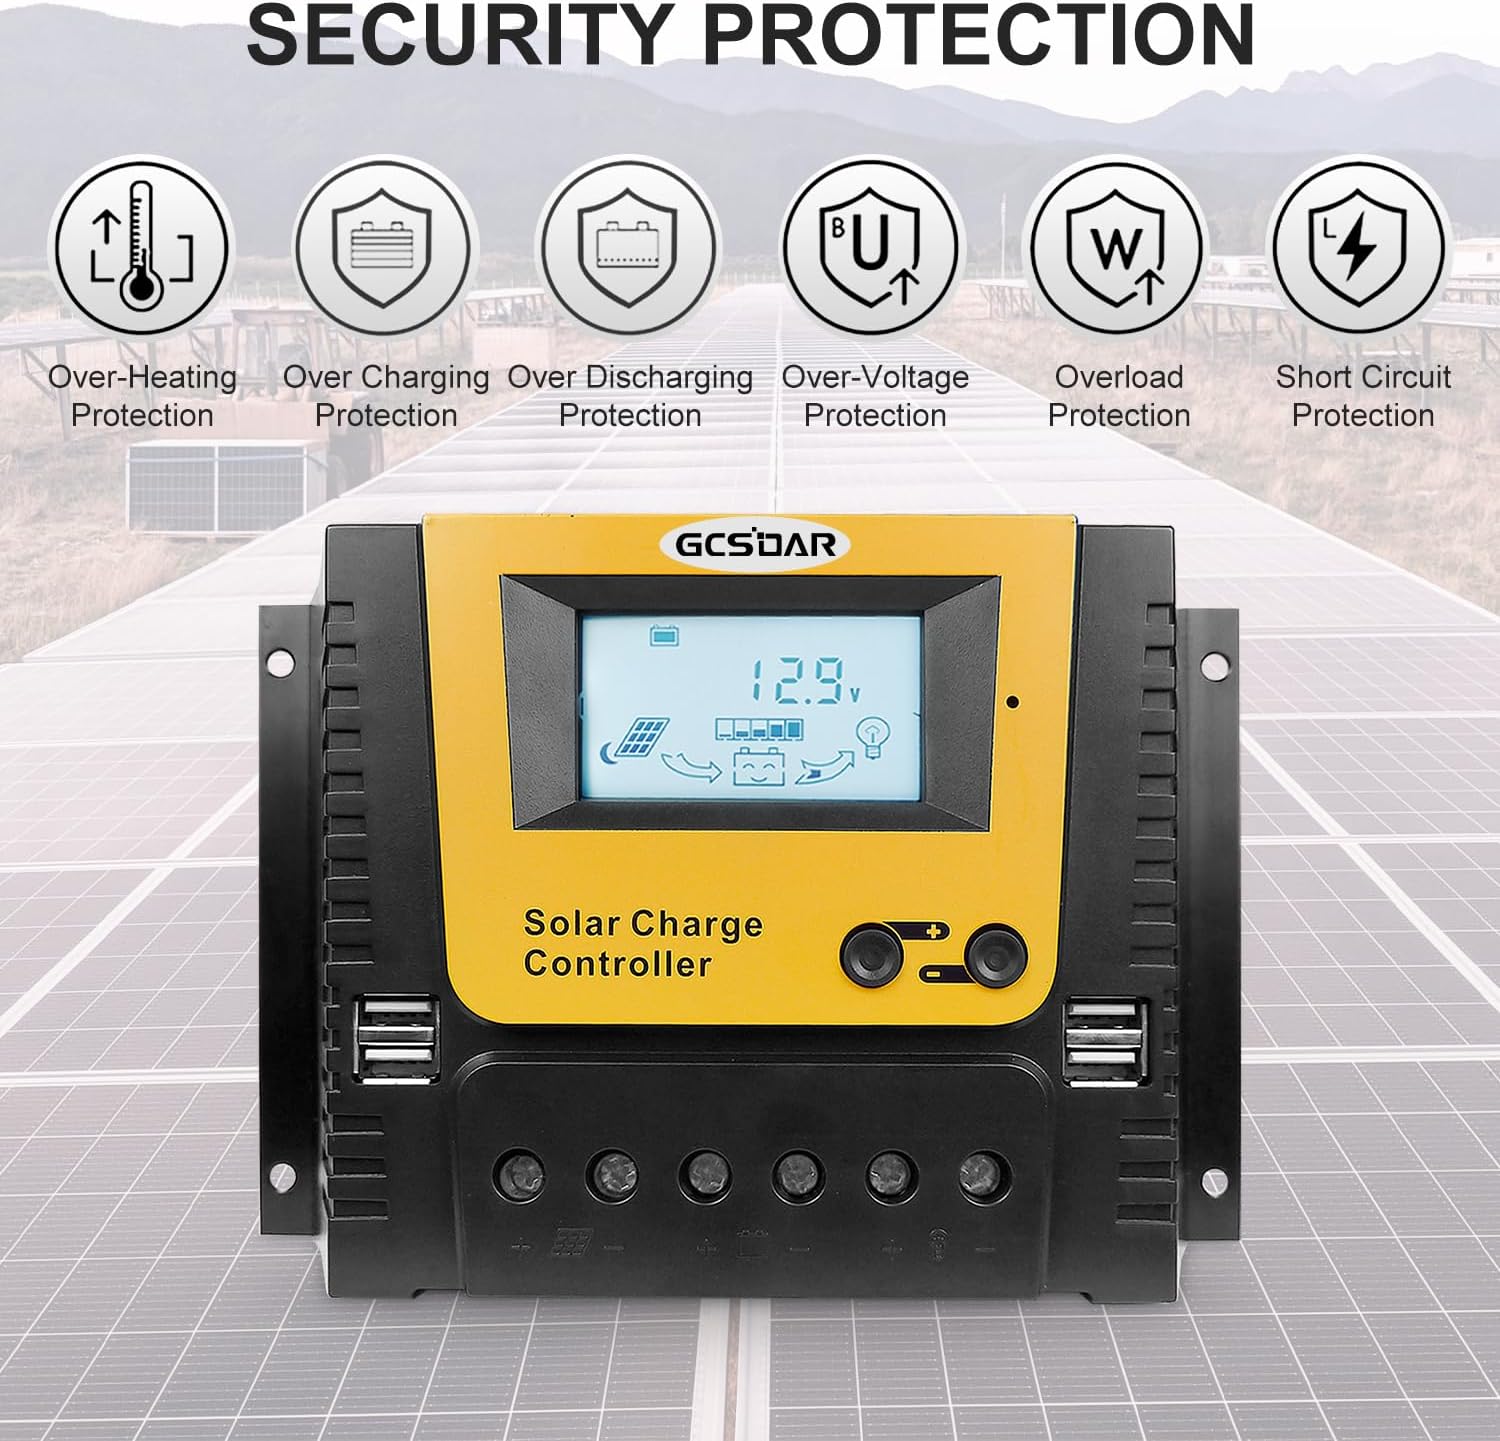
Image 8.1: Visual representation of the controller's built-in security protections.
Common Issues and Solutions:
- No Display/Power: Check battery connections and ensure the battery has sufficient voltage.
- No Charging: Verify solar panel connections, ensure sufficient sunlight, and check for PV open circuit voltage within specifications.
- Load Not Working: Check load connections, ensure the load current does not exceed the controller's rated discharge current, and verify battery voltage is above the low-voltage disconnect threshold.
- Error Codes: Refer to the LCD display for specific error codes. Consult the full manual or contact support for detailed explanations and solutions.
Protection Features:
- Solar panel reverse-polarity protection
- Battery reverse-polarity protection
- Battery reverse-discharge protection
- Over-heating protection
- Battery over-current protection
- Load over-load protection
- Load short-circuit protection
- Battery low-voltage protection
9. Maintenance
Regular maintenance helps ensure the longevity and optimal performance of your solar charge controller.
- Inspection: Periodically check all wiring connections for tightness and corrosion.
- Cleaning: Keep the controller clean and free from dust and debris. Use a dry cloth for cleaning.
- Ventilation: Ensure the installation area remains well-ventilated to prevent overheating.
- Battery Check: Monitor battery health and ensure proper electrolyte levels for flooded batteries.
10. Warranty and Support
GCSOAR is committed to providing reliable products and customer support.
- For technical assistance, GCSOAR offers free technical support.
- Assistance centers are available in Chicago (USA), Munich (Germany), Toronto (Canada), and Melbourne (Australia).
- Please retain your purchase receipt for warranty claims.
Ask a question about this manual
Ask about setup, troubleshooting, compatibility, parts, safety, or missing instructions. Manuals+ will review the question and use this page’s manual context to help answer it.