1. Introduction
This manual provides comprehensive instructions for the installation, operation, and maintenance of your Segotep Memphis M-ATX Mini Tower PC Case. Please read this manual thoroughly before beginning assembly to ensure proper setup and optimal performance.
2. Key Features
- 40 Series GPU Support: Designed to accommodate high-performance 40 series GPUs, ideal for gaming and creative applications.
- Vertical Air Duct: Optimizes internal airflow for efficient cooling and heat dissipation, preventing component overheating.
- Tool-less Disassembly: Facilitates quick and easy installation or upgrades of components without the need for tools.
- 460cm² Side Panel Cooling Holes: Allows for flexible installation of additional fans or radiators to enhance cooling capabilities.
- Excellent Cable Management: Features dedicated routing and concealment options for cables, ensuring a clean build, maximized airflow, and minimized interference.
- Tempered Glass Panels: Provides a clear view of internal components and adds to the aesthetic appeal.
3. Setup and Installation
Follow these steps for assembling your PC components within the Segotep Memphis case. Refer to the accompanying images and video for visual guidance.
3.1 Case Disassembly
Before installing components, carefully remove the side panels and top cover. The tempered glass side panels are designed for easy removal.

Figure 3.1: Exploded view of the Segotep Memphis case showing the removal of the 4mm tempered glass side panel, power cover, and removable dust filter.
Video 3.1: A detailed guide on disassembling the Segotep Slath Mini Case, which shares similar design principles for panel removal and internal access.
3.2 Motherboard and Storage Installation
The case supports M-ATX and ITX motherboards. Install your motherboard and then proceed with installing up to three SSDs and one HDD.

Figure 3.2: Layout indicating motherboard compatibility (M-ATX, ITX) and storage drive locations (3x SSD, 1x HDD).
3.3 GPU Installation
The Segotep Memphis case is designed to support 40 Series GPUs with a maximum length of 350mm. Ensure proper seating in the PCIe slot.
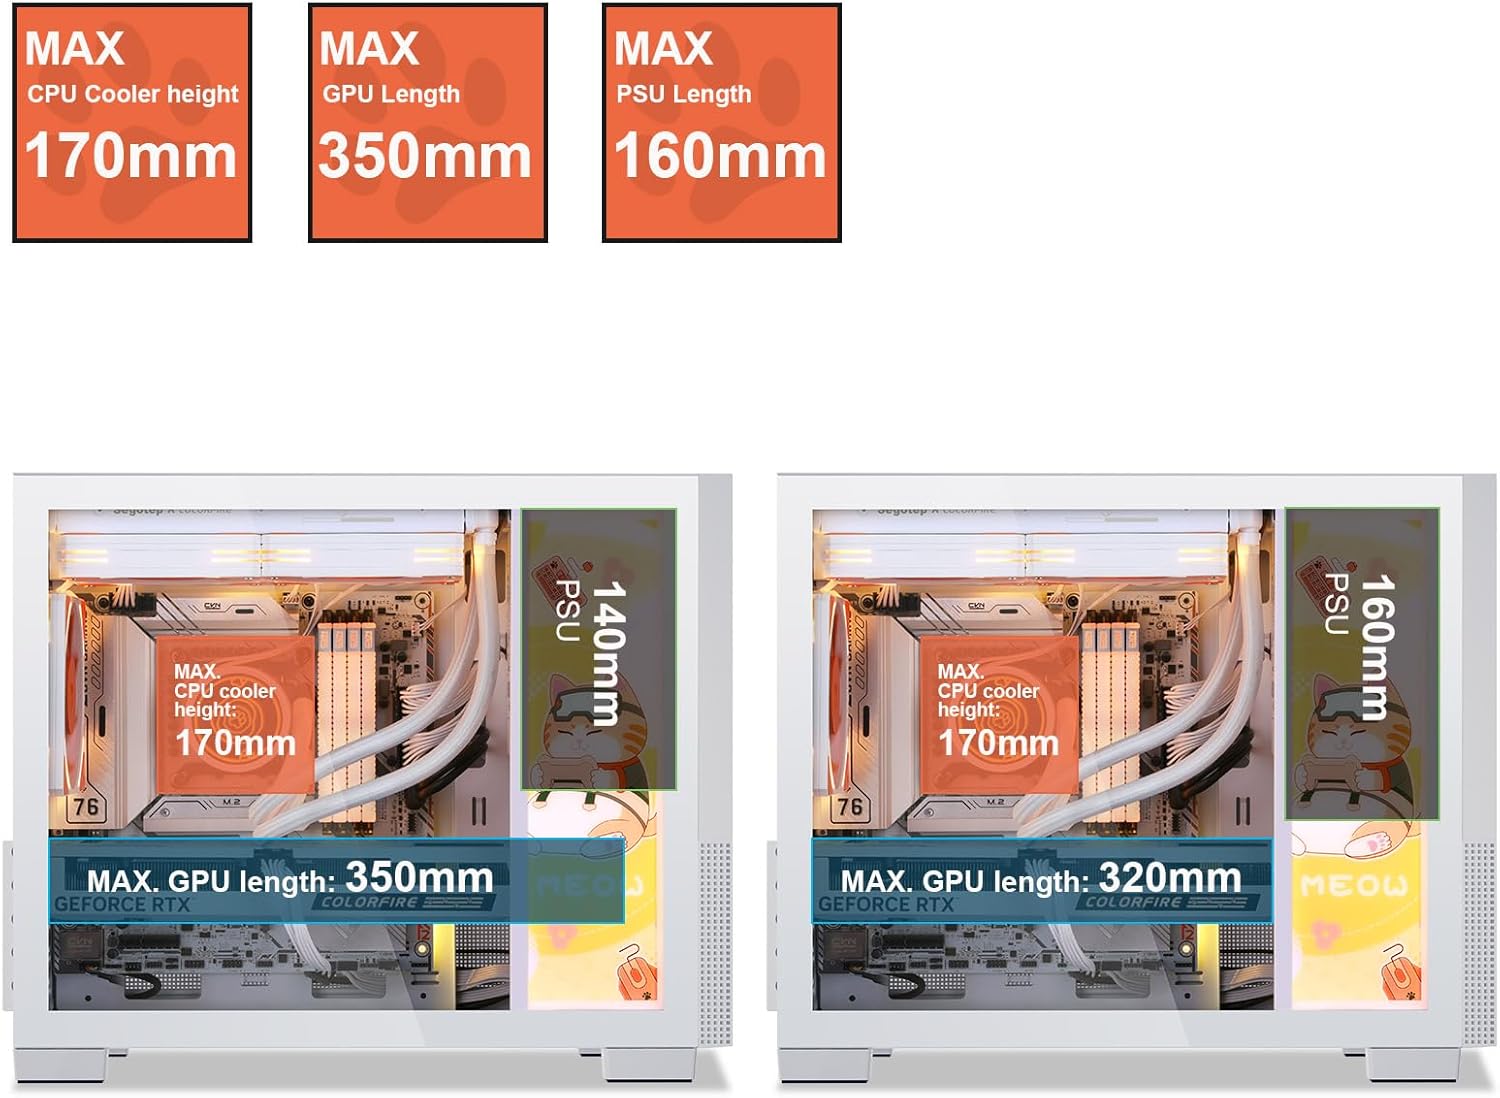
Figure 3.3: Component clearance specifications, including maximum GPU length.
3.4 Cooling System Installation
The case supports up to 6 case fans and a 240mm liquid radiator. Install fans in designated areas for optimal airflow.

Figure 3.4: Fan and radiator support, showing locations for 120mm/140mm fans and a 240mm liquid radiator.

Figure 3.5: Vertical air duct design for efficient cooling.
3.5 Power Supply Unit (PSU) Installation
Install the PSU in its designated rear-mount location. The case supports PSUs with a maximum length of 160mm.
3.6 Cable Management
Utilize the ample space and routing options behind the motherboard tray to manage cables effectively. This ensures a clean build and improved airflow.

Figure 3.6: Top panel and cable management features.
3.7 Reassembly
Once all components are installed and cables are managed, carefully reattach the side panels and top cover. Ensure all screws are tightened securely.
4. Operating Instructions
After successful assembly, connect all necessary peripherals and power cables. The front I/O panel provides convenient access to power, audio, and USB 3.0 ports.

Figure 4.1: Front I/O Panel layout.
- Connect your monitor, keyboard, mouse, and other peripherals to the appropriate ports on your motherboard and graphics card.
- Connect the power cable to the PSU and a wall outlet.
- Press the Power button on the front I/O panel to turn on your system.
5. Maintenance
Regular maintenance helps ensure the longevity and optimal performance of your PC case and components.
- Dust Filters: The Segotep Memphis case includes removable dust filters. Regularly clean these filters to maintain optimal airflow and prevent dust buildup inside the case.
- Exterior Cleaning: Use a soft, damp cloth to wipe down the exterior surfaces. Avoid abrasive cleaners that may damage the finish or tempered glass.
- Interior Cleaning: Periodically use compressed air to remove dust from internal components, paying attention to fan blades and heatsinks. Ensure the system is powered off and unplugged before cleaning.
6. Troubleshooting
If you encounter issues with your PC build, consider the following common troubleshooting steps:
- No Power:
- Ensure the PSU is switched on and properly connected to the wall outlet and motherboard.
- Verify all power cables (24-pin ATX, CPU, GPU) are securely seated.
- Check the front panel power switch connection to the motherboard.
- No Display:
- Confirm the monitor cable is connected to the graphics card (not the motherboard, if a dedicated GPU is installed).
- Reseat the graphics card in its PCIe slot.
- Ensure RAM modules are properly seated in their slots.
- Overheating:
- Check if all case fans are spinning and properly oriented for airflow.
- Clean dust filters and internal components.
- Verify CPU cooler installation and thermal paste application.
For further assistance, please refer to the support section or contact Segotep customer service.
7. Specifications
| Feature | Specification |
|---|---|
| Brand | Segotep |
| Model Name | Memphis |
| Case Type | Mini-Tower |
| Motherboard Compatibility | Micro ATX, ITX |
| Max GPU Length | 350mm |
| Max CPU Cooler Height | 170mm |
| Max PSU Length | 160mm |
| Liquid Radiator Support | Up to 240mm |
| Fan Support | Up to 6 fans |
| Storage Drive Bays | 3x SSD, 1x HDD |
| Front I/O Ports | 2x USB 3.0, Audio (Headphone/Microphone) |
| Material | Metal, Tempered Glass |
| Color | Memphis-White |
| Item Weight | 9.55 pounds |
| Package Dimensions | 19.25 x 15.5 x 11.5 inches |
8. Warranty and Support
Segotep products are designed for reliability and performance. For warranty information and technical support, please refer to the official Segotep website or contact their customer service directly. Keep your proof of purchase for warranty claims.
Contact Information: Please visit the official Segotep website for the most up-to-date support contact details.


