1. Product Overview
The Cornesty Professional Weather Station is an advanced wireless system designed to provide accurate, real-time weather data for your home and garden. It consists of a main display unit and a multi-sensor outdoor unit, offering comprehensive monitoring of various environmental conditions.
Key features include:
- Real-time weather condition monitoring (wind speed, wind direction, rainfall, temperature, humidity, atmospheric pressure).
- 12-hour weather forecast based on barometric pressure changes.
- Large 7.5-inch backlit display with touch screen for easy readability and settings adjustment.
- Customizable alarms for temperature, humidity, wind speed, and rainfall.
- Dual alarm clock and calendar functions.
- IPX4 waterproof rating for the outdoor sensor.
- Long wireless transmission range up to 330ft/100m.
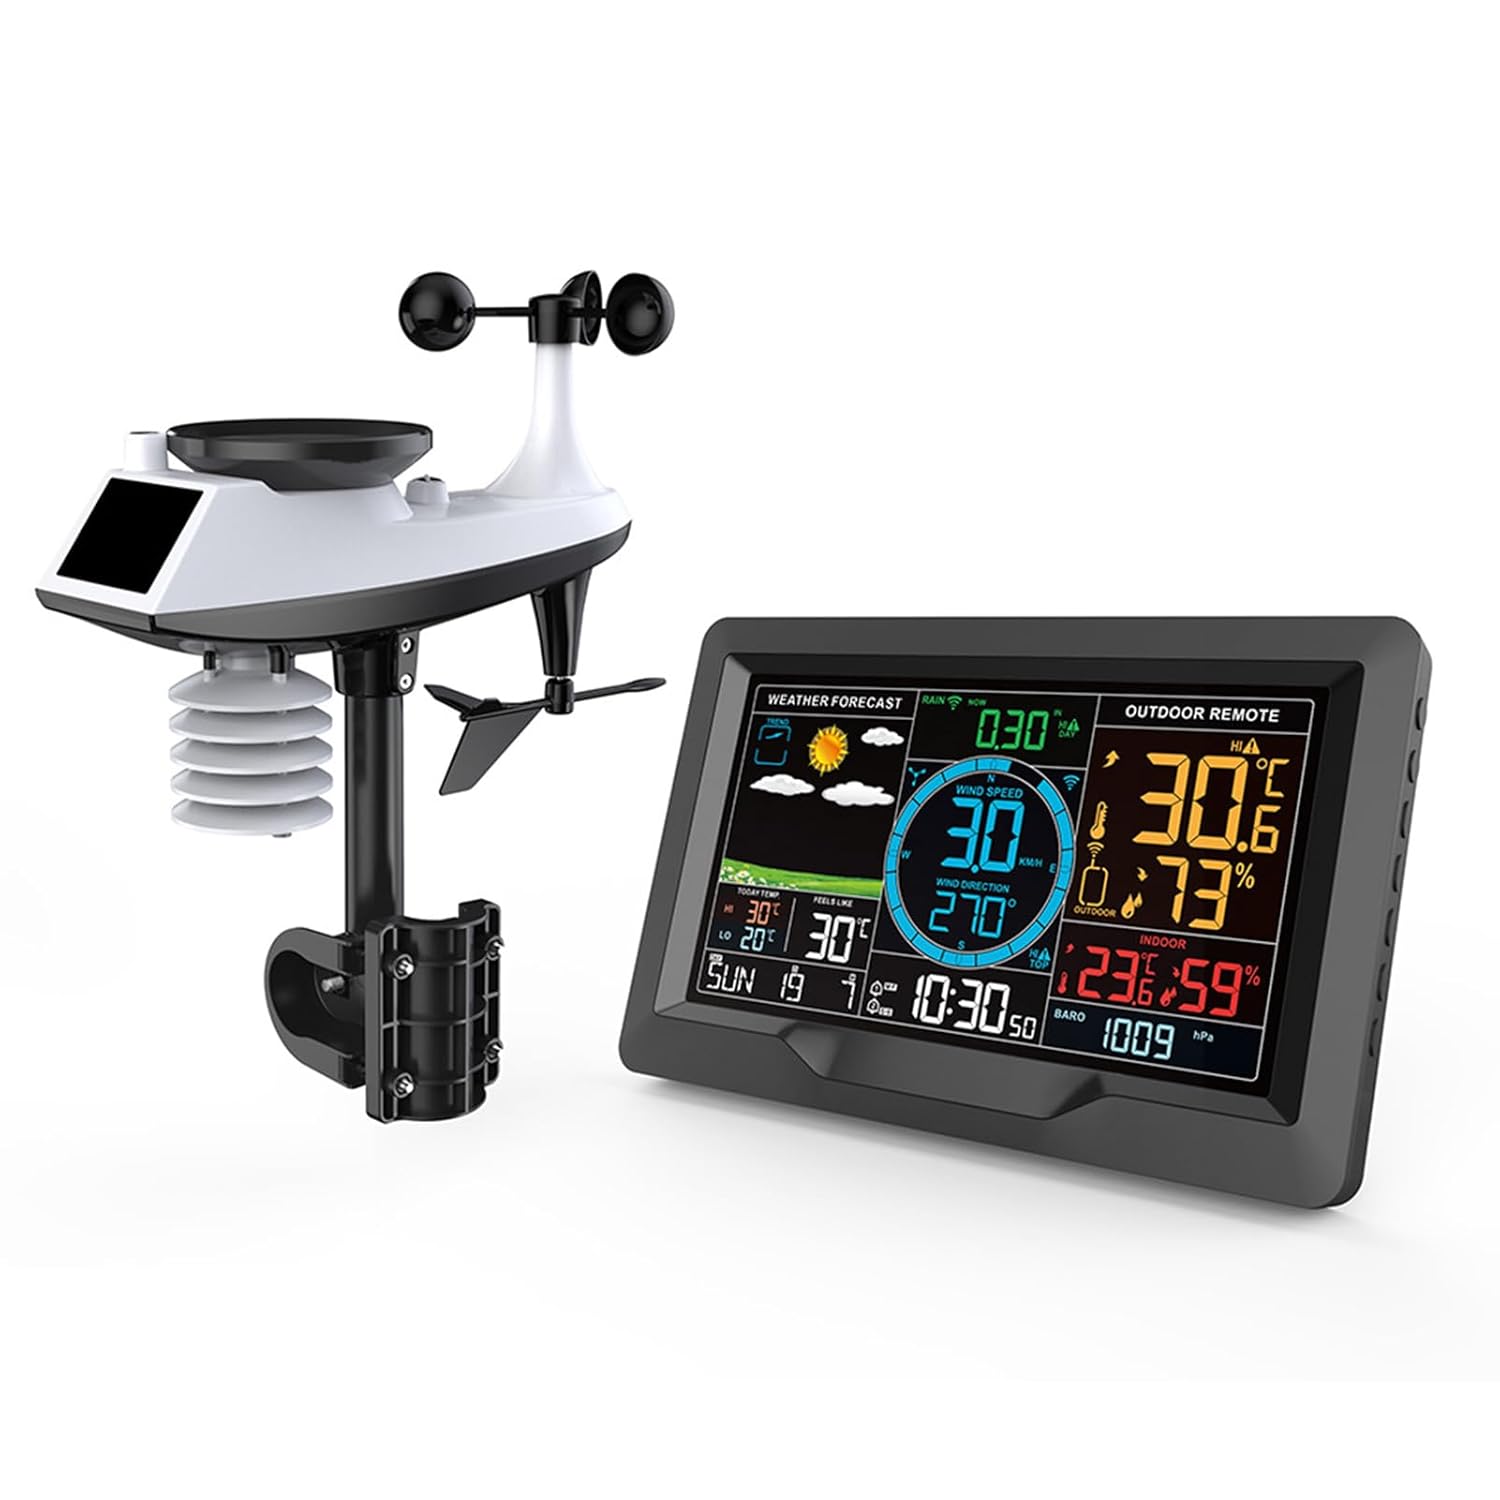
Figure 1.1: The main display unit and the outdoor multi-sensor unit of the Cornesty Professional Weather Station.
2. Setup and Installation
Follow these steps to set up your weather station for optimal performance.
2.1. Unpacking and Initial Placement
Carefully unpack all components. Before permanent installation, place the main display unit and the outdoor sensor unit close to each other to ensure successful initial connection.
2.2. Powering the Units
- Outdoor Sensor Unit: Insert 3 x AA batteries (not included) into the battery compartment of the outdoor sensor. Ensure correct polarity.
- Main Display Unit: Insert 2 x AA batteries (not included) into the battery compartment on the back of the display unit. For continuous power and backlight, connect the included power adapter to the display unit and a power outlet.
Note: The device will automatically search for the WWVB signal at 1:00 AM, 2:00 AM, and 3:00 AM, and after a reset. The screen may turn dark for approximately 7 minutes during this process.

Figure 2.1: Rear view of the display unit and components of the outdoor sensor, indicating battery compartments and power input.
2.3. Sensor Pairing
Once both units are powered, they should automatically attempt to pair. Confirm that the display unit shows readings from the outdoor sensor before proceeding to outdoor placement.
2.4. Outdoor Sensor Placement
For accurate readings, the outdoor sensor should be placed in an open area, away from obstructions that could block wind or rain, and out of direct sunlight if possible to avoid skewed temperature readings. The unit is IPX4 waterproof, suitable for outdoor use.
The outdoor sensor can be mounted to a pole or fixed to the ground using the provided mounting hardware. Ensure it is securely fastened to prevent movement in strong winds.

Figure 2.2: Examples of outdoor sensor installation, showing mounting options on a pole and ground.

Figure 2.3: Wireless signal transmission range of up to 330ft/100m, highlighting the IPX4 waterproof rating of the outdoor unit.
3. Operating Instructions
The main display unit provides a comprehensive overview of current and forecasted weather conditions. Its touch screen and backlit display allow for easy interaction and readability.
3.1. Display Layout and Information
The 7.5-inch display is organized into distinct areas for various data points:
- Weather Forecast: Icons indicating predicted weather for the next 12 hours.
- Wind Speed & Direction: Real-time wind speed (in km/h or mph) and direction.
- Rainfall: Cumulative rainfall data (e.g., past 30 minutes, hourly, daily, weekly, monthly, yearly).
- Outdoor Remote: Current outdoor temperature and humidity.
- Indoor: Current indoor temperature and humidity.
- Atmospheric Pressure: Barometric pressure readings.
- Time & Date: Current time, day of the week, and date.
- Temperature Trends: Highest and lowest temperatures of the day.

Figure 3.1: Annotated display showing various data points and their locations.

Figure 3.2: Visual representation of weather forecast icons.
3.2. Setting Alarms
The weather station supports dual alarms for time and customizable alarms for weather parameters.
- Time Alarms: Set two independent time alarms (e.g., AM 7:30, AM 8:30).
- Weather Alarms: Configure alerts for specific temperature, humidity, wind speed, or rainfall thresholds.
Refer to the detailed instruction manual (included in the box) for specific steps on setting and adjusting these alarms using the function buttons on the side of the display unit.
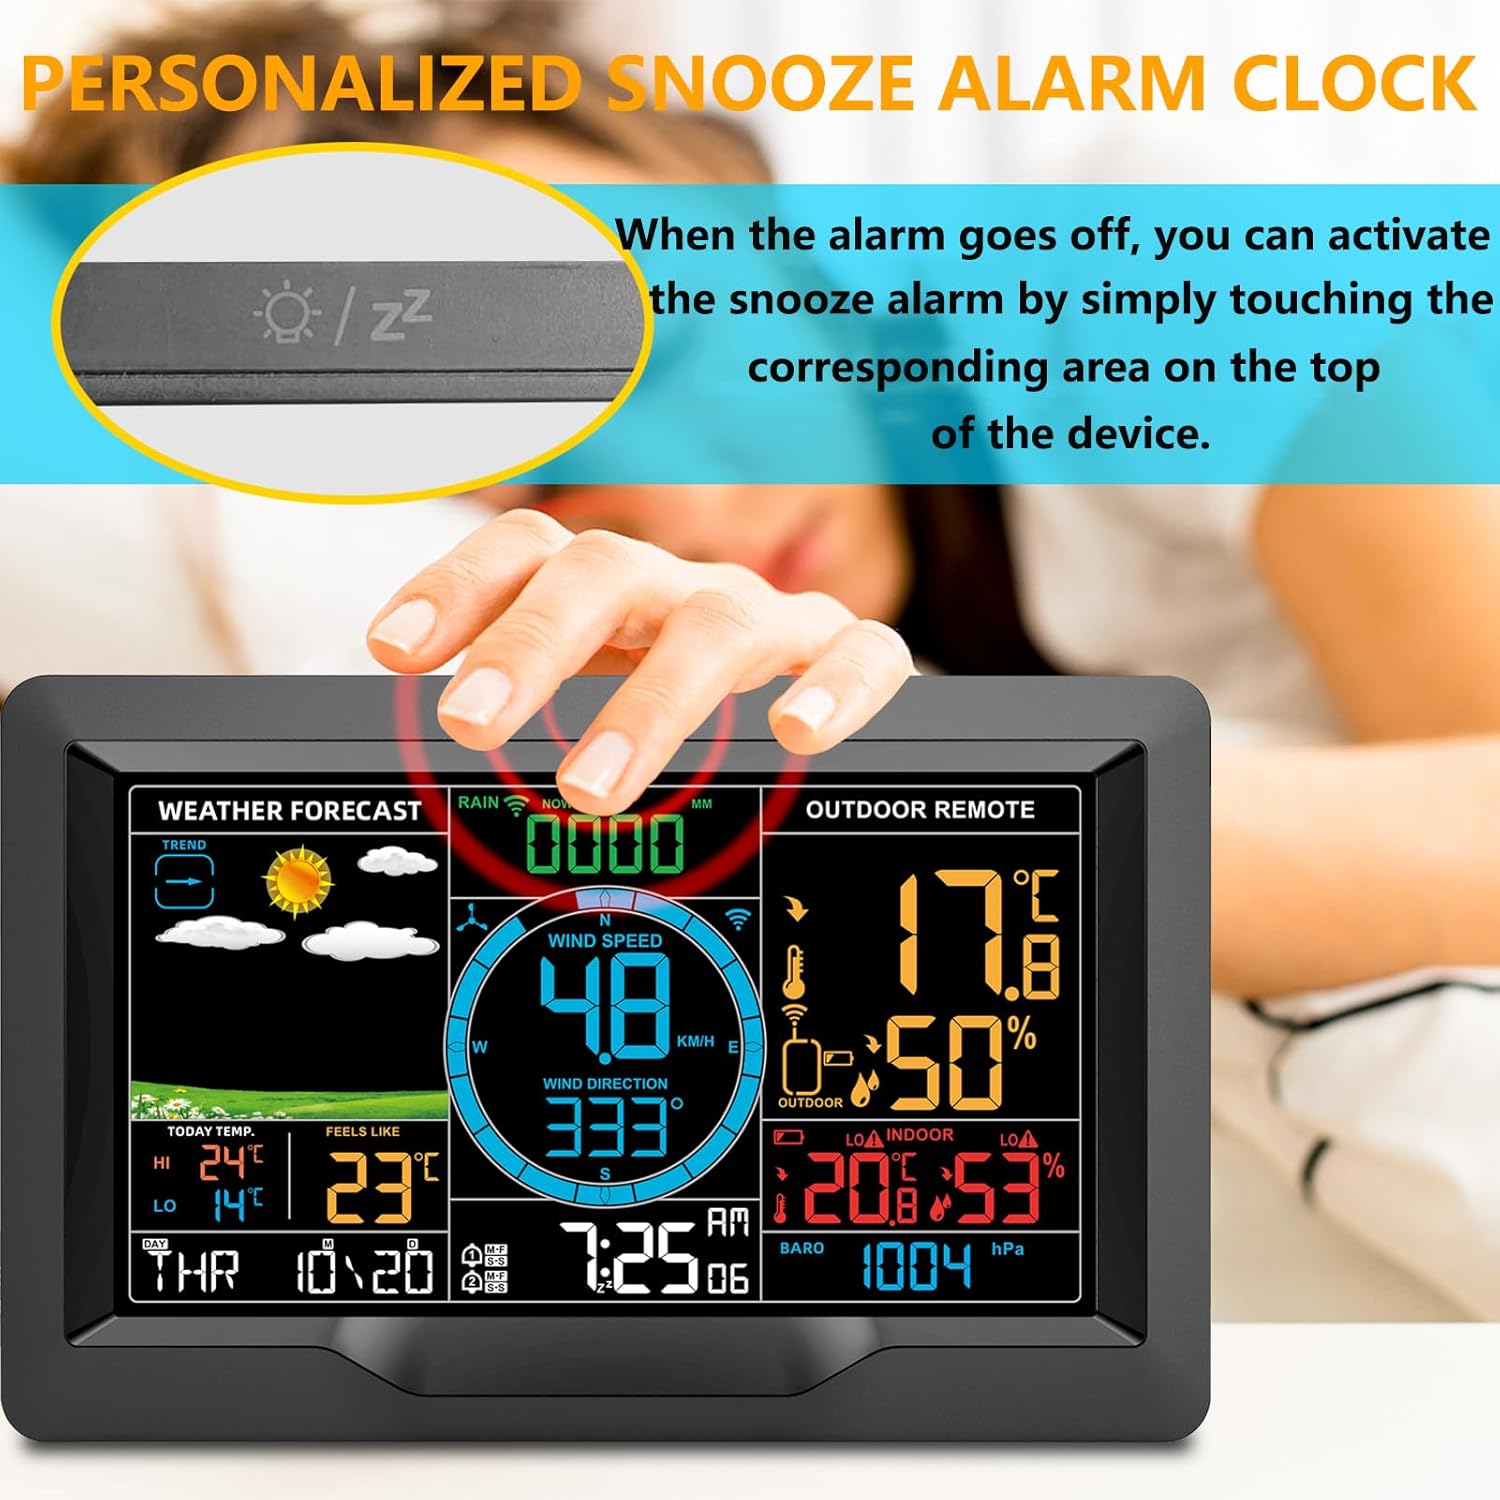
Figure 3.3: Example of dual alarm settings on the display.
3.3. Snooze Function
When a time alarm sounds, you can activate the snooze function by gently touching the corresponding area on the top of the display unit. This will temporarily silence the alarm for a set period.

Figure 3.4: Activating the snooze alarm by touching the top of the display unit.
4. Maintenance
Regular maintenance ensures the longevity and accuracy of your weather station.
- Cleaning: Wipe both the display unit and the outdoor sensor with a soft, damp cloth. Avoid abrasive cleaners or solvents that could damage the surfaces.
- Battery Replacement: Replace batteries in both units when the low battery indicator appears on the display. Use high-quality batteries for best performance.
- Outdoor Sensor Check: Periodically inspect the outdoor sensor for any debris (leaves, dirt, spiderwebs) that might obstruct the wind cups, wind vane, or rain collector. Clear any blockages to ensure accurate readings.
- Placement Review: Ensure the outdoor sensor remains in an optimal location, free from new obstructions or changes in its environment that could affect data accuracy.
5. Troubleshooting
If you encounter issues with your weather station, refer to the following common solutions:
- No Display/Screen Dark: If the screen does not stay on after searching for the WWVB signal, press the brightness adjustment button on the side of the host unit. Ensure the power adapter is securely connected or batteries are fresh.
- No Outdoor Sensor Readings:
- Ensure both the main display unit and the outdoor sensor have fresh batteries and are powered on.
- Verify that the units are within the effective transmission range (330ft/100m) and there are no major obstructions (thick walls, large metal objects) between them.
- Try bringing the outdoor sensor closer to the main unit to re-establish connection. You may need to reset both units (remove batteries, wait a few minutes, then reinsert).
- Inaccurate Readings (Temperature/Humidity/Wind/Rain):
- Check the outdoor sensor's placement. Ensure it's not in direct sunlight (for temperature), clear of obstructions (for wind), and the rain collector is free of debris.
- Ensure the outdoor sensor is level for accurate rainfall measurements.
- Verify that the sensor is securely mounted and not swaying excessively in wind.
- WWVB Signal Not Received: The device attempts to synchronize time automatically. If it fails, ensure the unit is placed in an area with good radio signal reception, away from electronic interference. Manual time setting is also available.
6. Specifications
| Feature | Detail |
|---|---|
| Product Dimensions | 14.96"D x 10.86"W x 5.35"H (Display and Sensor combined) |
| Item Model Number | 3390A tempest weather station |
| Brand | Cornesty |
| Power Source (Display) | Battery Powered (2 x AA, not included) / USB (5V=1A) |
| Power Source (Sensor) | Battery Powered (3 x AA, not included) |
| Connectivity Technology | Wireless (433.92MHz RF) |
| Transmission Range | Up to 330ft / 100m (open air) |
| Temperature Accuracy | 0.5 °C |
| Outdoor Temperature Range | -40°C (-40°F) to 70°C (158°F) |
| Indoor Temperature Range | -9°C (15°F) to 50°C (122°F) |
| Humidity Range | 20%RH to 95%RH |
| Special Features | Adjustable, Barometer, Humidity Monitor, Wind Speed/Direction, Rain Gauge, Forecast, Alarms |
| Included Components | Instruction Manual |
7. Warranty Information
For detailed warranty information regarding your Cornesty Professional Weather Station, please refer to the warranty card included with your purchase or visit the official Cornesty website. Warranty terms typically cover manufacturing defects for a specified period from the date of purchase.
8. Customer Support
Should you require further assistance, have questions about your product, or need to report an issue, please contact Cornesty customer support. You can find contact details on the official Cornesty website or within the product packaging.
Please have your model number (3390A Tempest Weather Station) and purchase information ready when contacting support to facilitate a quicker resolution.