1. Introduction
This manual provides essential information for the safe operation, maintenance, and troubleshooting of your POXURIO DK4000iAED Dual Fuel Inverter Generator. Please read this manual thoroughly before operating the generator to ensure proper use and to prevent injury or damage.

Figure 1.1: The POXURIO DK4000iAED Dual Fuel Inverter Generator, showcasing its compact design and control panel.
2. Safety Information
Operating a generator can be hazardous. Always follow these safety precautions to reduce the risk of fire, electric shock, and injury.
- Carbon Monoxide Hazard: Generators produce carbon monoxide (CO), an odorless, colorless, and poisonous gas. Operate the generator outdoors in a well-ventilated area, far away from windows, doors, and vents. Never operate indoors, in a garage, or in partially enclosed spaces.
- Fire Hazard: Gasoline and propane are highly flammable. Refuel in a well-ventilated area with the engine off and cool. Do not smoke or allow open flames near the generator. Store fuel in approved containers.
- Electrical Shock Hazard: Do not operate the generator in wet conditions. Ensure all electrical connections are secure and properly grounded. Never connect the generator directly to your home's electrical system without a transfer switch installed by a qualified electrician.
- Hot Surfaces: The generator's engine and muffler become very hot during operation and remain hot for some time after shutdown. Avoid contact with hot surfaces to prevent burns.
- Moving Parts: Keep hands, feet, and clothing away from moving parts.
- Children and Pets: Keep children and pets away from the generator at all times.
3. Product Features and Components
Familiarize yourself with the key components of your POXURIO DK4000iAED generator.

Figure 3.1: Labeled diagram of the generator's main components.
- Fuel Cap
- Recoil Handle
- Pull Rod (Extendable Handle)
- CO Alarm (Carbon Monoxide Detection)
- Digital Display (Shows output, fuel level, frequency, hours)
- Low Idle Switch (Economy Mode)
- One Push Start Button
- AC Breaker
- USB Outlet
- Reset Button
- Parallel Connector
- 30A Outlet
- Engine Cooling Vents
- 20A Outlet
- Ground Terminal
- Engine Service Panel
- Pulley
- Muffler and Spark Arrestor

Figure 3.2: The integrated pull rod design allows for convenient transport of the generator.
4. Setup and First Use
Before starting your generator for the first time, follow these steps carefully.
4.1 Unpacking
- Remove the generator and all accessories from the packaging.
- Inspect for any shipping damage. Contact customer support if damage is found.
- Ensure all components listed in the packing list are present.
4.2 Adding Engine Oil
The generator is shipped without engine oil. Operating without oil will cause severe engine damage.
- Place the generator on a level surface.
- Locate the oil fill cap/dipstick (typically near the engine service panel).
- Remove the cap and add approximately 0.45 liters (0.48 quarts) of SAE 10W/30 engine oil. Do not overfill.
- Reinsert the dipstick and ensure the oil level is between the minimum and maximum marks.
4.3 Connecting the Battery
For electric and remote start functions, the internal battery must be connected.
- Locate the battery compartment, often near the oil dipstick.
- Connect the positive (+) and negative (-) battery terminals. Ensure connections are secure. Some units may have shipping disconnects that need to be joined.
4.4 Fueling the Generator
This is a dual fuel generator, capable of running on gasoline or propane (LPG).
4.4.1 Gasoline Fueling
- Ensure the generator is off and cool.
- Open the fuel cap and slowly add fresh, unleaded gasoline (minimum 87 octane) to the fuel tank. Do not fill above the red indicator.
- Securely close the fuel cap.
4.4.2 Propane (LPG) Fueling
- Ensure the generator is off and cool.
- Connect the propane hose from a standard propane tank to the generator's LPG inlet.
- Ensure all connections are tight to prevent leaks.
5. Operating Instructions
Your generator offers multiple starting methods and operational modes.
5.1 Starting the Generator

Figure 5.1: The generator supports remote, electric, and recoil starting methods.
5.1.1 Remote Start
- Ensure the generator is in a safe, outdoor location.
- Select the desired fuel type (Gasoline or LPG) using the fuel selector switch.
- Press the start button on the remote key fob. The generator will attempt to start.
- To stop, press the stop button on the remote.
5.1.2 Electric Start (Push Button)
- Ensure the generator is in a safe, outdoor location.
- Select the desired fuel type (Gasoline or LPG) using the fuel selector switch.
- Press and hold the "One Push Start" button on the control panel until the engine starts.
- To stop, press the "Stop" button on the control panel.
5.1.3 Recoil Start (Manual Pull)
- Ensure the generator is in a safe, outdoor location.
- Select the desired fuel type (Gasoline or LPG) using the fuel selector switch.
- Pull the recoil handle firmly and smoothly until the engine starts.
- To stop, press the "Stop" button on the control panel.
5.2 Dual Fuel Operation
The generator can seamlessly switch between gasoline and propane. Ensure the fuel selector switch is set to the correct fuel source before starting. When switching from gasoline to propane, allow the carburetor to run dry of gasoline before connecting propane for optimal performance.

Figure 5.2: The dual fuel capability provides flexibility for various applications, such as camping.
5.3 Parallel Operation
For increased power output, two POXURIO DK4000iAED generators can be connected in parallel using a compatible parallel kit (sold separately).
- Ensure both generators are off and cool.
- Connect the parallel kit cables to the parallel connectors on both generators.
- Start both generators. Once stable, you can connect your loads to the parallel kit's outlets.
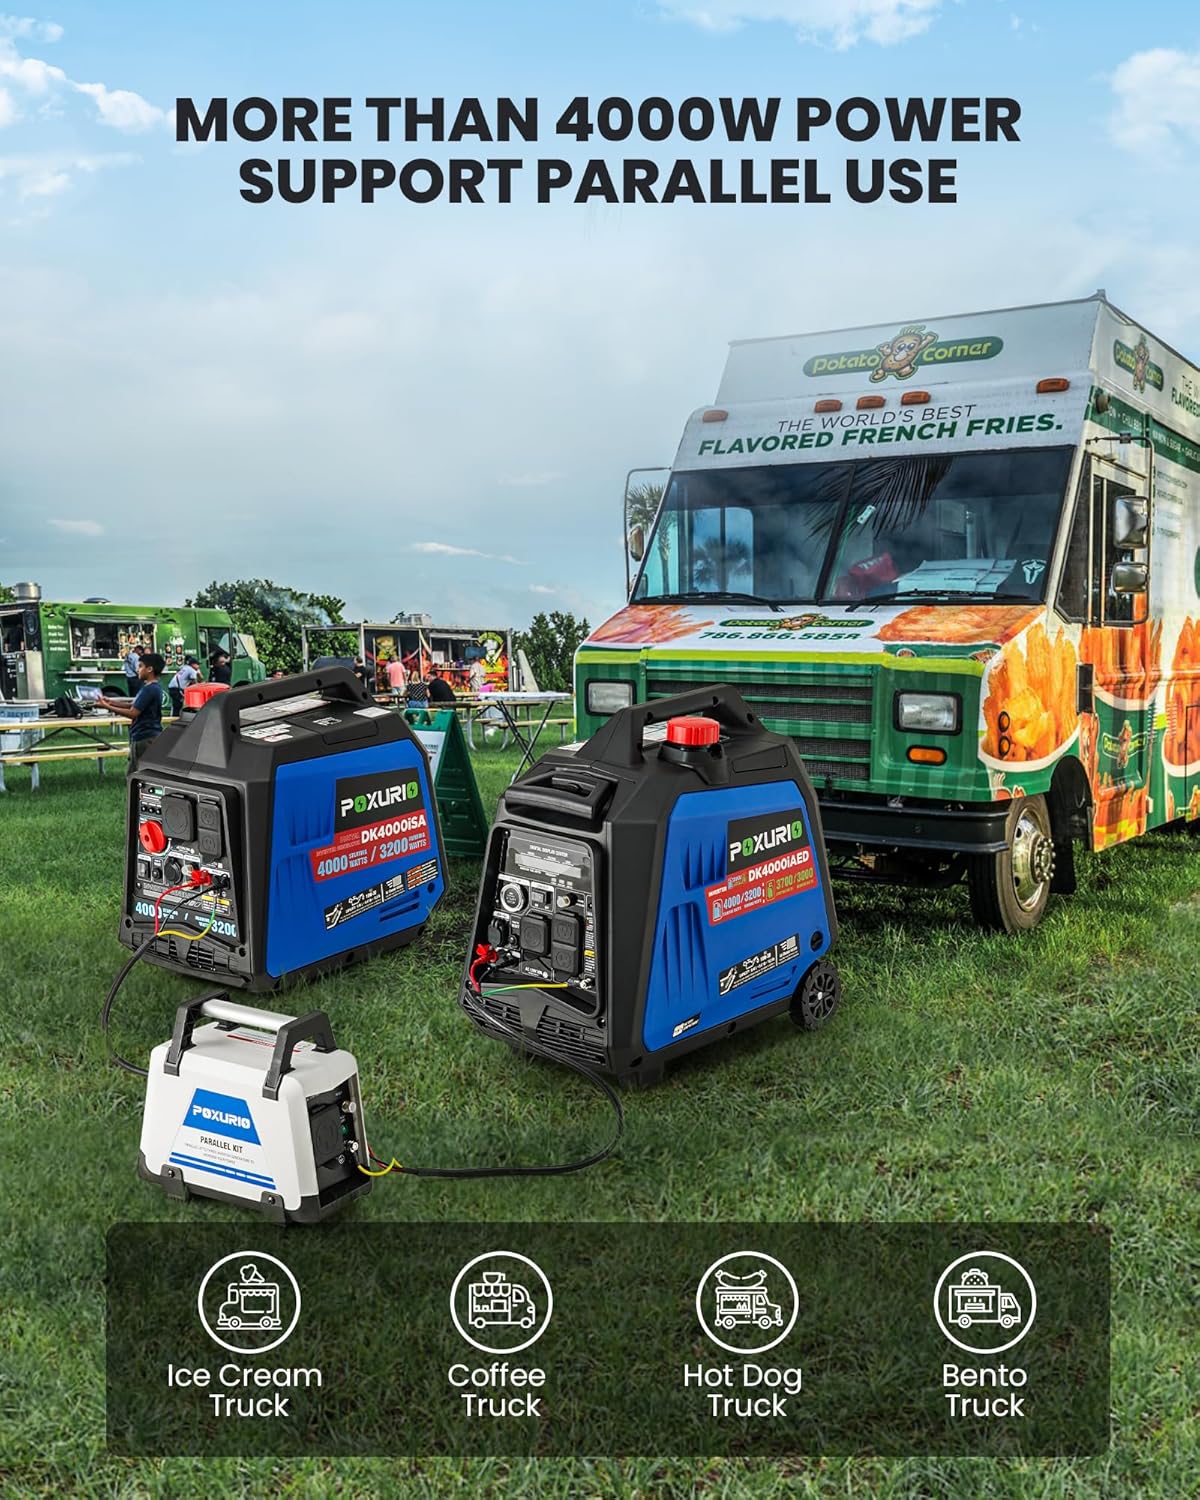
Figure 5.3: Parallel connection allows for increased power, suitable for demanding applications like food trucks.
5.4 Low Idle Switch (Economy Mode)
Engaging the Low Idle switch allows the generator to automatically adjust engine speed to match the load, improving fuel efficiency and reducing noise when less power is required.
5.5 CO Detect System
The integrated CO Detect system monitors carbon monoxide levels. If unsafe levels are detected, the generator will automatically shut down to protect users. Always ensure proper ventilation even with this safety feature.
6. Maintenance
Regular maintenance ensures the longevity and reliable operation of your generator. Always perform maintenance with the engine off and cool.
6.1 Engine Oil Change
Change the engine oil after the first 20 hours of operation, and then every 100 hours or annually, whichever comes first.
- Place a drain pan beneath the oil drain plug.
- Remove the oil drain plug and oil fill cap/dipstick to allow oil to drain completely.
- Reinstall the drain plug and refill with fresh SAE 10W/30 engine oil (approx. 0.45L).
- Check the oil level with the dipstick.
6.2 Air Filter Inspection and Cleaning
Inspect the air filter every 50 hours or monthly. Clean or replace as needed.
- Remove the air filter cover.
- Remove the foam filter element.
- Wash the filter in warm, soapy water, rinse, and allow to air dry completely. Lightly oil the filter with engine oil before reinstallation.
6.3 Spark Plug Inspection
Inspect the spark plug annually or every 100 hours. Replace if electrodes are worn or fouled.
- Remove the spark plug cap and use a spark plug wrench to remove the plug.
- Check the gap and condition. Replace with an A5RTC spark plug if necessary.
6.4 Storage
For extended storage (over 30 days), prepare the generator to prevent fuel degradation and engine damage.
- Add fuel stabilizer to the gasoline tank and run the engine for a few minutes to circulate.
- Drain the carburetor bowl (if applicable) or run the engine until it runs out of fuel.
- For propane, disconnect the propane tank.
- Change the engine oil.
- Store in a clean, dry, well-ventilated area.
7. Troubleshooting
This section addresses common issues you might encounter with your generator.
| Problem | Possible Cause | Solution |
|---|---|---|
| Generator will not start. | No fuel or low fuel. Engine oil level too low. Battery disconnected or low charge (for electric/remote start). Spark plug fouled or damaged. Fuel selector switch in wrong position. CO Detect system triggered. | Add fresh fuel. Add engine oil to proper level. Connect battery terminals; charge or replace battery if needed. Inspect and clean/replace spark plug. Ensure switch is set to Gasoline or LPG. Move generator to a well-ventilated area; allow to cool. |
| Engine runs, but no power output. | AC breaker tripped. Overload. | Reset the AC breaker. Reduce the connected load. |
| Generator shuts down unexpectedly. | Low oil shutdown. Overload shutdown. CO Detect system triggered. Lack of fuel. | Check and add oil. Reduce load. Move to well-ventilated area. Refuel. |
| Remote start not working. | Remote battery dead. Generator battery low/disconnected. Out of range. | Replace remote battery. Check generator battery connection and charge. Move closer to the generator. |
8. Specifications
Detailed technical specifications for the POXURIO DK4000iAED generator.

Figure 8.1: Key product parameters and specifications.
| Parameter | Value |
|---|---|
| Model | DK4000iAED |
| Engine Model | 164F/P |
| Engine Type | 4-Stroke |
| Displacement | 145 cc |
| Rated Power (Gasoline) | 3.2 kW |
| Max. Power (Gasoline) | 4.0 kW (4000 Watts) |
| Rated Power (LPG) | 3.0 kW |
| Max. Power (LPG) | 3.7 kW (3700 Watts) |
| Starting Wattage | 4000 Watts (Gas), 3700 Watts (LPG) |
| Running Wattage | 3200 Watts (Gas), 3000 Watts (LPG) |
| Fuel Type | Gasoline, Liquefied Petroleum Gas |
| Fuel Tank Volume | 6.0 L |
| Lubricating Oil Model | SAE 10W/30 |
| Lubricating Oil Capacity | 0.45 L |
| Rated Voltage | 120 V |
| Rated Frequency | 60 Hz |
| Starting Method | Recoil start / Electrical start / Remote start |
| Noise (at 7m, 25% load) | 62 db |
| Run Time @ 25% load | 9 H |
| Overall Dimension | 20.7 x 12.2 x 19.7 inches |
| Net Weight | 56.2 lb |
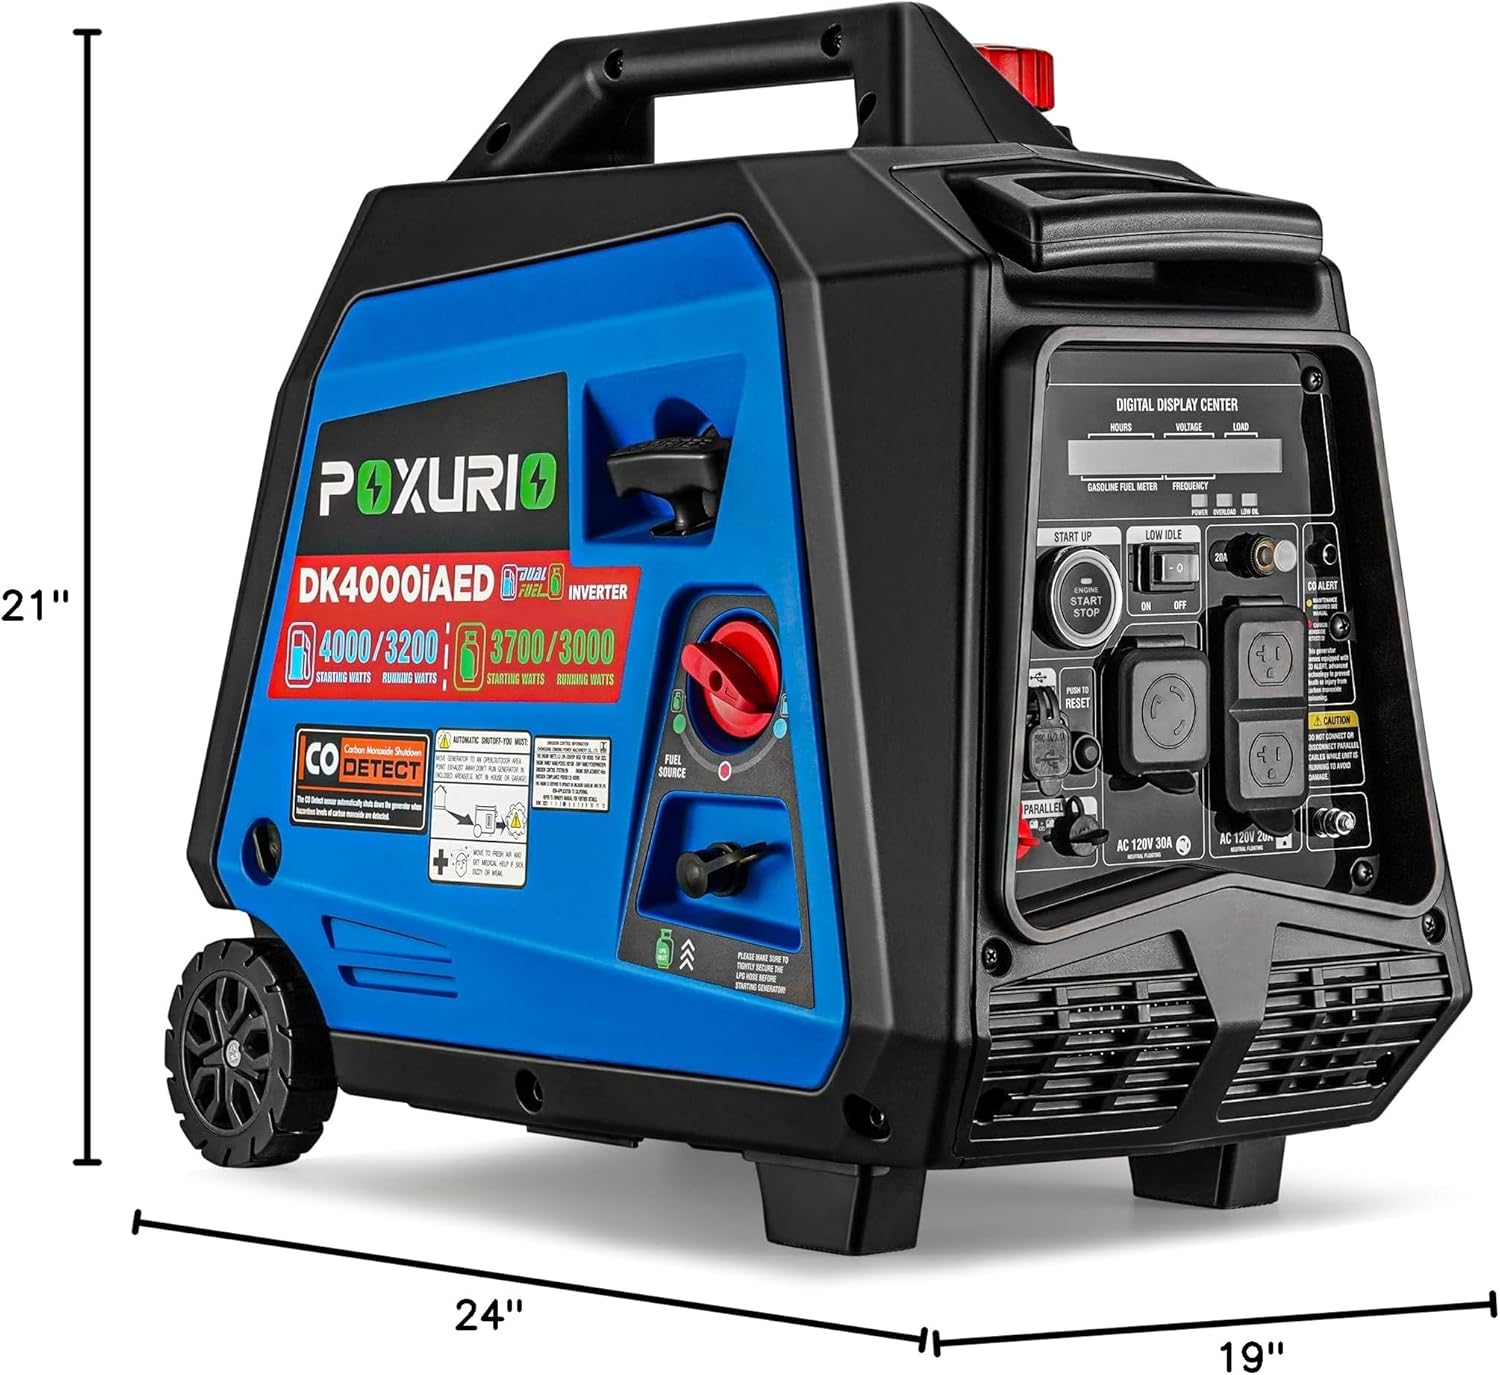
Figure 8.2: Physical dimensions of the generator.
9. Warranty and Support
POXURIO stands behind the quality of its products. For warranty information, technical support, or replacement parts, please contact POXURIO customer service. Keep your purchase receipt as proof of purchase for warranty claims.
While specific warranty terms may vary, general support can be obtained through the brand's official channels. Refer to the product packaging or the POXURIO website for the most current contact information.
