
Makita GA5091X01
Makita GA5091X01 Mini Grinder 125mm 1.900W User Manual
Model: GA5091X01 | Brand: Makita
1. Introduction
Thank you for choosing the Makita GA5091X01 Mini Grinder. This manual provides essential information for the safe and effective operation, maintenance, and troubleshooting of your new tool. Please read this manual thoroughly before using the grinder and keep it for future reference. Proper understanding and adherence to these instructions will ensure optimal performance and extend the life of your tool.
2. Safety Information
Always observe basic safety precautions to reduce the risk of fire, electric shock, and personal injury. This grinder operates on 240 Volts and has a powerful 1900 Watt motor. Always wear appropriate personal protective equipment (PPE) including safety glasses, hearing protection, and gloves.
General Power Tool Safety Warnings:
- Work Area Safety: Keep your work area clean and well lit. Cluttered or dark areas invite accidents. Do not operate power tools in explosive atmospheres, such as in the presence of flammable liquids, gases or dust.
- Electrical Safety: Power tool plugs must match the outlet. Never modify the plug in any way. Do not expose power tools to rain or wet conditions.
- Personal Safety: Stay alert, watch what you are doing and use common sense when operating a power tool. Do not use a power tool while you are tired or under the influence of drugs, alcohol or medication.
- Tool Use and Care: Do not force the power tool. Use the correct power tool for your application. Disconnect the plug from the power source before making any adjustments, changing accessories, or storing power tools.
Grinder Specific Safety Warnings:
- Always use the auxiliary handle provided with the tool. Loss of control can result in personal injury.
- Never use damaged abrasive discs. Inspect discs for cracks or damage before each use.
- Ensure the disc guard is properly installed and adjusted for maximum safety.
- Keep hands clear of the rotating disc.
- Be aware of sparks and flying debris during operation. Ensure no flammable materials are nearby.
3. Product Overview
Familiarize yourself with the components of your Makita GA5091X01 Mini Grinder.

Figure 3.1: Overall view of the Makita GA5091X01 Mini Grinder, showing the main body, side handle, and disc guard with an installed abrasive disc.

Figure 3.2: Front view of the grinder, highlighting the gear housing and spindle.

Figure 3.3: Side profile of the grinder, showing the main body and power cord connection.

Figure 3.4: Detail of the slide-type power switch, located on the side of the tool body for easy access.

Figure 3.5: Close-up of the spindle lock button, used to secure the spindle when changing abrasive discs.

Figure 3.6: View of the disc guard and installed abrasive disc, showing the protective cover over the grinding area.
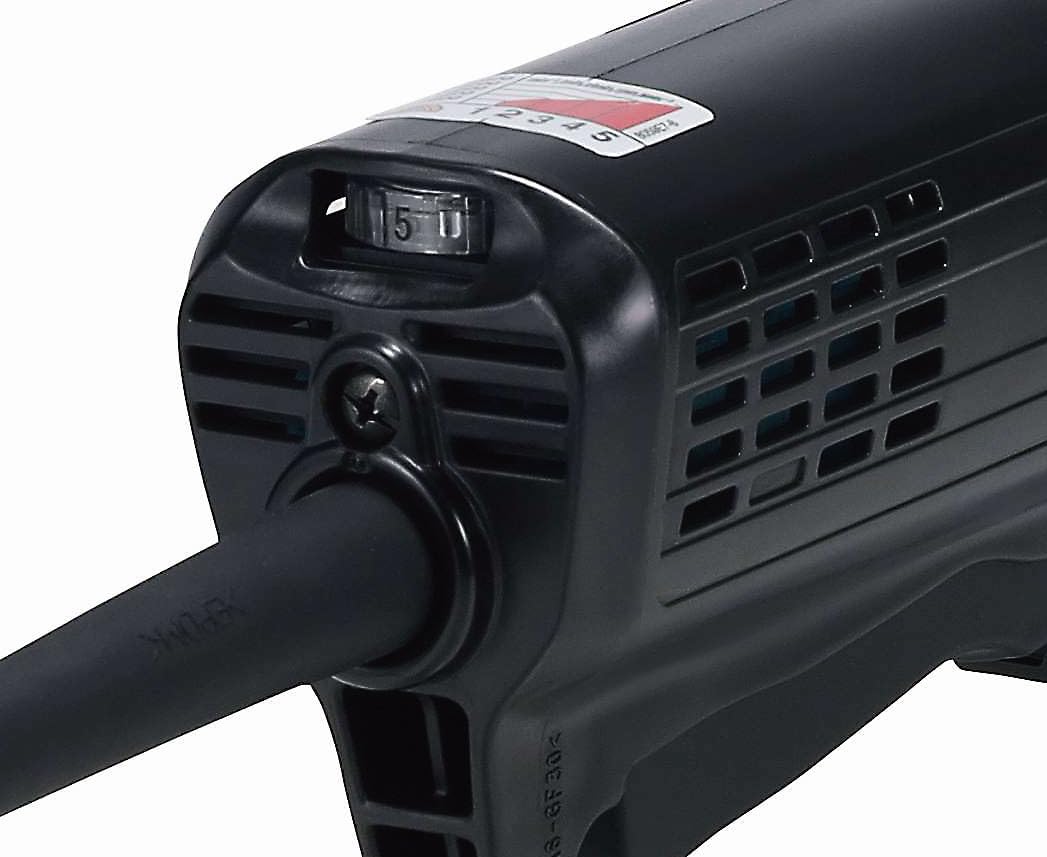
Figure 3.7: Close-up of the variable speed control dial, allowing adjustment of the grinder's RPM.
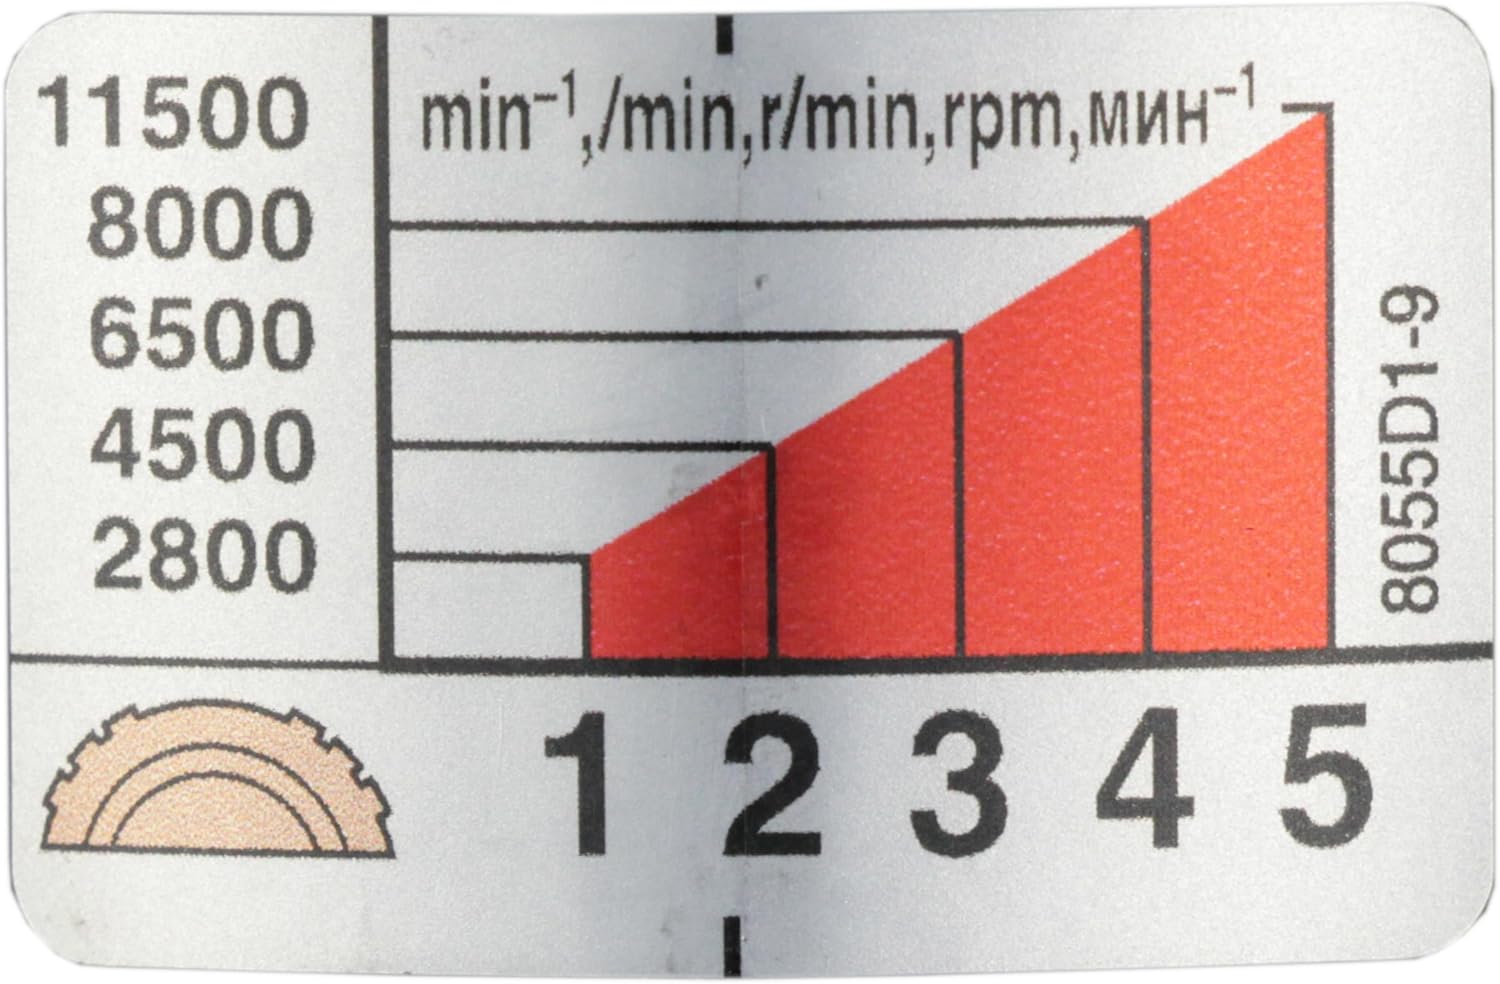
Figure 3.8: Chart indicating the approximate RPMs corresponding to each setting on the speed dial (1-5).
4. Setup
4.1 Attaching the Side Handle
The anti-vibration side handle can be screwed into either side of the gear housing, depending on your preference and the application. Ensure it is tightened securely before operation.
4.2 Installing the Disc Guard and Abrasive Disc
- Ensure the grinder is unplugged from the power source.
- Attach the disc protector (guard) to the grinder body. It should click into place or be secured with a screw, allowing for rotation to the desired position.
- Press the spindle lock button (refer to Figure 3.5) to prevent the spindle from rotating.
- Place the inner flange onto the spindle.
- Position the 125mm abrasive disc (e.g., stainless steel deburring disc 125x7.2x22.3 mm) onto the inner flange, ensuring it sits flush.
- Screw the outer flange (lock nut) onto the spindle and tighten it firmly using the provided wrench. Release the spindle lock.
4.3 Power Connection
Connect the grinder's power cord to a suitable 240 Volt power outlet. Ensure the power switch is in the "OFF" position before plugging in the tool.
5. Operating Instructions
5.1 Turning On/Off
- To turn on, slide the power switch (Figure 3.4) forward until it locks into the "ON" position.
- To turn off, slide the power switch backward.
5.2 Adjusting Speed
The GA5091X01 features a variable speed control dial (Figure 3.7). Rotate the dial to select the desired speed setting from 1 to 5. Refer to the speed chart (Figure 3.8) for approximate RPMs. Lower speeds are suitable for delicate work or polishing, while higher speeds are for aggressive grinding and cutting.
5.3 Grinding Techniques
- Always hold the grinder firmly with both hands, using the main handle and the auxiliary side handle.
- Allow the disc to reach full operating speed before contacting the workpiece.
- Apply light, even pressure. Do not force the grinder, as this can lead to overheating, disc damage, or loss of control.
- Maintain a consistent angle between the disc and the workpiece for optimal material removal and disc life.
- Be mindful of the direction of sparks and debris. Ensure they are directed away from yourself and others.

Figure 5.1: Demonstrating the grinder in use, showing sparks being generated during a cutting or grinding operation. Always wear appropriate PPE.

Figure 5.2: An operator using the Makita GA5091X01 to grind a metal pipe, illustrating a typical application for the tool.
6. Maintenance
Regular maintenance ensures the longevity and safe operation of your grinder.
6.1 Cleaning
- Always unplug the tool before cleaning.
- Regularly clean the ventilation openings to prevent overheating. Use a soft brush or compressed air.
- Wipe down the exterior with a damp cloth. Do not use harsh chemicals or solvents.
6.2 Disc Replacement
Replace worn or damaged abrasive discs promptly. Follow the same procedure as installation (Section 4.2), ensuring the correct type and size of disc (125mm) is used.
6.3 Carbon Brush Inspection
The motor uses carbon brushes which are consumable parts. Inspect them periodically for wear. When they are worn down to the limit mark, have them replaced by a Makita authorized service center to maintain motor performance and prevent damage.
6.4 Storage
Store the grinder in a clean, dry place, out of reach of children and away from direct sunlight or extreme temperatures.
7. Troubleshooting
| Problem | Possible Cause | Solution |
|---|---|---|
| Grinder does not start | No power supply; Faulty switch; Worn carbon brushes | Check power connection; Ensure switch is fully engaged; Have carbon brushes inspected/replaced by service center. |
| Excessive vibration | Damaged or improperly installed disc; Loose flanges; Bent spindle | Replace disc; Re-tighten flanges; Contact service center for inspection. |
| Overheating | Blocked ventilation; Overloading the tool; Worn motor components | Clean ventilation openings; Reduce pressure during operation; Allow tool to cool; Contact service center. |
| Reduced power/performance | Worn carbon brushes; Damaged motor | Have carbon brushes inspected/replaced; Contact service center. |
8. Specifications
| Feature | Detail |
|---|---|
| Brand | Makita |
| Model Number | GA5091X01 |
| Power Source | Electric (Corded) |
| Voltage | 240 Volts |
| Wattage | 1900 Watts |
| Disc Diameter | 125mm |
| Material | Metal (housing) |
| Item Weight | 4 Kilograms (approx. 8.8 pounds) |
| Product Dimensions | 13.74 x 5.51 x 5.08 inches |
| Included Components | Stainless steel deburring disc 125x7.2x22.3 mm, disc protector 125 mm, anti-vibration grip. |
9. Warranty and Support
For warranty information, please refer to the warranty card included with your product or visit the official Makita website. For technical support, service, or genuine Makita spare parts, please contact your local authorized Makita service center.
Makita Official Website: www.makitatools.com
Related documentsGA5091X01


Ask a question about this manual
Ask about setup, troubleshooting, compatibility, parts, safety, or missing instructions. Manuals+ will review the question and use this page’s manual context to help answer it.